The rain has cleared and so I finally got to finish adding a splitter.
And a shot of the rear diffuser and Mugen Inspired rear spoiler from Mr. D
Scott
PS- Many thanks to all those who helped this Clueless Old Man (you all may address me by this accurate description) figure out Photobucket.
3
Making The 1st Gen A Little More Aerodynamic
Started by cbstdscott, Feb 28 2010 07:51 PM
18 replies to this topic
#1
Posted 28 February 2010 - 07:51 PM
#2
Posted 28 February 2010 - 08:02 PM
#3
Posted 28 February 2010 - 08:11 PM
Have you posted a how-to on these projects already scott?
#4
Posted 28 February 2010 - 10:43 PM
QUOTE (Maine_Honda_Racer @ Feb 28 2010, 05:11 PM) <{POST_SNAPBACK}>
Have you posted a how-to on these projects already scott?
Ok, you've got me there. I am not very good about doing a step by step how-to like so many others on this site. In fact, I suck (yes, you can put that in your signatures).
When I get into a project, the last thing on my mind is go grab the camera and start snapping pictures of every step in the process. As you can see, I am not very swift when it comes to this Interweb thingy and so it is not natural for me to post in such detail.
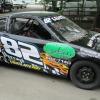
The diffuser is simple: cut a couple of large squares out of your rear bumper cover and then bend up some sheet aluminum to create a diffuser.
The air dam: Get another front bumper cover, bolt it up to the bottom of your existing bumper cover and cut it so that you get about 4" of extra air dam. Fill the "grill" with plastic sheeting.
Splitter: I bought a pre-made splitter off of eBay, but you can use a piece of 40x6" pice of sheet aluminum and bolt it to the bottom of your air dam.
Rear spoiler: Contact Mr D at Heel toe. Be sure to ask about his CF sunroof panels as well.
If anyone has any questions they are more than welcome to contact me through this website or via my email adress: [email protected].
Form Follows Function
#5
Posted 28 February 2010 - 11:14 PM
Looks great Scott! Most of all, very functional.
I'm curious as to how you bolted up the sheet metal to the bottom of your bumper. Mind sharing?
Also, two parts I spy that I want:
(1) 1.5i emblem
(2) B-pillar bar
Where does one get those? The emblem, is that from a hatch, or did Honda send them out in a foreign market on the CRX?
Thanks,
DT
I'm curious as to how you bolted up the sheet metal to the bottom of your bumper. Mind sharing?
Also, two parts I spy that I want:
(1) 1.5i emblem
(2) B-pillar bar
Where does one get those? The emblem, is that from a hatch, or did Honda send them out in a foreign market on the CRX?
Thanks,
DT
WagoCats HOOOOOOOO!!!!!
#6
Posted 28 February 2010 - 11:42 PM
I have the 1.5i emblem as well, got it from another member from overseas last year.
I love that rear diffuser scott, one day im going to attempt to make one as well. How far back does it go? and Im curious to know how you mounted the front splitter as well.
Check out my build!http://www.redpepper...showtopic=48435
custom extended fiberglass rear spoiler that wont develop rust bumps and weighs half as much as oem!http://www.redpepper...showtopic=55523
Tired of replacing/fixing your brittle plastic fenders? Wihttp://www.redpepper...showtopic=55674
custom extended fiberglass rear spoiler that wont develop rust bumps and weighs half as much as oem!http://www.redpepper...showtopic=55523
Tired of replacing/fixing your brittle plastic fenders? Wihttp://www.redpepper...showtopic=55674
#7
Posted 01 March 2010 - 01:04 AM
QUOTE (cbstdscott @ Feb 28 2010, 08:51 PM) <{POST_SNAPBACK}>
The rain has cleared and so I finally got to finish adding a splitter.
And a shot of the rear diffuser and Mugen Inspired rear spoiler from Mr. D
Scott
PS- Many thanks to all those who helped this Clueless Old Man (you all may address me by this accurate description) figure out Photobucket.
And a shot of the rear diffuser and Mugen Inspired rear spoiler from Mr. D
Scott
PS- Many thanks to all those who helped this Clueless Old Man (you all may address me by this accurate description) figure out Photobucket.
i was lookin at your hood pins Scott, and wondering what brand they are and where you got them from...they look to be the same as the ones Shahriah had on his one piece carbon fiber hood....
i am asking cause I am in need of a set of hood pins.
thanks in advance.
. . . .you can't piss on what you can't catch. . . .
#8
Posted 01 March 2010 - 01:19 AM
QUOTE (duckorbleed @ Feb 28 2010, 10:04 PM) <{POST_SNAPBACK}>
i am asking cause I am in need of a set of hood pins.
The slick way is to use these:
But they are more expensive, require a larger hole in the hood and are a bit more work to put in.
Look nice afterwords though, and are lockable.
They are called "Aerocatch".
#9
Posted 01 March 2010 - 01:37 AM
QUOTE (duckorbleed @ Feb 28 2010, 10:04 PM) <{POST_SNAPBACK}>
i was lookin at your hood pins Scott, and wondering what brand they are and where you got them from...they look to be the same as the ones Shahriah had on his one piece carbon fiber hood....
i am asking cause I am in need of a set of hood pins.
thanks in advance.
i am asking cause I am in need of a set of hood pins.
thanks in advance.
If I may interject... http://www.redpepper...e...st&p=344730
#10
Posted 01 March 2010 - 02:23 AM
QUOTE (cbstdscott @ Feb 28 2010, 10:43 PM) <{POST_SNAPBACK}>
I suck
Wow, Ok, done.
Now if I just could change your S/N to "clueless old guy"
Honda, because it's hard to look baller in your mom's Volvo.
The entire tool selection at Sears or the contents of a Snap-On truck will do you no good if you do not know how to use them.
#11
Posted 01 March 2010 - 03:16 AM
I installed some of the off brand knock offs of this hood pin set and they were horrible. Don't go cheap! And if you are cheap, get the traditional style.
The front lip looks great. hope you bought stainless hardware
Rollin 1G style.. reppin those old school Honda's
#12
Posted 01 March 2010 - 04:27 AM
nice^^.
how do you make the rearbumper extensions?
There is a old german saying: All good thinks are three --> C - R - X
#13
Posted 01 March 2010 - 10:58 AM
The B pillar brace comes from RPR member Marck (JEMotorsports). This is a huge help, it makes the car noticeably stiffer. In the picture below, you can see the fender braces that I added for stiffness as well.
The "1.5i" emblem came from one of our members in Australia.
The hood pins come from Pegaus Racing, a great friend to RPR. I HIGHLY recommend hood pins for anyone with a CF hood, it is a great safety measure. In this picture you can see the radiator plate that channels air from the "grill" to the radiator and prevents hood lift. It is the black thingy between the headlights.
The rear diffusers are very simple "channels" that are about 10" front to back. They bolt straight up into the plastic bottom of the rear bumper cover. This design is just "good enough" for the time being and I will be exploring an even more sophisticated design with a belly plate in the future. I am lucky to have access to a sheet metal brake (a machine for bending sheet metal) so bending up stuff is easy for me. Your local metal shop/machine shop may be able to do this stuff for you.
The front splitter bolts up through the plastic of the front bumper cover. The "grills" of the upside down bumper cover that is my air dam are damn rigid and make a good attachment point for the splitter.
I used very wide washers on the bolts that bolt through the bumper cover plastic. The plastic is very durable. The wide washers spread the load over a wide area and these are not load bearing structures. I did not use stainless hardware (I used aluminum) but that would be a good idea. My car lives its entire life in a warm, dry Southern California garage and never sees a puddle let alone rain, snow or slush.
Scott
Form Follows Function
#14
Posted 02 March 2010 - 02:43 PM
i know where scott got his rear bumper from.....
QUOTE (kjeffery @ Apr 17 2009, 06:17 PM) <{POST_SNAPBACK}>
Yet again Scott, you have all the answers
QUOTE (cbstdscott @ Apr 17 2009, 07:31 PM) <{POST_SNAPBACK}>
No. All the answers are in the Kakabox build thread.
QUOTE (Lymitliss @ May 26 2009, 08:06 PM) <{POST_SNAPBACK}>
Ohh yeah I guess that makes sense. King Kaymo has all the answers
#15
Posted 02 March 2010 - 04:21 PM
If I could have found something commercially to make the rear diffuser I would have used it. As it was, I got lucky on the splitter that appeared on eBay as a fluke.
That is part of the fun/challenge of these weird old cars, if I want something 9 times out of 10 I need to make it myself.
Form Follows Function