 Sign In
 Create Account
Wanna cheap option to relocate that battery?
As has been said before: source cables from a BMW with trunk mounted battery- 2ga. copper for cheap!
For the battery, peep the posts here: http://www.redpepper...showtopic=48446
I got my unit from Advanced for $85, with 325 CCA's!
Also, HeelToe has their new NRG Nano for $100 shipped. Life is good for bay tuckin' peppers!

The Official Rpr Tuck Thread
Started by OG Wagon, Feb 17 2010 11:26 PM
66 replies to this topic
#61
 Posted 11 July 2010 - 07:50 AM
-
- Leadfoot
-

- Group: 2009 Contributing Member
- Location:Mooresville, NC
-
Drives: 1986 Crx Si
 Back to top
#62
Posted 25 November 2010 - 09:01 AM
-
- Leadfoot
-
- Group: 2009 Contributing Member
- Location:Mooresville, NC
-
Drives: 1986 Crx Si
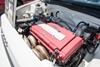
Hello to all once again. Just wrapped up my bay job, so thought I'd come here in post my progress, how I did it, and things I learned along the way.
Finished outcome:

This thread and the feedback received here was of enormous aid to me. I can't thank all of you guys enough for your help.
What went down:
- My engine was devac'd when I got it. Lucked out there, so now emissions boxes. Also, NC doesn't require all of that crap. Again lucky.
- I stripped all of the wiring out. There are 4 parts to the original Si engine harness:
I. The right-side headlight, horn, and fan wiring harness.
II. The A/C harness w/ relay fuses and several vacuum system component connections: disconnects from main harness.
II. The main engine harness get's pulled through it's original location into the interior.
IV. The smaller harness that enters on the upper-firewall of passenger side: get's pulled through as well. This part includes the injector box connector, the brake reservoir fluid level connectors, a small resister ground piece (originally bolted down behind coil at top of firewall) and one more clear 5-pin connector), as well as the LH headlight, horn, bumper lights, and fluid reservoir wiring.
Bay body work and paint: See my build thread. Basically, I cleaned the mess out of the engine, then wrapped it in trash bags. I never removed it, and all worked just fine. I took off all of the un-needed clips and mounting points of elements that were removed. I welded all of the holes shut, sans the heater core hole, which now serves as the hole where all my wires run through. I used a crap load more fiber-glass and bondo than most would ever think about using. Oh well, I had a crap-o welder, and I did the best I could with what I had to get the job done. After completed, everything got sprayed with Rust-O-Leum Etching primer (4 cans needed) and Rust-O-Leum Bedliner spray (5 cans needed). If you want to go this route, DON"T use Duplicolor. It sucks, tried it first.
- Battery: Choosen from my local Advanced Auto: "Magna Power Sports" EXT16L battery, meant for a Jet-Ski, in stock at most stores. Wow, is it awesome! I was worried about how it would do. So far, it's been incredible. No problems, no grouding noise, insta-fire every time. We'll see how it does this winter. I daily drive the battery, so I hope that (1) It will hold it's charge through the colder nights, and (2) the battery will last about 2 years. We'll see. It's also very light, I'd say it's less than 10 lbs., probably around 8 lb. Never weighed it sorry.


- continued next post...
Finished outcome:
This thread and the feedback received here was of enormous aid to me. I can't thank all of you guys enough for your help.
What went down:
- My engine was devac'd when I got it. Lucked out there, so now emissions boxes. Also, NC doesn't require all of that crap. Again lucky.
- I stripped all of the wiring out. There are 4 parts to the original Si engine harness:
I. The right-side headlight, horn, and fan wiring harness.
II. The A/C harness w/ relay fuses and several vacuum system component connections: disconnects from main harness.
II. The main engine harness get's pulled through it's original location into the interior.
IV. The smaller harness that enters on the upper-firewall of passenger side: get's pulled through as well. This part includes the injector box connector, the brake reservoir fluid level connectors, a small resister ground piece (originally bolted down behind coil at top of firewall) and one more clear 5-pin connector), as well as the LH headlight, horn, bumper lights, and fluid reservoir wiring.
Bay body work and paint: See my build thread. Basically, I cleaned the mess out of the engine, then wrapped it in trash bags. I never removed it, and all worked just fine. I took off all of the un-needed clips and mounting points of elements that were removed. I welded all of the holes shut, sans the heater core hole, which now serves as the hole where all my wires run through. I used a crap load more fiber-glass and bondo than most would ever think about using. Oh well, I had a crap-o welder, and I did the best I could with what I had to get the job done. After completed, everything got sprayed with Rust-O-Leum Etching primer (4 cans needed) and Rust-O-Leum Bedliner spray (5 cans needed). If you want to go this route, DON"T use Duplicolor. It sucks, tried it first.
- Battery: Choosen from my local Advanced Auto: "Magna Power Sports" EXT16L battery, meant for a Jet-Ski, in stock at most stores. Wow, is it awesome! I was worried about how it would do. So far, it's been incredible. No problems, no grouding noise, insta-fire every time. We'll see how it does this winter. I daily drive the battery, so I hope that (1) It will hold it's charge through the colder nights, and (2) the battery will last about 2 years. We'll see. It's also very light, I'd say it's less than 10 lbs., probably around 8 lb. Never weighed it sorry.
- continued next post...

WagoCats HOOOOOOOO!!!!!
#63
Posted 25 November 2010 - 09:24 AM
-
- Leadfoot
-
- Group: 2009 Contributing Member
- Location:Mooresville, NC
-
Drives: 1986 Crx Si
sorry, I've got to bake a cake right quick. I'll be back to finish this when I can. 
WagoCats HOOOOOOOO!!!!!
#64
Posted 25 November 2010 - 10:22 AM
-
- Leadfoot
-
- Group: 2009 Contributing Member
- Location:Mooresville, NC
-
Drives: 1986 Crx Si
OK, sorry, dual-layer carrot cake now in oven.
Where was I...Oh, battery wiring: I secured a mega-thick 0-gauge battery cable from Kaymo. He has had great success pulling these from mid-90's BMW 3 and 5 series, which feature a trunk mounted battery. Most yards charge a set-price for a battery cable. So, he has been paying pennies on the dollar for these incredible cables. They are extremely stout, very well insulated, and feature quality heat-shrink'd lug ends, one of which was already ready to mount onto my jet ski battery, which is a simple screw mount set-up.
So, basically, Devion's model here is what I used, sans one difference, I used the STARTER as my distribution block, as per A-man's advise. This saved me having to purchase another $60 worth of equipment in a distribution block. So, positive wire from battery goes to starter postivie connection. Then I ran the hazard wire (w/ in-line fuse) and the power wire from there to underneath the dash, where the hazard connects to the main harness and the smaller positive wire attaches to the factory fuse block originally mounted on the driver's side firewall:

Thread to read on the topic: http://www.redpepper...e...c=48958&hl=
I grounded my neg. to the side-frame of the car, just behind where the passenger seat belt rolls out, under the rear passenger quarter window. I was worried about this spot being a suitable ground, as many used seat bolt-holes as their grounding points. So far, my ground is working well. It then runs up to the engine where it mounts to the frame beside the tranny, and from there to the tranny to complete the grounding run.
Positive post has a 10O-amp in-line fuse mounted 6" from the positive terminal. I'm SO glad I did this, as I had a wiring goof initially, accidentally running ground to positive at the starter. Blew this fuse, needing a $10 replacement fuse, as result. Much better than a fire though!
Last note on this topic, when you are running the 0-gauge copper wire, you will need to go to a performance stereo shop to find lug ends for it, as they are not available at local auto stores. When crimping my 0-gauge lug ends on, I did not have a propane torch, and was not able to make the connection with molted solder (Kaka-style). However, my neighbor gave me a useful tip. When putting the lug end and cable in a vice, I dropped in a grade-8 bolt in the mix, about halfway down the copper connector, then viced it all down with the screw in between the vice and the lug end. This helped me to have a good firm pinched spot in the middle of the lug end. The screw was of course removed after vicing, and the process was repeated with the same screw for all of my connections.
- moving on next post...
Where was I...Oh, battery wiring: I secured a mega-thick 0-gauge battery cable from Kaymo. He has had great success pulling these from mid-90's BMW 3 and 5 series, which feature a trunk mounted battery. Most yards charge a set-price for a battery cable. So, he has been paying pennies on the dollar for these incredible cables. They are extremely stout, very well insulated, and feature quality heat-shrink'd lug ends, one of which was already ready to mount onto my jet ski battery, which is a simple screw mount set-up.
So, basically, Devion's model here is what I used, sans one difference, I used the STARTER as my distribution block, as per A-man's advise. This saved me having to purchase another $60 worth of equipment in a distribution block. So, positive wire from battery goes to starter postivie connection. Then I ran the hazard wire (w/ in-line fuse) and the power wire from there to underneath the dash, where the hazard connects to the main harness and the smaller positive wire attaches to the factory fuse block originally mounted on the driver's side firewall:
Thread to read on the topic: http://www.redpepper...e...c=48958&hl=
I grounded my neg. to the side-frame of the car, just behind where the passenger seat belt rolls out, under the rear passenger quarter window. I was worried about this spot being a suitable ground, as many used seat bolt-holes as their grounding points. So far, my ground is working well. It then runs up to the engine where it mounts to the frame beside the tranny, and from there to the tranny to complete the grounding run.
Positive post has a 10O-amp in-line fuse mounted 6" from the positive terminal. I'm SO glad I did this, as I had a wiring goof initially, accidentally running ground to positive at the starter. Blew this fuse, needing a $10 replacement fuse, as result. Much better than a fire though!
Last note on this topic, when you are running the 0-gauge copper wire, you will need to go to a performance stereo shop to find lug ends for it, as they are not available at local auto stores. When crimping my 0-gauge lug ends on, I did not have a propane torch, and was not able to make the connection with molted solder (Kaka-style). However, my neighbor gave me a useful tip. When putting the lug end and cable in a vice, I dropped in a grade-8 bolt in the mix, about halfway down the copper connector, then viced it all down with the screw in between the vice and the lug end. This helped me to have a good firm pinched spot in the middle of the lug end. The screw was of course removed after vicing, and the process was repeated with the same screw for all of my connections.
- moving on next post...
WagoCats HOOOOOOOO!!!!!
#65
Posted 25 November 2010 - 10:52 AM
-
- Leadfoot
-
- Group: 2009 Contributing Member
- Location:Mooresville, NC
-
Drives: 1986 Crx Si
Wiring:
There's no way to explain this that makes it seem easy. If your on the fence about doing the wiring part of this job, as I was, the best way is to just dive in to this and start it. It will all make sense when you are in the process of it. BEFORE cutting any wires to make extensions, etc..., label both sides of that wire with painters tap tabs an a pen, then make your cut. Extend one wire at a time, double-checking both sides of the wire/connector to ensure that they match once you have completed the extension job on that wire.
Solder and heat shrink everything. I found a flame-gun for a grille to be very helpful in shrinking down my heat shrink outside. I also used a big old solder GUN from Radio shack, not the smaller iron. For wires, it makes it about 10 times quicker, as you don't have to wait for the soldering iron to heat up. Once you get the hang of it, it's so much easier.
As for wire routing through the fenders, once a wire was soldered in the interior to it's extension wire, I then used the speaker wire holes near the doors to pass everything through. I took the grommet out, and passed each wire one-by-one through the hole, then through the grommet, then through a 1/2" hole that I had drilled in the plastic fender mounting post, before finally heading to it's appropriate connector. I did one connector at a time until all of the connectors were completed on each side. This helped me to keep track of things better. For instance, making 20 extension wires, passing them through, then tried to find their appropriate connector, would be a bit more of a headache IMO, and I think would lend itself to an error much easier. I triple checked each connector's wires before moving on to the next connector. Once all of the wires were done on that side of the car, I wrapped everything up as neatly as I could, used some zip ties (I joined two of zip ties together, then passed this through the holes found on the frame, and used this to hold up the wires), and some loom and electrical tape to finish the protection of the wires. Finally, I pushed the grommet back into it's place to make a water tight seal. You can also see in the pic below that I had to use an additional grommet on the passengers side, as my OEM fogs wires would not fit through the speaker wire hole. It was just too max'd out at that point. The wire running up to the wiper cowl hosts a hood release switch for my alarm.
Here's a pic of the passengers side here for reference.


- continued next post...
There's no way to explain this that makes it seem easy. If your on the fence about doing the wiring part of this job, as I was, the best way is to just dive in to this and start it. It will all make sense when you are in the process of it. BEFORE cutting any wires to make extensions, etc..., label both sides of that wire with painters tap tabs an a pen, then make your cut. Extend one wire at a time, double-checking both sides of the wire/connector to ensure that they match once you have completed the extension job on that wire.
Solder and heat shrink everything. I found a flame-gun for a grille to be very helpful in shrinking down my heat shrink outside. I also used a big old solder GUN from Radio shack, not the smaller iron. For wires, it makes it about 10 times quicker, as you don't have to wait for the soldering iron to heat up. Once you get the hang of it, it's so much easier.
As for wire routing through the fenders, once a wire was soldered in the interior to it's extension wire, I then used the speaker wire holes near the doors to pass everything through. I took the grommet out, and passed each wire one-by-one through the hole, then through the grommet, then through a 1/2" hole that I had drilled in the plastic fender mounting post, before finally heading to it's appropriate connector. I did one connector at a time until all of the connectors were completed on each side. This helped me to keep track of things better. For instance, making 20 extension wires, passing them through, then tried to find their appropriate connector, would be a bit more of a headache IMO, and I think would lend itself to an error much easier. I triple checked each connector's wires before moving on to the next connector. Once all of the wires were done on that side of the car, I wrapped everything up as neatly as I could, used some zip ties (I joined two of zip ties together, then passed this through the holes found on the frame, and used this to hold up the wires), and some loom and electrical tape to finish the protection of the wires. Finally, I pushed the grommet back into it's place to make a water tight seal. You can also see in the pic below that I had to use an additional grommet on the passengers side, as my OEM fogs wires would not fit through the speaker wire hole. It was just too max'd out at that point. The wire running up to the wiper cowl hosts a hood release switch for my alarm.
Here's a pic of the passengers side here for reference.
- continued next post...
WagoCats HOOOOOOOO!!!!!
#66
Posted 06 December 2010 - 06:07 AM
-
- Spoool'n
-
- Group: Contributing Member
- Location:Las Vegas
-
Drives: 86 Si
-
Image Gallery
 View Garage

#67
Posted 06 December 2010 - 10:49 PM
-
- Leadfoot
-
- Group: 2009 Contributing Member
- Location:Mooresville, NC
-
Drives: 1986 Crx Si
QUOTE (C8V6C @ Dec 6 2010, 06:07 AM) <{POST_SNAPBACK}>
Looks great buddy 
Thanks bro! Your bay was pretty much the main inspiration. That and ATXboy's wonderful advise and progression pics of his own bay.
I guess I should finish this post. Ha!
OK, engine harness:
Take it off. Unwrap everything, get rid of the old gooey electrical tape and useless clips, etc... LABEL YOUR INJECTOR connectors 1-4 from left to write prior to un-looming. Once unloomed it can be quite tricky to tell which was original furthest to the left, etc...
Their are two connectors, one yellow and one white, each 6 pin connectors that usually reside on the drivers side of the bay. These two connectors need to be lengthened by about 3 feet per wire, so around 10 wires total. Once lengthened, they get passed through behind the firewall, into the interior and then head over towards behind the steering wheel to mate up to their male counterparts coming from the drivers side of the main interior harness. The same will hold true for the two little wires to the brake fluid reservoir fluid sensor, should you choose to run these (I like knowing if my fluid is low!). Additionally, if you are running windshield wipers, than the wiring for your windshield wires will need to be extended by about 2 feet in order to cleanly run it through the heater hole,down low out of view, and sneak up under the brake lines in the bay to the wiper motor. That's it. These are the only extensions that need to be done to the Si harness to get a clean tuck.
Once done, wrap everything back up nice and pretty. Done:

That's pretty much it. Just get in the car, pray, and turn the key. That's what I did and it worked for me. Go God!!
Once I knew that the engine was running and all was good with the wiring, I got on my back for about an hour and cleaned up everything good under the dash, making sure that everything was zipped up safely, as well as high and out of view.
Best of luck on your own bay project. Don't be afraid. It wasn't nearly as hard as it was time consuming. Crap, I mean, it was REALLY time consuming. REALLY REALLY. NOT a weekend deal. Unless your Rywire. And you are not, so let's all plan on having another car to drive, since we are not Ryan.
Hope this all helps! Make sure to post your progress/thoughts/lessons-learned here for your Pepper-brother-en to reference prior to embarking on their own bay clean-up quest.
- Dan
WagoCats HOOOOOOOO!!!!!


Community Forum Software by IP.Board
Licensed to: Red Pepper Racing