 Sign In
 Create Account
Chris,
Can you tell us a little more about the power steering system you have in the car? Great thread BTW.
Julian

Epcivic Buildup Projects
Started by EPcivic, May 06 2007 05:44 PM
106 replies to this topic
#31
 Posted 24 March 2009 - 08:36 PM
-

- Just Drive...
-

- Group: 2010 Contributing Member
- Location:San Diego, Ca
-
Drives: 84 Honda CRX, 94 Honda Civic 4dr, 95 Volvo 850 Turbo Wgn, 91 Mazda Miata
 Back to top
#32
Posted 25 March 2009 - 05:00 PM
-
- 2008 & 2009 EP National Champion
-
- Group: 2010 Contributing Member
- Location:Findlay, Ohio
QUOTE (87MugenProCR-X @ Mar 25 2009, 02:36 AM) <{POST_SNAPBACK}>
Chris,
Can you tell us a little more about the power steering system you have in the car? Great thread BTW.
Julian
Can you tell us a little more about the power steering system you have in the car? Great thread BTW.
Julian
Ok. I did post a write up on the power steering system a long time ago, but it didn't have any pics. From the new steering quickener, it goes to a nice fresh rebuilt Civic sedan power steering rack that I picked up on ebay a few years ago for something rediculous like $50

The rack is driven by an electric over hydraulic pump from a 2nd gen MR2. This pump takes the place of the belt driven pump, and provides the same level of hydraulic pressure regardless of engine rpm. This is a huge benefit for two reasons. First, you don't have nearly as much problems with 'beating' the pump at lower rpms. Second, you don't have to worry about throwing a belt at high rpms. Third, it seems to use less horsepower than a belt driven pump. It is also easier to mount in my opinion, since you don't have to worry about belt alignment. I mounted the pump to a bracket I made that locates it to the passenger frame rail where the battery used to be. I did have to get some hydraulic hoses made up to get it all to work together, but nothing complicated:

The pump needs a lot of current to run when it is under a heavy load, so I didn't mess around when wiring it. Power comes from the battery to a 100amp breaker, then to a universal starter relay and on to the pump. Wiring is all 2ga nice stereo amp wire that I had left over from when I used to be into car stereos. The relay is switched by a simple toggle switch on the dash, so I only run the pump when I'm racing, then allow the charging system to catch up if needed while I return to grid. So far, it all seems to be working fine.

-Chris
#33
Posted 16 April 2009 - 11:39 AM
-

- I AM THE STIG!!!
-
- Group: Members
- Location:Ontario Canada
-
Drives: 1987 CRX Si (with big flares and a ZC!) 2004 Civic SiR
-
Image Gallery
Any driving impresions yet Chris??
This is a thing I've been considering for some time but haven't really put any significant time into it.
I'm curious to hear your thoughts on this setup.
Rob
This is a thing I've been considering for some time but haven't really put any significant time into it.
I'm curious to hear your thoughts on this setup.
Rob
Must.....go......racing.......

#34
Posted 16 May 2009 - 06:20 PM
-
- #83
-
- Group: Members
- Location:st. louis
-
Drives: 86 civic dx, 98 crv

chris, you had said this a while back in this thread about your head:
"KMS titanium retainers and heavy duty valve springs"
where did you locate these heavy duty valve springs? i've been looking all over. you've got the 12-v si head, but wouldn't these work for the cvcc as well? that is, the 12 valves that are the same minus the 4 pre-combustion ones.
thanks.
"KMS titanium retainers and heavy duty valve springs"
where did you locate these heavy duty valve springs? i've been looking all over. you've got the 12-v si head, but wouldn't these work for the cvcc as well? that is, the 12 valves that are the same minus the 4 pre-combustion ones.
thanks.
beer is good for you.
#35
Posted 22 July 2010 - 04:18 PM
-
- 2008 & 2009 EP National Champion
-
- Group: 2010 Contributing Member
- Location:Findlay, Ohio
Here's an update on EP motor 2.0. After starting the 2010 season by blowing my motor due to a flywheel failure, I've been spending a lot of time putting together version two. It is all done, tuned, and running great, so I've finally gotten a litttle time to compile my photos and post about it.
The basis for this build is another AWD wagon block, in order to mate up with the Integra transmission. The previous block had some severe scoring in cylinder #2, and was already .040" overbore, and our rules limit is .047". This made the previous block pretty much useless, plus it would have required line boring to straighten it out after the bent crankshaft anyway.
So, if anybody has an AWD block they don't need, I'm always interested in buying spares - seriously.
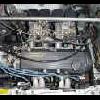
I decided to spend more time and money building this motor, in hopes that it would make more power and last longer. Starting off with the root cause of the other motor's failure, I had to replace the flywheel. I choose to get an Aasco aluminum flywheel from Marcus. It is much lighter than the previous flywheel, and the ring gear is bolted on, so I shouldn't have issues with it falling off again. I also replaced the clutch/pressure plate/throwout bearing, since they touch the flywheel, and my rule for racing repairs is to always replace the damaged part and all the parts that it touches. Here's a picture of all of the parts that went into this motor:

The bottom end includes a knife edged crankshaft, custom JE forged pistons, and ARP rod bolts. The pistons and rods were balanced to 1/10 of a gram, and the entire rotating assembly, including the pressure plate was balanced as well. It turns out that the pressure plate was the most out of balance part in the whole assembly, and even it was very close to perfect before balancing. The block was decked .080" and the head by .010" to get the compression up to 13.2:1.
Here is a picture of the crank and head:

Removing .090" of material does change the cam timing, but not by as much as has been reported here. The 'rule of thumb' of 1 degree per .010" is WRONG. The correct value is 1 degree per .040" of material removed.
Here is a picture of me measuring piston to valve clearance:

Here is the finished motor, ready to drop in:

And finally, for the payoff, after breaking it in and making a few tweeks, I spent 4hrs at the dyno and tuned it on E85. The result was a very healthy 148hp and 122ft-lbs at the wheels, using my race tires and autocross alignment settings. The E85 tune was only 3-4 hp stronger than the race gas, but it's $2.20/gal vs. $7, and available locally for me, so I'm going to run it on E85.
All in all, I'm very pleased with the results.
-Chris
The basis for this build is another AWD wagon block, in order to mate up with the Integra transmission. The previous block had some severe scoring in cylinder #2, and was already .040" overbore, and our rules limit is .047". This made the previous block pretty much useless, plus it would have required line boring to straighten it out after the bent crankshaft anyway.
So, if anybody has an AWD block they don't need, I'm always interested in buying spares - seriously.
I decided to spend more time and money building this motor, in hopes that it would make more power and last longer. Starting off with the root cause of the other motor's failure, I had to replace the flywheel. I choose to get an Aasco aluminum flywheel from Marcus. It is much lighter than the previous flywheel, and the ring gear is bolted on, so I shouldn't have issues with it falling off again. I also replaced the clutch/pressure plate/throwout bearing, since they touch the flywheel, and my rule for racing repairs is to always replace the damaged part and all the parts that it touches. Here's a picture of all of the parts that went into this motor:
The bottom end includes a knife edged crankshaft, custom JE forged pistons, and ARP rod bolts. The pistons and rods were balanced to 1/10 of a gram, and the entire rotating assembly, including the pressure plate was balanced as well. It turns out that the pressure plate was the most out of balance part in the whole assembly, and even it was very close to perfect before balancing. The block was decked .080" and the head by .010" to get the compression up to 13.2:1.
Here is a picture of the crank and head:
Removing .090" of material does change the cam timing, but not by as much as has been reported here. The 'rule of thumb' of 1 degree per .010" is WRONG. The correct value is 1 degree per .040" of material removed.
Here is a picture of me measuring piston to valve clearance:
Here is the finished motor, ready to drop in:
And finally, for the payoff, after breaking it in and making a few tweeks, I spent 4hrs at the dyno and tuned it on E85. The result was a very healthy 148hp and 122ft-lbs at the wheels, using my race tires and autocross alignment settings. The E85 tune was only 3-4 hp stronger than the race gas, but it's $2.20/gal vs. $7, and available locally for me, so I'm going to run it on E85.
All in all, I'm very pleased with the results.
-Chris
#36
Posted 22 July 2010 - 06:56 PM
-

- This thing should fit!
-
- Group: 2013 Contributor
- Location:opɐɹoloƆ 'suılloƆ ʇɹoℲ
Nice Engine Build Chris! I'm also glad to hear you've had great luck with E-85. I have already taken steps to convert over to that fuel for my own personal project. And it's not even a race car! HA! Where I live, you can get it at almost every corner station. I'm reading more and more about people converting over to E-85 for the track. Your reasons concerning fuel prices seem to be the most common.
Later if you can (or the rules will let you), push that compression even higher. I've read that levels as high as 15:1 are working with E-85. I've also read it's a challenge to reach those numbers. Parts start to get damn close to each other at those levels.
David
Later if you can (or the rules will let you), push that compression even higher. I've read that levels as high as 15:1 are working with E-85. I've also read it's a challenge to reach those numbers. Parts start to get damn close to each other at those levels.
David

#37
Posted 22 July 2010 - 07:07 PM
-

- Demon Of All Trades
-
- Group: 2013 Contributor
- Location:Oklahoma
-
Drives: 87 Civic Si, 88 Civic DX, 90 CRX DX, 80 Trans Am, 10 Fit Sport
-
Image Gallery
 View Garage
I think the biggest problem with running super high compression which is what E85 is awesome for is the lack of fuel supply. E85 requires so much more fuel to run at a stoich air fuel ratio than regular gasoline. You need some huge injectors.

#38
Posted 23 July 2010 - 09:26 AM
-

- ホンダ、夢の力
-
- Group: 2012 Contributor
- Location:Nashville TN.
-
Drives: -------- 1986' CRX Si (X2) -------- 1993' GMC Sanoma SLE
-
Image Gallery
QUOTE (EPcivic @ Jul 22 2010, 04:18 PM) <{POST_SNAPBACK}>
... The result was a very healthy 148hp and 122ft-lbs at the wheels, using my race tires and autocross alignment settings....
wow... I thought this thing would make some power, but this is great. I'll bet it pulls awsome! Whats the power band like?

#39
Posted 23 July 2010 - 05:10 PM
-
- Dual Mikunis Rule
-
- Group: 2011 Contributing Member
- Location:Utica, MI
-
Drives: 1987 CRX DX, 2001 Subaru 2.5RS, 2004 Accord EX, 1983 Honda VT500FT
-
Image Gallery
View Garage
Awesome!!! Still trying to get my EP motor together... won't be as extreme as yours...
Si or CDM DX head? Custom cam?
Si or CDM DX head? Custom cam?
"If Honda does not race there is no Honda." -Soichiro Honda

#40
Posted 23 July 2010 - 08:46 PM
-
- 2008 & 2009 EP National Champion
-
- Group: 2010 Contributing Member
- Location:Findlay, Ohio
The power band is nice and wide. It makes over 100ft-lbs from 3000 to 7500rpm. The area around the horsepower peak is nice and flat too. Nearly a 2000rpm window where it is within 10hp of the peak. Horsepower peak is between 6500 and 7000. The torque numbers look really good. It's making almost 25ft-lbs more than a stock B16 from 3500 to 5500 rpm.
This is the same head I've been using, a USDM Si. It has been ported by me, and has a fair amount of chamber rework as well. For the cam, I ended up with a fairly mild WEB regrind (Stage II). Because of the block decking, I did not have the piston to valve clearance to run the Colt Stage III cam at the correct cam timing (my mistake for trusting the incorrect cam timing adjustment numbers I found on the internet). With the cam just 3-4 deg advanced past where it should be, the power was off by almost 20hp. The WEB cam has a lot less duration, so it can fit at the correct timing. It was actually quite interesting. This motor was completely insensitive to air to fuel ratio and ignition timing. We made huge changes there and were only seeing 5hp swings. Cam timing, on the other hand, was very sensitive. Another odd thing is that the motor made the most power on E85 with ignition timing settings 8deg less advanced than the best race gas tune. This is pretty much opposite of what most people say happens when tuing on E85. We tried lots of combinations, from very rich with lots of timing to leaner with less timing. I think we made over 40 pulls.
-Chris
#41
Posted 24 July 2010 - 08:08 AM
-

- Merlin
-
- Group: Contributing Member
- Location:OOOHIO
-
Drives: '07 Toyota Tundra SR5
#42
Posted 24 July 2010 - 11:17 AM
-
- ホンダ、夢の力
-
- Group: 2012 Contributor
- Location:Nashville TN.
-
Drives: -------- 1986' CRX Si (X2) -------- 1993' GMC Sanoma SLE
-
Image Gallery
Very nice! Thanks for the info. I can't imagine what 100ft lbs from 3K feels like with this little NA single cam. Your car must be very competitive, nationals champ and now with this motor? lol
#43
Posted 24 July 2010 - 12:24 PM
-

- Slowpoke
-
- Group: 2010 Contributing Member
- Location:Ennismore, Ontario
-
Drives: 1986 honda crx dx
QUOTE
The 'rule of thumb' of 1 degree per .010" is WRONG. The correct value is 1 degree per .04" of material removed.
can you please explain the theory behind this. by my math 1 degree per .010" is roughly cprrect
#44
Posted 25 July 2010 - 08:12 AM
-
- 2008 & 2009 EP National Champion
-
- Group: 2010 Contributing Member
- Location:Findlay, Ohio
QUOTE (wyatt89 @ Jul 24 2010, 06:24 PM) <{POST_SNAPBACK}>
can you please explain the theory behind this. by my math 1 degree per .010" is roughly cprrect
Sure. The theory is really quite straightforward, and isn't really a theory - it is simply the mechanics of the system.
The cam pulley has 40 teeth. Nobody can argue this point.
A complete trip around the cam pulley is 360 degrees, 'cause it's a circle. Again, this is pretty basic geometry.
This means that each tooth of the pulley is 1/40th of 360 degrees, or 360/40 = 9 degrees per tooth.
The pitch of the timing belt is 0.375". You can measure it if you want, or look up the specs on Gates website.
This means for every tooth moved on the belt, it travels 0.375". Since we also know that each tooth on the cam gear is 9 degrees of cam timing, we can conclude that 9 degrees of cam timing is equal to 0.375" of belt travel, so:
9 degrees = .0375" travel
Dividing each side by 9 to get it in terms of inches per degree, we get:
0.375"/9 = .041 inches per degree
This is the correct answer. I confirmed this by measuring lobe centers with a degree wheel on the assembled motor as well. In the case of my motor, with 0.090" removed, I needed to advance the cam by 2.16 degrees to return it to the original relationship with the crank. This was also the setting that yielded the highest horsepwer and best looking curves. Moving just 2-3 degrees away from this setting would change the power significantly, but always lost total area under the curve.
-Chris
#45
Posted 25 July 2010 - 11:59 AM
-
- Slowpoke
-
- Group: 2010 Contributing Member
- Location:Ennismore, Ontario
-
Drives: 1986 honda crx dx


Community Forum Software by IP.Board
Licensed to: Red Pepper Racing