 Sign In
 Create Account
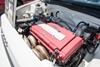
I was always worried about cleaning mine too. The dizzy is the most important to
watch out for though

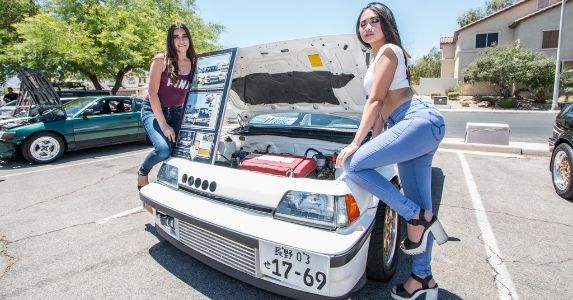
The Official Rpr Tuck Thread
Started by OG Wagon, Feb 17 2010 11:26 PM
66 replies to this topic
#16
 Posted 19 February 2010 - 01:46 PM
-
- Spoool'n
-

- Group: Contributing Member
- Location:Las Vegas
-
Drives: 86 Si
-
Image Gallery
 View Garage
 Back to top
#17
Posted 19 February 2010 - 02:01 PM
-

- Demon Of All Trades
-
- Group: 2013 Contributor
- Location:Oklahoma
-
Drives: 87 Civic Si, 88 Civic DX, 90 CRX DX, 80 Trans Am, 10 Fit Sport
-
Image Gallery
View Garage
Im going to start putting extra wires in my car, just to make up for the lack of them in all of yours.

#18
Posted 19 February 2010 - 02:09 PM
-
- Spoool'n
-
- Group: Contributing Member
- Location:Las Vegas
-
Drives: 86 Si
-
Image Gallery
View Garage
#19
Posted 19 February 2010 - 02:28 PM
-
- Leadfoot
-
- Group: 2009 Contributing Member
- Location:Mooresville, NC
-
Drives: 1986 Crx Si
Wow, thanks so much for input and support of this thread!
I'm still soaking everything in, which is why I haven't responded.
At work now, I'll add more questions, etc... this evening.
I'm still soaking everything in, which is why I haven't responded.
At work now, I'll add more questions, etc... this evening.

WagoCats HOOOOOOOO!!!!!
#20
Posted 19 February 2010 - 02:36 PM
-
- Demon Of All Trades
-
- Group: 2013 Contributor
- Location:Oklahoma
-
Drives: 87 Civic Si, 88 Civic DX, 90 CRX DX, 80 Trans Am, 10 Fit Sport
-
Image Gallery
View Garage
Just ditching the black plastic condiut that Honda uses, and going with the braided nylon mesh covering makes it look a whole 100x better even if your not moving the wiring from sight.
Just remember when you do all your tucks, you've got a chance of having to go back and trouble shoot your new improved wiring one day for problems. And having to look through 150 white wires sucks.
http://www.riwire.co...es/supplies.htm has a good selection of colored and pre-striped wiring. Best selection i found.
#21
Posted 20 February 2010 - 02:43 AM
-

- In the left lane
-
- Group: Contributing Member
- Location:Austin, TX, United States
-
Drives: 1986 Honda Civic Si
-
Image Gallery
View Garage
QUOTE (C8V6C @ Feb 18 2010, 03:52 PM) <{POST_SNAPBACK}>
Haven't fully decided yet if I was gonna keep yhe chassis, but I did consider that option.
ah yes i remember now even considering a 1g! thatd be siiick but you do have a nicely unique 3g
 at the same time all the stuff you have on a 1g would look sick too
 QUOTE (RARECRX @ Feb 18 2010, 03:55 PM) <{POST_SNAPBACK}>
I love tucked bays.. they look so clean.. I wish we could devac and tuck legally here in Ca.. Lucky guys..
 my car is emission test free after this last test this year
QUOTE (DEIVIONCRX @ Feb 19 2010, 01:01 PM) <{POST_SNAPBACK}>
Im going to start putting extra wires in my car, just to make up for the lack of them in all of yours.
hahahaha
QUOTE (DEIVIONCRX @ Feb 19 2010, 01:36 PM) <{POST_SNAPBACK}>
Just ditching the black plastic condiut that Honda uses, and going with the braided nylon mesh covering makes it look a whole 100x better even if your not moving the wiring from sight.
Just remember when you do all your tucks, you've got a chance of having to go back and trouble shoot your new improved wiring one day for problems. And having to look through 150 white wires sucks.
http://www.riwire.co...es/supplies.htm has a good selection of colored and pre-striped wiring. Best selection i found.
Just remember when you do all your tucks, you've got a chance of having to go back and trouble shoot your new improved wiring one day for problems. And having to look through 150 white wires sucks.
http://www.riwire.co...es/supplies.htm has a good selection of colored and pre-striped wiring. Best selection i found.
good info
#22
Posted 20 February 2010 - 09:43 PM
-
- Leadfoot
-
- Group: 2009 Contributing Member
- Location:Mooresville, NC
-
Drives: 1986 Crx Si
Cool stuff going on here. Thanks again.
I'll be ridding of all of my heater controls and A/C equipment under the dash. So, this should clean things up a bit, and give me some room to put everything.
So, check me for understanding here, the process is basically:
(1) Take dash out of car to make things easier.
(2) Take off front bumper, header panel, and fenders for access and protection.
(2) Take intake manifold off so I can see everything better.
(3) Start trying to re-route wires and cables to make everything either "hidden" or underneath something.
- Headlight and bumper light wiring goes through the fenders
- Engine stuff goes underneath the manifold. (Do wires need to be lengthened here, or are they all long enough?)
- Get the battery out of there. Find a way to mount it in a hidden location. If it's a gel cell, it's safe to go inside the car.
(Perhaps in the little privacy-cargo area behind seats. Saw a post with this done VERY cleanly a few weeks ago. Can someone
post that on this thread for our reference. The guy used OEM battery tie down brackets, cut them, and then drilled holes in the
cargo area, bolting the battery down using the cargo area plastic, no drilling or holes to the metal floorboard involved).
- Run some wires to remote terminals in the bay to make jump starts, etc..., easier. Need a wiring diagram for this. Anyone?
- Get a cleaner looking intake (check! HKS deal pending...).
(4) Once wires are re-routed, take engine harness out of car and strip off all insulation. Re-cover with loom or mesh covering, and either electrical tape or heat-shrink the wiring, depending on your time, patience, and budget.
(5) Headlight wiring will need to be lengthened and soldered in this case. You COULD just use twist ties and electrical tape for this, but that would be considered a major shortcut. Soldering is better. Right? Or, can I safely be lazy here with the twist-tie method?
(6) - Turn M/C over 180 degress to make for a more accesible entry of the booster vac line from underneath the M/C.
- Clutch cable comes from the same place, but goes underneath the manifold to reach it's final destination.
- Where does the hood cable go? Can it go behind the driver's side fender as well? Is it long enough? If not, what's the cleanest way to
get it to the front?
- Throttle cable: No clue what to do to clean this up. What's possible?
(7) Move all of the fuse boxes and Coil, etc... to underneath the passenger side, where my heater and A/C stuff used to be.
(8) Reinstall engine harness, either threw the OEM harness location on the firewall, or through the now-vacant heater hole(s).
(9) Reinstall the intake manifold.
(10) Install fenders and bumper, etc...
(11) Check to make sure everything works.
How does this look?
WagoCats HOOOOOOOO!!!!!
#23
Posted 20 February 2010 - 10:05 PM
-
- Leadfoot
-
- Group: 2009 Contributing Member
- Location:Mooresville, NC
-
Drives: 1986 Crx Si
Oh, I would also like to pick up a blue-silicone hose kit while I'm at it.
Is there one for another car that can be cut/made to fit our cars?
Is there one for another car that can be cut/made to fit our cars?
WagoCats HOOOOOOOO!!!!!
#24
Posted 21 February 2010 - 12:52 AM
-
- Spoool'n
-
- Group: Contributing Member
- Location:Las Vegas
-
Drives: 86 Si
-
Image Gallery
View Garage
(1) Take dash out of car to make things easier.
Yes, it would make it easier.
(2) Take off front bumper, header panel, and fenders for access and protection.
A must...esp if you run wires under the fenders
(2) Take intake manifold off so I can see everything better.
I didnt take mine off, but this would be easier.
(3) Start trying to re-route wires and cables to make everything either "hidden" or underneath something.
- Headlight and bumper light wiring goes through the fenders
Check
- Engine stuff goes underneath the manifold. (Do wires need to be lengthened here, or are they all long enough?)
Some will need lengthening, some not....just trial and error
- Get the battery out of there. Find a way to mount it in a hidden location. If it's a gel cell, it's safe to go inside the car.
(Perhaps in the little privacy-cargo area behind seats. Saw a post with this done VERY cleanly a few weeks ago. Can someone
post that on this thread for our reference. The guy used OEM battery tie down brackets, cut them, and then drilled holes in the
cargo area, bolting the battery down using the cargo area plastic, no drilling or holes to the metal floorboard involved).
Relocating to the trunk area or passenger seat are always good ways to go
- Run some wires to remote terminals in the bay to make jump starts, etc..., easier. Need a wiring diagram for this. Anyone?
Never did this one, but I have seen it done before.
- Get a cleaner looking intake (check! HKS deal pending...).
(5) Headlight wiring will need to be lengthened and soldered in this case. You COULD just use twist ties and electrical tape for this, but that would be considered a major shortcut. Soldering is better. Right? Or, can I safely be lazy here with the twist-tie method?
ALWAYS SOLDER EVERYTHING
(6) - Turn M/C over 180 degress to make for a more accesible entry of the booster vac line from underneath the M/C.
Turn over booster, not MC I know you know what you meant
- Clutch cable comes from the same place, but goes underneath the manifold to reach it's final destination.
Yeah, I just ran mine under the mani
- Where does the hood cable go? Can it go behind the driver's side fender as well? Is it long enough? If not, what's the cleanest way to
get it to the front?
- Throttle cable: No clue what to do to clean this up. What's possible?
I ran a shorter cable from a 99-00 civic si i think, but i am b series
Yes, it would make it easier.
(2) Take off front bumper, header panel, and fenders for access and protection.
A must...esp if you run wires under the fenders
(2) Take intake manifold off so I can see everything better.
I didnt take mine off, but this would be easier.
(3) Start trying to re-route wires and cables to make everything either "hidden" or underneath something.
- Headlight and bumper light wiring goes through the fenders
Check
- Engine stuff goes underneath the manifold. (Do wires need to be lengthened here, or are they all long enough?)
Some will need lengthening, some not....just trial and error
- Get the battery out of there. Find a way to mount it in a hidden location. If it's a gel cell, it's safe to go inside the car.
(Perhaps in the little privacy-cargo area behind seats. Saw a post with this done VERY cleanly a few weeks ago. Can someone
post that on this thread for our reference. The guy used OEM battery tie down brackets, cut them, and then drilled holes in the
cargo area, bolting the battery down using the cargo area plastic, no drilling or holes to the metal floorboard involved).
Relocating to the trunk area or passenger seat are always good ways to go
- Run some wires to remote terminals in the bay to make jump starts, etc..., easier. Need a wiring diagram for this. Anyone?
Never did this one, but I have seen it done before.
- Get a cleaner looking intake (check! HKS deal pending...).
(5) Headlight wiring will need to be lengthened and soldered in this case. You COULD just use twist ties and electrical tape for this, but that would be considered a major shortcut. Soldering is better. Right? Or, can I safely be lazy here with the twist-tie method?
ALWAYS SOLDER EVERYTHING
(6) - Turn M/C over 180 degress to make for a more accesible entry of the booster vac line from underneath the M/C.
Turn over booster, not MC
I know you know what you meant- Clutch cable comes from the same place, but goes underneath the manifold to reach it's final destination.
Yeah, I just ran mine under the mani
- Where does the hood cable go? Can it go behind the driver's side fender as well? Is it long enough? If not, what's the cleanest way to
get it to the front?
- Throttle cable: No clue what to do to clean this up. What's possible?
I ran a shorter cable from a 99-00 civic si i think, but i am b series
#25
Posted 21 February 2010 - 12:54 AM
-

- Certified Parts Whore
-
- Group: 2016 Contributor
- Location:Annapolis, MD
-
Drives: Um... Drove an 86 crx si
-
Image Gallery
View Garage
please take alot of pics
(\ /)
(O.o)
(> <)
This is Bunny. Copy Bunny into your signature to help him on his way to world domination.
Success is about standing out, not fitting in.
#26
Posted 21 February 2010 - 09:50 AM
-
- Leadfoot
-
- Group: 2009 Contributing Member
- Location:Mooresville, NC
-
Drives: 1986 Crx Si
Great answers C8V6C!
Last one (for now), what about the hood-latch cable?
I will take TONS of pictures of the process, beginning mid-June.
Last one (for now), what about the hood-latch cable?
I will take TONS of pictures of the process, beginning mid-June.
WagoCats HOOOOOOOO!!!!!
#27
Posted 21 February 2010 - 11:30 AM
-

- Mr.Ididntseeyousittingthereofficer
-
- Group: 2009 Contributing Member
- Location:Hickory, North Carolina
-
Drives: 74'vert Blazer, 84redrexHF (RIP), 87blackrexSI, 91STDhatch(resurrected for beater)(RIP again)
i dont believe the hood latch cable is long enough. on a side note, later model civic owners relocate the hood cable INTO the engine bay FROM the fender, because you can reach in the fender well and pop the hood, cut the battery cable disableing alarm and POOF there goes your car.
are you really removing your heater too? id just kill the AC...
are you really removing your heater too? id just kill the AC...
QUOTE (kjeffery @ Apr 17 2009, 06:17 PM) <{POST_SNAPBACK}>
Yet again Scott, you have all the answers
QUOTE (cbstdscott @ Apr 17 2009, 07:31 PM) <{POST_SNAPBACK}>
No. All the answers are in the Kakabox build thread.
QUOTE (Lymitliss @ May 26 2009, 08:06 PM) <{POST_SNAPBACK}>
Ohh yeah I guess that makes sense. King Kaymo has all the answers 
#28
Posted 21 February 2010 - 03:49 PM
-
- Spoool'n
-
- Group: Contributing Member
- Location:Las Vegas
-
Drives: 86 Si
-
Image Gallery
View Garage
I gutted my hood latch entirely, so I won't be much help.
But, I have changed them on other cars....it's just a cable.
Therefore, it shouldn't be terribly difficult to find another, longer cable, to use in it's place that you can route elsewhere. It just needs slight tension on it
But, I have changed them on other cars....it's just a cable.
Therefore, it shouldn't be terribly difficult to find another, longer cable, to use in it's place that you can route elsewhere. It just needs slight tension on it
#29
Posted 22 February 2010 - 11:39 AM
-

- Slowpoke
-
- Group: 2009 Contributing Member
- Location:SLC
-
Drives: 84 1500 Coupe, 89 Cherokee
1) Take out the dash - 100x easier.
2) Yup, you have to take all the body panels off. I didn't take off my intake manifold. I think you will want to leave it on so you will know how long to make each wire. You can route stuff under it just fine.
3) For the battery mounted in the personal trunk, here's what I did:
At first I wanted to secure the battery through the metal of the floor. But underneath the personal trunk is the gas tank. So I didn't want to drill holes near that. Then I thought I would put the battery on the floor behind the passenger seat. It didn't fit great there, plus it fit SO well in the personal trunk. So I just secured the battery to the plastic of the trunk. And the trunk is secured to the chassis pretty well. I used a hole saw and drilled holes in the front and rear for the wire. I also drilled holes for the mounting locations.

I used the washers under the trunk to add support to the plastic. I cut down the stock 'J' bolts and re-threaded them to use with my new battery. I got the flexible battery hold down from Checker for like $6. Here is the battery tied down:

Here is the close negative side I bolted down to the trunk cross brace.

Link on my project page: Batter Mount
Also, why do you want remote terminals? If it's for looks, that's fine. But consider that they are going to add more weight and cost since you also need to run more big gauge wires. If you're concerned about jumping: I use the (+) on the starter and the (-) pretty much anywhere.
4) I labeled all the connectors, then un-loomed all the wires, then reconnected and modified the wires (shortened, lengthened), then used tape at each junction, then removed the new harness, then loomed it all up again.
5)SOLDER!!!!!! Don't cheap on this.
6) I didn't change the booster. I got rid of my hood latch all together. I have the chock cable running out the plug where the latch cable used to go.
7) I kept my heater. Did you NEVER use your heater this winter? If this is not a track car I would recommend keeping it.
8) Like I said earlier, I used the stock location for the harness.
9) ....
10)
11) I was pretty nervous. The only issues I had were the turn signals. Although it turned out it was the bumper and not the wiring.
12) Just use black hoses. Make the bay clean, not multi colored.
Hope that helped. Also, read the thread on H-T. HT-Tuck thread
2) Yup, you have to take all the body panels off. I didn't take off my intake manifold. I think you will want to leave it on so you will know how long to make each wire. You can route stuff under it just fine.
3) For the battery mounted in the personal trunk, here's what I did:
At first I wanted to secure the battery through the metal of the floor. But underneath the personal trunk is the gas tank. So I didn't want to drill holes near that. Then I thought I would put the battery on the floor behind the passenger seat. It didn't fit great there, plus it fit SO well in the personal trunk. So I just secured the battery to the plastic of the trunk. And the trunk is secured to the chassis pretty well. I used a hole saw and drilled holes in the front and rear for the wire. I also drilled holes for the mounting locations.
I used the washers under the trunk to add support to the plastic. I cut down the stock 'J' bolts and re-threaded them to use with my new battery. I got the flexible battery hold down from Checker for like $6. Here is the battery tied down:
Here is the close negative side I bolted down to the trunk cross brace.
Link on my project page: Batter Mount
Also, why do you want remote terminals? If it's for looks, that's fine. But consider that they are going to add more weight and cost since you also need to run more big gauge wires. If you're concerned about jumping: I use the (+) on the starter and the (-) pretty much anywhere.
4) I labeled all the connectors, then un-loomed all the wires, then reconnected and modified the wires (shortened, lengthened), then used tape at each junction, then removed the new harness, then loomed it all up again.
5)SOLDER!!!!!! Don't cheap on this.
6) I didn't change the booster. I got rid of my hood latch all together. I have the chock cable running out the plug where the latch cable used to go.
7) I kept my heater. Did you NEVER use your heater this winter? If this is not a track car I would recommend keeping it.
8) Like I said earlier, I used the stock location for the harness.
9) ....
10)
11) I was pretty nervous. The only issues I had were the turn signals. Although it turned out it was the bumper and not the wiring.
12) Just use black hoses. Make the bay clean, not multi colored.
Hope that helped. Also, read the thread on H-T. HT-Tuck thread
#30
Posted 22 February 2010 - 05:45 PM
-
- Leadfoot
-
- Group: 2009 Contributing Member
- Location:Mooresville, NC
-
Drives: 1986 Crx Si
AWESOME additions Jaminak! Thanks so much for taking the time to share all of your knowledge on this, and for the battery tie-down explanation in the trunk. SO clean!! I will definitely be doing this. What is the model # of your battery?
WagoCats HOOOOOOOO!!!!!


Community Forum Software by IP.Board
Licensed to: Red Pepper Racing