 Sign In
 Create Account
Hey guys im tryn to sell my rex ,,, besides that befor i got my crx i was into muscle cars my uncle ownd a race shop and my dad owns a mopar 71 challenger r/t 383... me and him are geting a 1967 dodge gts 383 with front disk brakes from factory and im also geting a 74 dodge duster 340 six pack 4spd ...the guy befor me owns the GTS it was suposto be restored and it was goin on barret jackson auction the guy who was doin the work took his money striped the car and never did nuting besides strip it tottal and now the guy needs it gone and hes really sick..
anyway i wanna kno has any one made a rotisserie or a sand blaster or any other home made tools and if they have instuction own how they did it or a write up,, thanks angelo
Any One Make Homemade Rotisserie
Started by 1994rm250, Jun 16 2008 07:56 PM
14 replies to this topic
#1
 Posted 16 June 2008 - 07:56 PM
-
- Slowpoke
-

- Group: Members
- Location:New York, longisland
-
Drives: 1986 crx si ZC
 View Garage
I say "Just Do It". Fcuk the "Just Buy It" philosophy. Let the rich primdonnas spend their money. I'll take ugly but badass backyard vehicle anyday.
AIM- rolloutperf
AIM- rolloutperf
 Back to top
#2
Posted 16 June 2008 - 08:08 PM
-

- Demon Of All Trades
-
- Group: 2013 Contributor
- Location:Oklahoma
-
Drives: 87 Civic Si, 88 Civic DX, 90 CRX DX, 80 Trans Am, 10 Fit Sport
-
Image Gallery
View Garage

#3
Posted 16 June 2008 - 10:48 PM
-

- Turd Polisher
-
- Group: 2012 Contributor
- Location:Seattle, WA 98115
-
Drives: from point 'A' to point 'B' daily.
-
Image Gallery
View Garage
QUOTE (DEIVIONCRX @ Jun 16 2008, 05:08 PM) <{POST_SNAPBACK}>
I think David firstgencrx made one for his car.
Yup and it's one to envy! Do a search...it'll pop up. It's a beaut!

#4
Posted 17 June 2008 - 12:16 AM
-

- This thing should fit!
-
- Group: 2013 Contributor
- Location:opɐɹoloƆ 'suılloƆ ʇɹoℲ
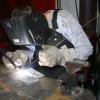
I did a short run of images of the rotisserie I built when I was doing the adjustable caster/camber plates thread. It starts here:
http://www.redpepper...e...st&p=343768
The rotisserie is designed for heavier cars like mid 60's muscle. I estimate it can hold a 5,000 pound car with ease. The CRX shell that sits on it now is like having a flee hanging from it.
Sorry, no drawings (I built it from pictures in my head), and no build thread of it's construction. And I have no time to make plans, so don't ask. You're welcome to use any of the ideas I incorporated in the design. One thing that is cool about the design, is it will pick up a car that's on the ground. So you don't need the common second lift to put the body in the rotisserie like the other units you see out there.
I am a big fan of safety. So my advice to you is over build it. It's better to work without needing to think about your tools. It's very heavy. Made from mostly 1/4 wall tubing. Mostly 4" and 3" square. Some 2" at the grips. I wouldn't be surprised if it weighed 1,200 pounds by itself. Could be even more. Sits on wheels so you can move your project around.
Good luck.
David

#5
Posted 17 June 2008 - 02:08 PM
-
- Slowpoke
-
- Group: Members
- Location:Ft. Collins CO
-
Drives: 87 crx dx (in a re-build phase); 02 Cadillac Escalade (gas hog) ; 03 Honda Accord V6 Coupe

QUOTE
I think David firstgencrx made one for his car.
QUOTE (kakabox @ Jun 16 2008, 09:48 PM) <{POST_SNAPBACK}>
Yup and it's one to envy! Do a search...it'll pop up. It's a beaut!
I've seen it first hand! First class fabrication! You WILL NOT see a better rotisserie. 'nuff said
 "Oversteer scares passengers, understeer scares drivers"
Freedom has a taste, a sweetness, that only those that have fought for it, know.
#6
Posted 17 June 2008 - 03:56 PM
-
- Slowpoke
-
- Group: Members
- Location:New York, longisland
-
Drives: 1986 crx si ZC
View Garage
yeh its REALLY GOOD i can do the same quailty if i had time but i only have 4 days to make one thanks alot guys angelo
I say "Just Do It". Fcuk the "Just Buy It" philosophy. Let the rich primdonnas spend their money. I'll take ugly but badass backyard vehicle anyday.
AIM- rolloutperf
AIM- rolloutperf
#7
Posted 17 June 2008 - 05:46 PM
-
- This thing should fit!
-
- Group: 2013 Contributor
- Location:opɐɹoloƆ 'suılloƆ ʇɹoℲ
QUOTE (1994rm250 @ Jun 17 2008, 02:56 PM) <{POST_SNAPBACK}>
yeh its REALLY GOOD i can do the same quailty if i had time but i only have 4 days to make one thanks alot guys angelo
For what it's worth, I have seen people use a couple of heavy duty engine stands at each end of an object they want to rotisserize! I know, that's not a real word.

Just be careful. We don't want to read about you in the Darwin Awards!
David
#8
Posted 17 June 2008 - 09:56 PM
-

- the only Moderator who can fight MONSTERS
-
- Group: Moderators
- Location:Ghost Valley, CA
-
Image Gallery
#9
Posted 18 June 2008 - 09:54 AM
-

- Leadfoot
-
- Group: 2018 Contributor
- Location:Chicago, IL
-
Drives: 1986 Honda CRX DX
-
Image Gallery
View Garage
QUOTE (Ghost-One @ Jun 17 2008, 08:56 PM) <{POST_SNAPBACK}>
did some one else make our out of 2x4s and engine stands?
xxPaulCPxx made one from 2x4's and some stick welded steel, engine stands would serve the role of those parts perfectly I would think... I still have the email he sent me in 2003 or so with his pictures and instructions stored on my home computer, I'll post them up when I get home... Not the most perfectly balanced, and I would prefer to use 1stgencrx's design if I had the choice, but it seems strong enough for these cars!
DarkHand
#10
Posted 20 June 2008 - 09:21 PM
-
- Leadfoot
-
- Group: 2018 Contributor
- Location:Chicago, IL
-
Drives: 1986 Honda CRX DX
-
Image Gallery
View Garage
Ok found it... Remember this is not mine! This is the entire writeup that xxPaulCPxx gave me in 2003 for his rotisserie:
How to build a CRX Rotisserie

Materials List:
* 4 - 48" square tube steel, 1"x1"
* 2 - 36" or 48" 1/2" x 1 1/4" channel steel (looks like a shallow U)
* 1 - 36" 1"x 1/4" bar steel
* 2 - 2" diameter pipe, 5" long
* 2 - 2 1/4" diameter pipe, 3 1/2" long
* 2 - 2"x12" sheet steel
* 9 - 2x4 x 8' lumber
* 5 - 1x4 x 8' lumber
* 1 - box of 3" drywall or deck screws
Step 1 - Prepare yourself and your CRX.
Learn how to weld, or get someone who can weld. Good welds are critical to your success with this project. They don't have to be perfect, just pretty good.
Take off as much weight as you can. A lighter car is safer for this project. Doors, the hatch, and the engine are good candidates for removal. I left the engine in for my project, because I had just put it in and didn't want to look like I had made a mistake! I also removed all the body panels as well as the interior, as I am doing rust repair with this rotisserie
Step 2 - Make a front and rear mounting brackets.

Start by taking the front bumper face, bumper, and bumper mounts off the car. Also remove the headlights, and anything else that looks like it might get in the way. The bumper mounts connect directly to the frame, and that is where the mounting bracket will support your car.
Cut four pieces of 1 x 1/4" steel bar to 4 1/2", and 2 pieces each of 1x1 square tube at 5" and 6 1/2". These will be the connection to the car. Drill a 3/8 hole 3 5/8 inches apart on the steel bars. Weld the square tube to the center of the bars, making a T out of each. Bolt them onto the frame where the bumper mount used to be, put the shorter tubes on the part that is raised. The tubes should end at about the same place in space. Cut two four pieces of 1 x 1/4" steel bar to 6", and weld them to the notch of each T for added rigidity.

(Picture note: while I used angle iron for extra support, the 1" bar would have been fine as well)
Take 2 1x1x48" square tubes and weld a 1 1/4" x 36" (or 48") channel bar between them, so the flat end is flush with the edges of the tubes. This will create a bumper like bar that is 48" long by 3 1/4" high. Place this between the tubs that are mounted to the frame, and weld them together.

Place a piece of 1" diameter material between a jack and the crossbar. Lift the car up by that crossbar, and then try to determine where the center of weight is for the front. Both wheels should lift and come down at the same time when lifted at the correct spot. Mine was slightly toward the driver's side of center.
For the rear cross-member, cut four pieces of 1 x 1/4" bar stock to 3 1/2". Drill two 3/8" holes 2 3/8" apart on two of the pieces. Attach it to the bumper mount. Take another 3 1/2" piece and create an L with it and the attached piece, so the leg of the L almost covers the third hole. Mark a line on that piece, then drill a 3/8" hole on that line in the center of the bar. Attach it to the third bumper hole, and weld the two bars together, careful not to weld them onto the frame.

Take a 1x1x48" square tube and weld a 1 and 1/4 inch x 36" (or 48") channel bar to it, so the flat end is flush with the edges of the tube.
Cut two pieces of 1x1 square tube to 4". Weld these onto the center of each foot of the L brackets. Weld the 48" tube and channel bar to this tube, matching the square tube to square tube, with the channel stock on top and flat side facing out.
Cut two pieces of 1x1/4 bar stock to 4 inches. Rest them on an angle between the long leg of the L and the tube and channel bar, and then weld it secure.

Mark on the rear bracket the point where a straight line from the front balance point would intersect the rear. It is important that this be as close to perfect as possible, so that when the vehicle is rotated, both rotation points are even and it rolls smoothly and doesn't bind. There is room for some error, but don't push it! The balance point for the rear is likely to be dead center, since it doesn't have a heavy slightly offset engine to pull either way. You don't want it dead center, you want it to match the front!
Weld on the 2" diameter x 5" pipes to the marked points on the front and rear brackets. Weld it well, as ALL of the weight of the vehicle goes through this point. If I were going to do a car heavier than 2000 lbs, I'd reinforce the heck out of this point. A simple weld was sufficient for my car, however.
Congrats, you're halfway there!
Step 3 - Make the A-frames

Cut 8 pieces of 2x4 with a 45 degree angle, so that you have two pieces, the tip of the longer piece is 4'6", the shorter piece is 3'6".
Cut 4 pieces of 2x4 with a 45 degree angle at each end, so that the longest edge on each piece is 2'
You can use 2x4 lumber for this if you wish, but strength wise 1x4 is plenty strong for these pieces. I used lots more 2x4 than I needed because I already had it on hand. Cut a piece of 1x4 so you have 2 sections that are 4', cut another piece so you have 2 sections that are 1'6". You will have two pieces left that are 8'.
Place the 4'6" pieces on a flat surface, so that the angled end is pointing away and the other ends are touching at the corners. Stack an additional layer of 4'6" pieces on top of these and screw them down to the layer below. Make sure the two pieces are angled 90 degrees away from one another. On the angled edges, place the 8' section there, flush with the angled cuts. The tips of the pieces should be about 6' apart. Reconfirm the angles, and screw the crosspiece to the legs. Place the 1'6" piece at across the legs near the top, parallel to the bottom cross member. Make sure JUST the corners of the top of the legs meet, and screw the top cross member in place.

Repeat the above and you now have two sturdy triangles.
Place the 3'6" pieces on a flat surface, stacking them and screwing them together in layers of two. Raise the triangle, and place these foot pieces under the two 45 degree corners of the triangle. The feet will be toed in at a 45 degree angle to the cross member, and the 45 degree angled ends should have there flat faces toward the center, with slightly less than 4' between the tips of the feet. Screw the triangle to the feet.

Continued below...
How to build a CRX Rotisserie
Materials List:
* 4 - 48" square tube steel, 1"x1"
* 2 - 36" or 48" 1/2" x 1 1/4" channel steel (looks like a shallow U)
* 1 - 36" 1"x 1/4" bar steel
* 2 - 2" diameter pipe, 5" long
* 2 - 2 1/4" diameter pipe, 3 1/2" long
* 2 - 2"x12" sheet steel
* 9 - 2x4 x 8' lumber
* 5 - 1x4 x 8' lumber
* 1 - box of 3" drywall or deck screws
Step 1 - Prepare yourself and your CRX.
Learn how to weld, or get someone who can weld. Good welds are critical to your success with this project. They don't have to be perfect, just pretty good.
Take off as much weight as you can. A lighter car is safer for this project. Doors, the hatch, and the engine are good candidates for removal. I left the engine in for my project, because I had just put it in and didn't want to look like I had made a mistake! I also removed all the body panels as well as the interior, as I am doing rust repair with this rotisserie
Step 2 - Make a front and rear mounting brackets.
Start by taking the front bumper face, bumper, and bumper mounts off the car. Also remove the headlights, and anything else that looks like it might get in the way. The bumper mounts connect directly to the frame, and that is where the mounting bracket will support your car.
Cut four pieces of 1 x 1/4" steel bar to 4 1/2", and 2 pieces each of 1x1 square tube at 5" and 6 1/2". These will be the connection to the car. Drill a 3/8 hole 3 5/8 inches apart on the steel bars. Weld the square tube to the center of the bars, making a T out of each. Bolt them onto the frame where the bumper mount used to be, put the shorter tubes on the part that is raised. The tubes should end at about the same place in space. Cut two four pieces of 1 x 1/4" steel bar to 6", and weld them to the notch of each T for added rigidity.
(Picture note: while I used angle iron for extra support, the 1" bar would have been fine as well)
Take 2 1x1x48" square tubes and weld a 1 1/4" x 36" (or 48") channel bar between them, so the flat end is flush with the edges of the tubes. This will create a bumper like bar that is 48" long by 3 1/4" high. Place this between the tubs that are mounted to the frame, and weld them together.
Place a piece of 1" diameter material between a jack and the crossbar. Lift the car up by that crossbar, and then try to determine where the center of weight is for the front. Both wheels should lift and come down at the same time when lifted at the correct spot. Mine was slightly toward the driver's side of center.
For the rear cross-member, cut four pieces of 1 x 1/4" bar stock to 3 1/2". Drill two 3/8" holes 2 3/8" apart on two of the pieces. Attach it to the bumper mount. Take another 3 1/2" piece and create an L with it and the attached piece, so the leg of the L almost covers the third hole. Mark a line on that piece, then drill a 3/8" hole on that line in the center of the bar. Attach it to the third bumper hole, and weld the two bars together, careful not to weld them onto the frame.
Take a 1x1x48" square tube and weld a 1 and 1/4 inch x 36" (or 48") channel bar to it, so the flat end is flush with the edges of the tube.
Cut two pieces of 1x1 square tube to 4". Weld these onto the center of each foot of the L brackets. Weld the 48" tube and channel bar to this tube, matching the square tube to square tube, with the channel stock on top and flat side facing out.
Cut two pieces of 1x1/4 bar stock to 4 inches. Rest them on an angle between the long leg of the L and the tube and channel bar, and then weld it secure.
Mark on the rear bracket the point where a straight line from the front balance point would intersect the rear. It is important that this be as close to perfect as possible, so that when the vehicle is rotated, both rotation points are even and it rolls smoothly and doesn't bind. There is room for some error, but don't push it! The balance point for the rear is likely to be dead center, since it doesn't have a heavy slightly offset engine to pull either way. You don't want it dead center, you want it to match the front!
Weld on the 2" diameter x 5" pipes to the marked points on the front and rear brackets. Weld it well, as ALL of the weight of the vehicle goes through this point. If I were going to do a car heavier than 2000 lbs, I'd reinforce the heck out of this point. A simple weld was sufficient for my car, however.
Congrats, you're halfway there!
Step 3 - Make the A-frames
Cut 8 pieces of 2x4 with a 45 degree angle, so that you have two pieces, the tip of the longer piece is 4'6", the shorter piece is 3'6".
Cut 4 pieces of 2x4 with a 45 degree angle at each end, so that the longest edge on each piece is 2'
You can use 2x4 lumber for this if you wish, but strength wise 1x4 is plenty strong for these pieces. I used lots more 2x4 than I needed because I already had it on hand. Cut a piece of 1x4 so you have 2 sections that are 4', cut another piece so you have 2 sections that are 1'6". You will have two pieces left that are 8'.
Place the 4'6" pieces on a flat surface, so that the angled end is pointing away and the other ends are touching at the corners. Stack an additional layer of 4'6" pieces on top of these and screw them down to the layer below. Make sure the two pieces are angled 90 degrees away from one another. On the angled edges, place the 8' section there, flush with the angled cuts. The tips of the pieces should be about 6' apart. Reconfirm the angles, and screw the crosspiece to the legs. Place the 1'6" piece at across the legs near the top, parallel to the bottom cross member. Make sure JUST the corners of the top of the legs meet, and screw the top cross member in place.
Repeat the above and you now have two sturdy triangles.
Place the 3'6" pieces on a flat surface, stacking them and screwing them together in layers of two. Raise the triangle, and place these foot pieces under the two 45 degree corners of the triangle. The feet will be toed in at a 45 degree angle to the cross member, and the 45 degree angled ends should have there flat faces toward the center, with slightly less than 4' between the tips of the feet. Screw the triangle to the feet.
Continued below...
DarkHand
#11
Posted 20 June 2008 - 09:22 PM
-
- Leadfoot
-
- Group: 2018 Contributor
- Location:Chicago, IL
-
Drives: 1986 Honda CRX DX
-
Image Gallery
View Garage
Continued from above:
Place the 2' stabilizer sections at the pointed end of the feet, so they lean up to the legs. Screw them to the feet and the legs. Place the 4' section where the feet points connect to the stabilizers, on the stabilizers, and screw them down.


Repeat the above and you now have two sturdy A-frames. These frames should be stable any direction you try and push or pull them. There you be little or no movement when applying force to any section.
Take the 2 1/4” diameter x 3 1/2” pipe and lay it into the notch at the top of each frame. Secure these to the frame by welding a piece of sheet metal to the pipe and screwing the metal into the wood. This is a small safety measure in case of disaster.

Almost done! Now comes the delicate part.
Step 4 – Mount the car to the A-frames.
Attach the front and rear brackets to the car.
Using jack stands, cinderblocks, and a floor jack, CAREFULLY lift the car so the bracket axles will fit into the notch pipe. Lift each side only a few inches at a time to keep it level. Since this is higher than most jacks can lift, you will use the cinderblocks to extend the reach of the jack. If you raise it too much on one side, the jack stands may tip and dump your car! Slow and easy, keep it as level as you can. Always have a stand under each corner as you lift.
Once you are at the correct height at one side, slide the A-frame into place and screw on the 2” inch pipe end cap. Adjust the other side; slide the other A-frame into place and screw on the 2” inch pipe end cap. Slowly lower the car so it is resting on the A-frames, but do not take out the jack stands just yet. The car will want to roll to one side or the other; leave the jack stands on the side it wants to roll toward.
Step 5 – Roll the car.

If you balanced it correctly, the car will probably take 100 lbs at its heaviest point to roll, so it can be rolled by hand (use you legs to help). You want to keep the rollover controlled, so attach a pulley or winch system to a strong point in your garage and lower it from there. You can skip this if you have a strong friend helping you control the roll. Remove the last two jack stands and roll it over.

After the car is completely over (or at least at the angle you want it to be) you can use a piece of scrap lumber to brace the bracket to the A-frame. For safety sake, I strongly suggest using jack stands as an additional support around the engine bay.


That’s it! Now you can work on the exhaust, rusted frame, suspension, even pull the motor through the bottom of the car. Tires make a convenient step up while you work.

Place the 2' stabilizer sections at the pointed end of the feet, so they lean up to the legs. Screw them to the feet and the legs. Place the 4' section where the feet points connect to the stabilizers, on the stabilizers, and screw them down.
Repeat the above and you now have two sturdy A-frames. These frames should be stable any direction you try and push or pull them. There you be little or no movement when applying force to any section.
Take the 2 1/4” diameter x 3 1/2” pipe and lay it into the notch at the top of each frame. Secure these to the frame by welding a piece of sheet metal to the pipe and screwing the metal into the wood. This is a small safety measure in case of disaster.
Almost done! Now comes the delicate part.
Step 4 – Mount the car to the A-frames.
Attach the front and rear brackets to the car.
Using jack stands, cinderblocks, and a floor jack, CAREFULLY lift the car so the bracket axles will fit into the notch pipe. Lift each side only a few inches at a time to keep it level. Since this is higher than most jacks can lift, you will use the cinderblocks to extend the reach of the jack. If you raise it too much on one side, the jack stands may tip and dump your car! Slow and easy, keep it as level as you can. Always have a stand under each corner as you lift.
Once you are at the correct height at one side, slide the A-frame into place and screw on the 2” inch pipe end cap. Adjust the other side; slide the other A-frame into place and screw on the 2” inch pipe end cap. Slowly lower the car so it is resting on the A-frames, but do not take out the jack stands just yet. The car will want to roll to one side or the other; leave the jack stands on the side it wants to roll toward.
Step 5 – Roll the car.
If you balanced it correctly, the car will probably take 100 lbs at its heaviest point to roll, so it can be rolled by hand (use you legs to help). You want to keep the rollover controlled, so attach a pulley or winch system to a strong point in your garage and lower it from there. You can skip this if you have a strong friend helping you control the roll. Remove the last two jack stands and roll it over.
After the car is completely over (or at least at the angle you want it to be) you can use a piece of scrap lumber to brace the bracket to the A-frame. For safety sake, I strongly suggest using jack stands as an additional support around the engine bay.
That’s it! Now you can work on the exhaust, rusted frame, suspension, even pull the motor through the bottom of the car. Tires make a convenient step up while you work.
DarkHand
#12
Posted 20 June 2008 - 11:01 PM
-
- This thing should fit!
-
- Group: 2013 Contributor
- Location:opɐɹoloƆ 'suılloƆ ʇɹoℲ
Well, that's a testament to how light weight our cars are! Be careful people.
David
David
#13
Posted 22 June 2008 - 10:25 AM
-

- Honda
-
- Group: Super Administrators
- Location:Erin, ON
-
Drives: 2003 Jetta TDi, 1988 CRX Si
-
Image Gallery
View Garage
Back in the day, rpr and I built one out of old bedframes from my brother's firehall. Worked OK, but man, at one point it started to fail so I had to start welding and bracing in a hurry!! be careful!!

Civic Nation. Represent.
#14
Posted 22 June 2008 - 09:12 PM
-
- Leadfoot
-
- Group: 2018 Contributor
- Location:Chicago, IL
-
Drives: 1986 Honda CRX DX
-
Image Gallery
View Garage
QUOTE (Masta @ Jun 22 2008, 10:25 AM) <{POST_SNAPBACK}>
Back in the day, rpr and I built one out of old bedframes from my brother's firehall. Worked OK, but man, at one point it started to fail so I had to start welding and bracing in a hurry!! be careful!!
Bedframes and a welder... Is there anything they can't do?
 I just built a sheet metal bending brake out of welded bedframes myself! I'll have a mini writeup soon.
DarkHand
#15
Posted 28 June 2008 - 09:46 AM
-
- Slowpoke
-
- Group: Members
- Location:Ft. Collins CO
-
Drives: 87 crx dx (in a re-build phase); 02 Cadillac Escalade (gas hog) ; 03 Honda Accord V6 Coupe
QUOTE (firstgencrx @ Jun 20 2008, 09:01 PM) <{POST_SNAPBACK}>
Well, that's a testament to how light weight our cars are! Be careful people.
David
David
It's also a testament to how insanely overkill yours is!
just kidding. I think you could lift a school bus with yours  "Oversteer scares passengers, understeer scares drivers"
Freedom has a taste, a sweetness, that only those that have fought for it, know.


Community Forum Software by IP.Board
Licensed to: Red Pepper Racing