Jump to content


The Kakabox Build


  • You cannot reply to this topic
2000 replies to this topic

#361
kakabox

  • Turd Polisher
  • PipPipPipPipPip
    • Group: 2012 Contributor
    • Location:Seattle, WA 98115
    • Drives: from point 'A' to point 'B' daily.
    • Image Gallery
    Garage View Garage
QUOTE (Richard @ Jun 13 2006, 11:48 PM)
tyee rod ends? thats genius! im going to have to steal that one!

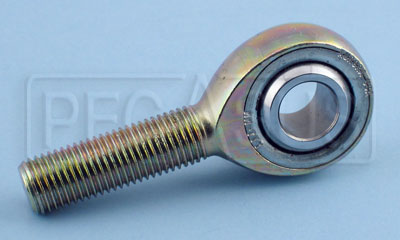
Well, not tie rod ends, but rather heim joints, or rose joints...rod ends...these:


...I purchased 3/8" stainless rod ends from: http://www.midwestcontrol.com/

Cheers! cool.gif

#362
RineRacing

  • Slowpoke
  • PipPip
    • Group: Members
This is simply the best build thread I have read in a long time. Excellent attention to detail.

My only complaint is not enough pictures of that cat! tongue.gif

#363
bigk3000

  • 1337 5h17
  • PipPipPipPipPip
    • Group: Members
    • Location:Langley BC Canada
    • Drives: 84 Civic Hatch 1500 S with D16A1 blacktop
    • Image Gallery
i think you should have built one of those car rotators liek AREN D built, so you could roll the car over and blast / re paint the undercoating.. its the only thing on your car that isnt spotless and redone...

I dont even own my civic anymore.. its posts like this that keep me comming back to this site
EXPLOSIVO!
84 Civic Hatchback 1500S-w/ d16 blacktop :P
86 Nissan 300zx GLL

user posted image

SportInjectedClub
user posted image

#364
3gencivic

  • civics rule
  • PipPipPipPipPip
    • Group: Contributing Member
    • Location:chilliwack BC
    • Drives: 01 jimmy4x4, 92 ranger custom longbox 2wd
yes not to get extra posting numbers but its a great build thread and it should get pined or stickyed when it sall done for all to find theres so much info on this thread.

keep up the good work

#365
kakabox

  • Turd Polisher
  • PipPipPipPipPip
    • Group: 2012 Contributor
    • Location:Seattle, WA 98115
    • Drives: from point 'A' to point 'B' daily.
    • Image Gallery
    Garage View Garage
Thanks for the kind words guys. blush.gif

I got to tell you, I'm having a lot of fun w/the KAKAbuild and an equal amt of fun posting the build on this thread! smile.gif So, yeah, it's fun for me and hopefully other peeps can use/copy the info to their benefit.

Yup, this is a great site and Tom (rpr) deserves kudos (and/or 'mad props') for creating/maintaining it! Thanks Tom!

#366
jjamiemmark

  • Spit pop bang
  • PipPipPipPip
    • Group: Contributing Member
    • Location:Ottawa,Ontario
    • Drives: 86 CRX,91 CRX SI
    Garage View Garage
ya thats a double props to tom what a site! biggrin.gif
05192012083.jpg

#367
crxls

  • corvette contender
  • PipPipPipPipPip
    • Group: Contributing Mod
    • Location:Hanover Pennsylvania
    • Drives: your car if i find the keys
    • Image Gallery
QUOTE (kakabox @ Jun 14 2006, 01:31 AM)


WTF? i count 8 jackstands blink.gif

i guess you can never be too safe wink.gif

great build!!!
When I die, i want to go asleep peaceful.......... not screaming and freaking out like everyone else in the car

"i left the bar a little after you and ended up flipping my car in the arbys drive thru"


QUOTE (cbstdscott @ Dec 10 2008, 03:27 PM) <{POST_SNAPBACK}>
Another loser who can not get traction. I feel sorry for him.

IM A LOSER!!! my car pulls harder when spinning than any "highly modified" EW


Team BUrnOUt founding member

#368
kakabox

  • Turd Polisher
  • PipPipPipPipPip
    • Group: 2012 Contributor
    • Location:Seattle, WA 98115
    • Drives: from point 'A' to point 'B' daily.
    • Image Gallery
    Garage View Garage
QUOTE (crxls @ Jun 15 2006, 09:56 PM)
QUOTE (kakabox @ Jun 14 2006, 01:31 AM)


WTF? i count 8 jackstands blink.gif

i guess you can never be too safe wink.gif

great build!!!


4 to hold the car up, 2 to hold the axle at anticipated ride height (notice no springs or dampers)...and 2 to confuse the viewer! laugh.gif

...oh, and I have another set (not shown in the pic) that I can use too!

Yes, must be safe. wink.gif

Edited by kakabox, 16 June 2006 - 08:33 AM.


#369
kakabox

  • Turd Polisher
  • PipPipPipPipPip
    • Group: 2012 Contributor
    • Location:Seattle, WA 98115
    • Drives: from point 'A' to point 'B' daily.
    • Image Gallery
    Garage View Garage
...more rear stabar stuff:

Modified (shorted) the ES stabar bushing brackets so that the ears wouldn't stick out so much. Welded a plate to a 2" muffler clamp for the bushing support. Two inch muffler clamps are a perfect fit for the HF axle; the Si axle is ~0.30" larger in dia, so perhaps a 2 1/4" muffler clamp would work for that axle.


After removing the paint from the axle in the stabar mount areas, I positioned the stabar again, torqued down the muffler clamp (bracket) nuts, then remove the whole axle/stabar unit from the car to weld the muffler clamps to the axle. Originally I was only going to tack weld the clamps to the axle...guess I got carried away! I don't think the stabar mounts are moving any time soon! blink.gif


...both the 'U' bolt and the bracket are welded to the axle, yeah, probably overkill, but, I love to weld! wink.gif


Cleaned up the welds and painted the welded areas w/Rustoleum...it's shiny in the pic because it's just painted; it'll be semi-gloss after drying overnight.


More rear axle news: I got the rear dampers today! cool.gif


Cheers! cool.gif

#370
duukiey

  • Slowpoke
  • PipPip
    • Group: Members
    • Location:Calgary area
    • Drives: 87 crx
WOW, i wish i had te room an time to do even 1/4 of what you have done hear, it is all great and shows me how to do stuff, great read and wonderful info given, thanx...

-mike-

#371
kakabox

  • Turd Polisher
  • PipPipPipPipPip
    • Group: 2012 Contributor
    • Location:Seattle, WA 98115
    • Drives: from point 'A' to point 'B' daily.
    • Image Gallery
    Garage View Garage
For those peeps concerned about the clearance btwn my phb mount brace and the axle beam, here's a pic showing the min clearance with the axle on the bump stops: 0.50"


...no worries mates! tongue.gif

A couple of months ago, I was fortunate enough to be able to buy an unused rpr adj phb! smile.gif I installed it last night...here are some pics of it in all it's rod-ended, stainless steel, TIG welded glory!


Cheers! cool.gif

#372
Aren D.

  • Save the pepper, save the world.
  • PipPipPipPipPip
    • Group: 2013 Contributor
    • Location:Tooele UT
    • Drives: 1985 CRX SI/2003 Frontier SC/2006 Jetta TDI/2014 Civic SI
    • Image Gallery
    Garage View Garage
Your project is looking really good man, awsome work and super clean! I love seeing all you fab parts and mods.

#373
kakabox

  • Turd Polisher
  • PipPipPipPipPip
    • Group: 2012 Contributor
    • Location:Seattle, WA 98115
    • Drives: from point 'A' to point 'B' daily.
    • Image Gallery
    Garage View Garage
QUOTE (Aren D. @ Jun 17 2006, 03:07 AM)
Your project is looking really good man, awsome work and super clean! I love seeing all you fab parts and mods.

Hey, thanks Aren...when are you getting back to Cali to work on your project? I look fwd to seeing updates on your build thread too.

Cheers! cool.gif

#374
kakabox

  • Turd Polisher
  • PipPipPipPipPip
    • Group: 2012 Contributor
    • Location:Seattle, WA 98115
    • Drives: from point 'A' to point 'B' daily.
    • Image Gallery
    Garage View Garage
Weight Reduction and Mini Battery Tray Fab:

Here's a comparison of the stock 3g battery and the Mr. Disability 'NRG' Cell battery...28 lbs. for the stocker, 11.1 lbs. (digital scale) for the mini-me:


The mini battery is lxndr's. I don't have one, yet! The oem battery tray is entirely too large and cumbersome to use...lxndr and I tried, but, we couldn't come up w/a satisfactory way to use the stock battery tray, have the mini-me secure and not look like ass! blink.gif Believe me I really tried to use the stock tray...all the while lxndr was patiently and politely saying: "I think we should just make a completely new tray for it..." After what seemed like several hours staring at it, I said the same! blink.gif

Since I intended to use a 'NRG' mini battery too, I made a two trays, one for 'xndr and one for me.

The mini battery tray goes in the stock battery tray location and uses the stock captured nuts on the passenger side frame rail...no new holes need to be drilled.


After some careful measuring, pieces for the tray base were cut:


...and welded together:


Amazing, after cutting pieces, welding together, the battery still fits nicely inside:


...and still bolts up to the existing locations:


The battery is cantillevered off of the frame rail, so, just like the oem battery tray, two "diagonal" braces were welded on to react the overturning moment:


Two 1/4 in. coupling nuts were welded on for the hold down bolts:


...continued...
#375
kakabox

  • Turd Polisher
  • PipPipPipPipPip
    • Group: 2012 Contributor
    • Location:Seattle, WA 98115
    • Drives: from point 'A' to point 'B' daily.
    • Image Gallery
    Garage View Garage
...mini-me battery tray fab continued:

Two completed trays:

...two stainless steel 1/4 bolts are used to hold the battery down against the base.

The final tray w/the battery lashed down!


...and here's lxndr carrying his home!


The KAKATRAY ( rolleyes.gif ) weighs in at 1 lb, 8 oz...the oem tray weighs 14 oz.

Total weight saving: 16.9 lbs. battery - ~1 lb. tray = 16 lbs.

Cheers! cool.gif