Jump to content


The Kakabox Build


  • You cannot reply to this topic
2000 replies to this topic

#136
chedda_j

  • Lives to modify
  • PipPipPipPipPipPip
    • Group: Vendors
    • Location:Cranbrook, B.C, Canada
    • Drives: 1986 Honda Civic 2.2L LSD, Acura TL Aspec
    Garage View Garage
QUOTE (kakabox @ Feb 14 2006, 11:27 PM)
More weight savings:

Removed the front bumper cover to expose the steel front bumper beam:

...20 lbs. of steel beam and struts:


I started chopping off everything that I didn't need to mount the bumper and/or maintain it's shape:


...and ended up w/only this:

Next up, the 6 lb. bumper struts:


...I welded up some 1 x 1 x .065 RHS steel to replace the struts.  These turned out weighing only 1 lb. for the pair!


...the holes are for water drainage; the tube will be horizontal when installed:


Here's all the pieces to the new light weight front bumper "beam" on the scale: 4.5 lbs. total...a 15.5 lb. reduction!
...and here's the new "beam" installed.  I left the bumper's upper stiffener intact to help maintain the bumper's shape:


...and here's the 15.5 lbs. I removed, ready for the scrap heap!


I'll do the same thing to the rear bumper for a ~30 lb. total reduction!

Cheers!  cool.gif


I really really hope you dont hit anything. Good luck buddy. Those bumpers look so wierd cause i have a DX bumper on my sedan or a GL in laymans terms. They dont have those big ends on them. But they are heavy as fuck. I might cut mine too. Never know.

10395168_748294558578686_901304337744719


#137
gkiing

  • In the left lane
  • PipPipPip
    • Group: Members
the bumpers only do anything up till around 10mph. After that the frame/engine begins bending to absorb the impact. And hopefully you dont get bent in the process.

But yes, a fender bender will turn into a frame bender in a car without bumpers.

#138
kakabox

  • Turd Polisher
  • PipPipPipPipPip
    • Group: 2012 Contributor
    • Location:Seattle, WA 98115
    • Drives: from point 'A' to point 'B' daily.
    • Image Gallery
    Garage View Garage
"Good luck buddy" biggrin.gif ...thanks!

Yes, I agree: don't really want to hit anything going more than 2 mph! The KAKABOX project isn't about making a safe/comfortable dd, it's about taking a FREE pos and making a light weight, fun to drive ax and ot car that's still street licensed and looks kinda cool. If I do hit something, I'm hoping it's only an ax cone! wink.gif

#139
racelife

  • need more speed!
  • PipPip
    • Group: Members
    • Location:SLC. Utah
    • Drives: 86rex(bad comp), 90rex(blown head), 90teg(no engine), 90accord(wifes), 98civic 4dr.ex(dd) and a heap of broken 1st and 3rd gens.
a true insperation.
biggrin.gif

#140
87CrxType-one

  • Loving the 1g's and 3g's
  • PipPip
    • Group: Members
    • Location:Kennewick, Washington
    • Drives: 87crx si, and my beautiful 76 gas station orange 1980 plymouth arrow pickup, oh yeah baby!!!!!!!
    • Image Gallery
Awesome....Like everything thing you have done. SUperb biggrin.gif

#141
lxndr

  • All work and no play makes LXNDR a dull boy. All work and no...
  • PipPipPipPipPip
    • Group: Members
QUOTE (kakabox @ Feb 14 2006, 10:27 PM)


What are those two odd sized holes in one of your cut down bumper brackets for?

#142
kakabox

  • Turd Polisher
  • PipPipPipPipPip
    • Group: 2012 Contributor
    • Location:Seattle, WA 98115
    • Drives: from point 'A' to point 'B' daily.
    • Image Gallery
    Garage View Garage
QUOTE (lxndr @ Feb 15 2006, 06:43 PM)
QUOTE (kakabox @ Feb 14 2006, 10:27 PM)


What are those two odd sized holes in one of your cut down bumper brackets for?


...what holes? All I see are red x's... laugh.gif

wink.gif

Edited by kakabox, 15 April 2006 - 12:32 PM.


#143
lxndr

  • All work and no play makes LXNDR a dull boy. All work and no...
  • PipPipPipPipPip
    • Group: Members
smile.gif

That's what I'm here for!

#144
kakabox

  • Turd Polisher
  • PipPipPipPipPip
    • Group: 2012 Contributor
    • Location:Seattle, WA 98115
    • Drives: from point 'A' to point 'B' daily.
    • Image Gallery
    Garage View Garage
Firewall/Fender Truss for the KAKABOX:

After seeing the fender brace thread: http://www.redpepper...e...st&p=191692
...I thought this would be an easy, unobtrusive way to get a little more bending stiffness in the shock tower to firewall connection. By adding a gusset btwn the frame rail and the firewall, it will, at least in theory, stiffen (reduce the deflection) the frame rails cantilevered off of the firewall. This is a load path for some of the front end chassis loads that are reacted into the firewall bulkhead. Any stiffening in this area should provide some benefit in the handling performance of the front suspension by providing it w/a firmer platform, thus reducing geometry changes under load. This is the theory anyway.

But, also, if you're thinking of doing this mod, keep in mind that the frame rail you're stiffening is part of the front end's crush zone. By adding stiffness to this rail, in a front end collision, you could potentially cause more impact energy to be transferred into the cockpit. Anyway, just some thoughts to keep in mind if you're planning on doing this to your dd.

Anywhoooo, on w/the mod!

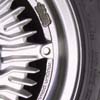
First off was the removal of the front fender inside liner where I was treated to a constant shower of debris word to the wise: wear safety glasses and keep your "pie hole" closed! After removing the liner and then the fender, I swept up the fallen debris and found that I had ~ 1 lb. of sand/leaves/pebbles hiding inside my fender!


I cleaned up under the fender and tacked on the liner to see the area I had to work with. Placement of the truss bars is critical for fender/liner clearance; I don't want the liner or the fender to rub on the truss.


I wanted to take advantage of the door hinge hard points, so, I made some hinge plates (.125" mild steel plate) that attach w/the oem hinge bolts. For mounting the plates, I used the two lower hinge bolts but only the lower bolt of the upper hinge. I didn't make that bolt common to the truss so that I can remove it w/o the door falling on the ground! The vertical member of the truss was welded to the hinge plates.

The truss is removable; a bolt on design was employed. The truss diagonal will connect to the lwr section of the vertical member and go up and fwd to the upper chassis section...I'll be using a bolted connection here, so I needed to add some "nutserts" to the upper frame rail. I need enough fasteners to ensure good load transfer; holes (5/8" dia) for the welded in 3/8" nutserts:


...this were located on a flat surface and there are doubled up sheet metal panels in this locn making it a stiffer place to weld in the nutserts. Here are the nuts welded in; the center one I've already filed down flat. All the welds were filed flat so that the bracket fits flush on the chassis:


Next up is fabbing the frame rail bracket. It's made from a 4.25 long section of a 2 x 2 x .125 mild steel angle...a quick paper template to capture the "nutsert" positions:


Then with some hack sawing, grinding, drilling, repeated mock-ups and lots of careful measurements to ensure that the bracket flange doesn't hit the inner fender (it did, so I trimmed it accordingly)...here's the frame rail bracket mounted to the chassis:


The diagonal member is welded to the lower portion of the door hinge tube and the frame rail bracket. An angle of 45* was chosen for the diagonal member. After a mock-up to ensure that the diagonal clears the fender liner (it does by ~ .25"), the diagonal is tack welded in place:


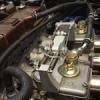
In order for the truss to be as close as possible and run parallel to the frame rail, I found I had to flatten slightly the frame rail's diagonal stiffening bead. Also, for the truss's horizontal member to connect w/the fender bracket, I had to cut away the lower portion of a sheet metal collector flange (three sheet metal panels are joined together to form a flange). This flange joint consists of three spot welds; I cut away the lower section leaving only two. I don't feel bad cutting out a spot welded portion as the lost area is more than replaced by the truss. Here's the area before flattening and clearancing:


...and after flattening w/a BFH and clearancing w/die grinder:


...to be continued next post...

Edited by kakabox, 12 March 2008 - 11:01 PM.


#145
kakabox

  • Turd Polisher
  • PipPipPipPipPip
    • Group: 2012 Contributor
    • Location:Seattle, WA 98115
    • Drives: from point 'A' to point 'B' daily.
    • Image Gallery
    Garage View Garage
...so all there was left to do was to tack in the horizontal member in place:


The truss was then removed from the car and the welds completed. I alternated welding the three joints to prevent out-of-plane warping. The completed truss weighs 3 lbs…all the axial members are made from 1 x 1 x .065 RHS mild steel:


Here is the completed truss in situ:


…and a profile view:


…and here it is showing its relationship to the inner fender liner…clearance is ~.25” btwn the diagonal bar and the liner:


Next up is painting the truss and final instl. I’ll also take a pic of the truss from inside the fender well, showing the relationship of it w/the fender.

Cheers! cool.gif

Edited by kakabox, 15 April 2006 - 12:09 PM.


#146
badpenny

  • tinker, tinker....BOOOOOOM!!!! then I run around
  • PipPipPipPipPipPip
    • Group: Contributing Mod
    • Location:Hurst, Texas
    • Drives: Don't, because they don't run and I am a crappy mechanic.
    • Image Gallery
    Garage View Garage
Man, great thread, Loving it, absolutley loving it.
Honda, because it's hard to look baller in your mom's Volvo.Posted Image 
The entire tool selection at Sears or the contents of a Snap-On truck will do you no good if you do not know how to use them.

#147
racelife

  • need more speed!
  • PipPip
    • Group: Members
    • Location:SLC. Utah
    • Drives: 86rex(bad comp), 90rex(blown head), 90teg(no engine), 90accord(wifes), 98civic 4dr.ex(dd) and a heap of broken 1st and 3rd gens.
exelent stuff!

#148
mindlessracing

  • In the left lane
  • PipPipPip
    • Group: Members
    • Location:western south dakota
    • Drives: 05 gmc sierra; 97 teg h22 turbo; 87 crx hf; 90 300zx tt
    • Image Gallery
after reading the 11 pages.........all i have to say is........

damn, you are doing a great job, very nice cleaning and excellent designs and records of weight.

i am no where near that crazy on my 86 si hatch.........mostly just my gsr (and i sure didn't get that for free like you did! lol)

i just wish i could pick up 1g tegs or even 3g civics around here like you guys do........it suxs.

keep the info/pics coming.
user posted image

#149
Aren D.

  • Save the pepper, save the world.
  • PipPipPipPipPip
    • Group: 2013 Contributor
    • Location:Tooele UT
    • Drives: 1985 CRX SI/2003 Frontier SC/2006 Jetta TDI/2014 Civic SI
    • Image Gallery
    Garage View Garage
dude I love your build, its badass.

#150
strudel

  • Leadfoot
  • PipPipPipPipPip
    • Group: 2011 Contributing Member
    • Location:Edmonton, AB
    • Drives: 2009 AUDI TT 3.2L, Project Teg powered Austin Mini Van
    • Image Gallery
Have a look at This Site for some pictures of bracing. It's in Products and then the subaru section under suspension. If it doesn't work there is a link in the bottom left corner for a flash update and then it loads up OK. JS

Edited by strudel, 25 February 2006 - 02:05 AM.

If you want one of these Logos send me a PM

aan.jpg


Austin Mini Van with DOHC Honda HP
http://www.angelfire.com/droid/strudel
Honda reliability and power combined with Mini cachet and style.