 Sign In
 Create Account
Great work as always. So, I'm guessing based on all of this: CC plates + (TEIN + remote strut adjusting kit) = no go. One day I hope to have a nice car like yours.

The Kakabox Build
Started by kakabox, Sep 23 2005 04:31 PM
2000 replies to this topic
#1156
 Posted 23 January 2008 - 12:14 PM
-
- Project CI2-VIC Team Lead
-

- Group: 2012 Contributor
- Location:Eastern NC
-
Drives: 16 Ford RS, 84 Civic 2000S (B20Z2), 98 Civic EX
-
Image Gallery
 View Garage
 Back to top
#1157
Posted 23 January 2008 - 04:27 PM
-
- Can't stay off the race track!
-
- Group: 2010 Contributing Member
- Location:Maine
-
Drives: 1993 Civic EX Track Car, 1987 Crx Si Ice Racer, 1990 CRX Si Track Car, 2004 Dodge Durango
That is outstanding, you have turned what was already the fastest car in your club into a faster car over the winter. I can only imagine the carnage at the first event! You need to go national in SM!
#1158
Posted 23 January 2008 - 06:32 PM
-

- Leadfoot
-
- Group: 2011 Contributing Member
- Location:Edmonton, AB
-
Drives: 2009 AUDI TT 3.2L, Project Teg powered Austin Mini Van
-
Image Gallery
QUOTE (jsgprod @ Jan 23 2008, 09:28 AM) <{POST_SNAPBACK}>
Actually JS, lowering the strut in the spindle won't affect the ride height at all. That's done by the springs, or torsion bars in our case. 
Jay
Jay
Am I off today or what? Should have not stayed up so late or stayed in bed this morning! When the brain goes off before it's put in gear funny things happen.

I like my hood bump idea for the top of the struts. Didn't I see something like that on this site somewhere. Maybe I'm still in bed and dreaming. JS
If you want one of these Logos send me a PM
Austin Mini Van with DOHC Honda HP
http://www.angelfire.com/droid/strudel
Honda reliability and power combined with Mini cachet and style.
#1159
Posted 23 January 2008 - 10:59 PM
-
- Turd Polisher
-
- Group: 2012 Contributor
- Location:Seattle, WA 98115
-
Drives: from point 'A' to point 'B' daily.
-
Image Gallery
View Garage
Screech:
Thanks.
Yes, I don't think you'll be able to fit the TEIN "remote strut adjusting kit" on top of the struts and close the hood using David's CC plates...unless you 'ventilate' the hood ala strudel (or Mitsu VR3000GT...see/read below)!
Maine_Honda_Racer:
Yes, the K'box goes pretty well...I established that fact last year. The driver needs to catch up w/it, however. Dialing in the suspension (proper tire pressures, rear stabar setting and TEIN damper settings) and getting the driver faster are this year's goals...oh, yeah, and having fun! This year I'll be able to run the full year on the Kumho V710's...I can't wait!
David,
You're welcome.
Yes, the 'stack-up' of your CC plates is greater than the OEM mounts, therefore the top of the strut is higher under the hood.
strudel:
Yeah, that could be a interesting design detail. The '90-'93 Mitsu VR3000's had 'pods' on the hood for that very reason.

...actually the pods were there "to accommodate the ECS controllers at the top of the strut turrets."
Fortunately I have hood clearance, so no pods for me!
Cheers!
Thanks.
Yes, I don't think you'll be able to fit the TEIN "remote strut adjusting kit" on top of the struts and close the hood using David's CC plates...unless you 'ventilate' the hood ala strudel (or Mitsu VR3000GT...see/read below)!
Maine_Honda_Racer:
Yes, the K'box goes pretty well...I established that fact last year. The driver needs to catch up w/it, however. Dialing in the suspension (proper tire pressures, rear stabar setting and TEIN damper settings) and getting the driver faster are this year's goals...oh, yeah, and having fun!
This year I'll be able to run the full year on the Kumho V710's...I can't wait!David,
You're welcome.
Yes, the 'stack-up' of your CC plates is greater than the OEM mounts, therefore the top of the strut is higher under the hood.
strudel:
Yeah, that could be a interesting design detail. The '90-'93 Mitsu VR3000's had 'pods' on the hood for that very reason.
...actually the pods were there "to accommodate the ECS controllers at the top of the strut turrets."
Fortunately I have hood clearance, so no pods for me!
Cheers!

#1160
Posted 04 February 2008 - 02:32 AM
-
- Turd Polisher
-
- Group: 2012 Contributor
- Location:Seattle, WA 98115
-
Drives: from point 'A' to point 'B' daily.
-
Image Gallery
View Garage
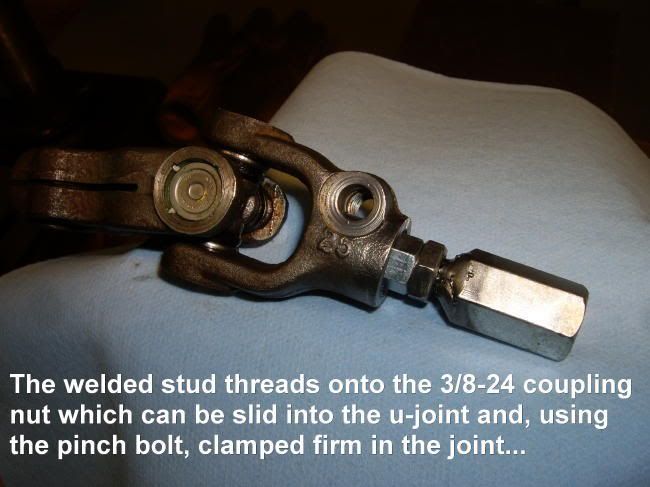
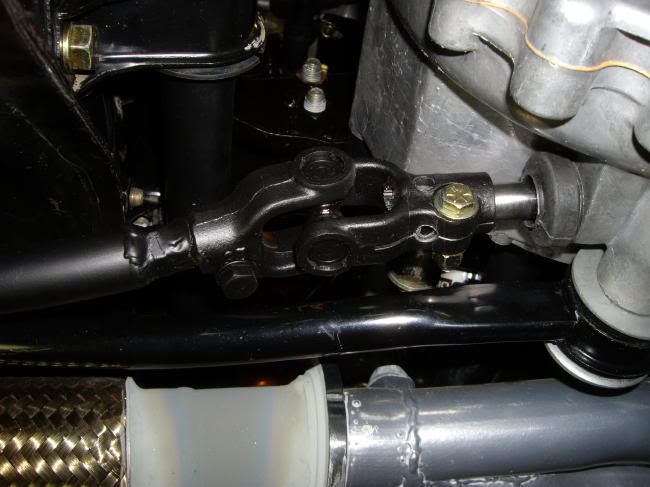
Steering U-Joint Shift Linkage:
As sexy as the Kakashifter is, it's long length, besides attracting the ladies, also amplifies any slop in the shift linkage. So, I wasn't too surprised when I sat in the driver's seat shifting the gears to find the Kakashifter had a wee bit 'o slop.
Gee, who would of thought a 21 year old shift linkage w/a 16" shift lever on top might have a little play in it!
I decided to do something about it.
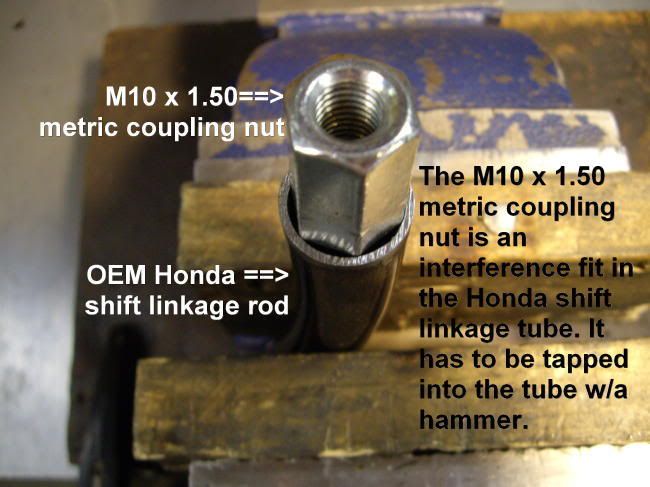
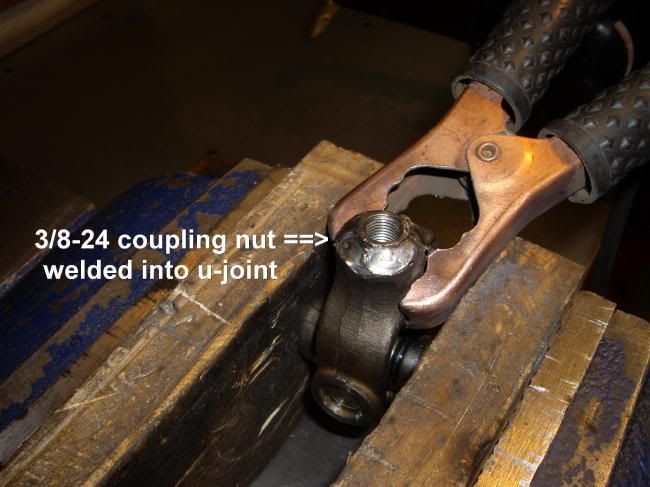
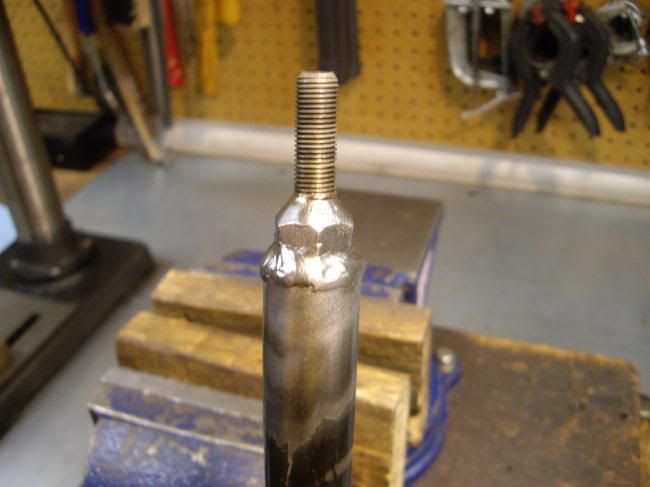
I got under the car and found that 99% of the free play in the K'box's shift linkage came from the shift rod to transaxle joint...this thing:
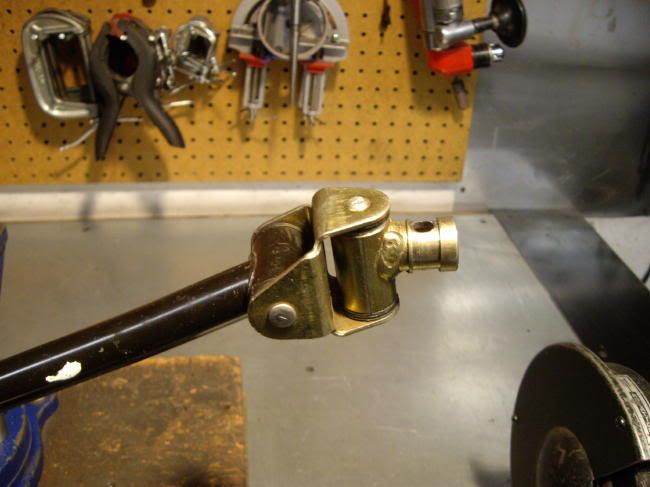
I remembered lxndr (remember him?) telling me a couple years ago that people have used the manual steering rack u-joint as a replacement for this joint, and, imagine that, I just happen to have a spare HF steering rack u-joint in my pile of goodies (btw, any 1/3g manual rack u-joint will work). This u-joint has no play whatsoever.
A quick mock up on a spare D16 'teg tranny I have (this mod will work on the D15 trans also) showed that the u-joint just might work. The fit over the tranny's shift shaft was loose, but, after pinching the u-joint attach neck closed a little in a vise, it became a very tight fit. Now, how to attach it to the trans and to the shift linkage rod...?
I searched and couldn't find any pics or a good explanation of how to take the splined, pinch-bolted, steering u-joint and attach it to the OEM shift linkage...so, I came up w/my own way.
Here's how I did it:
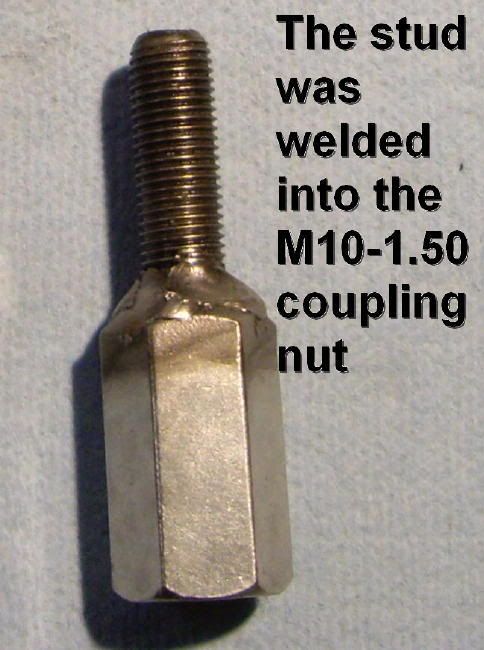
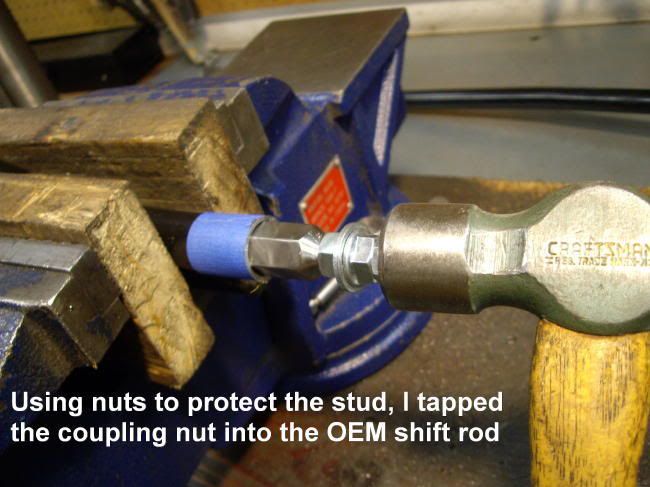
I knew was that a M10-1.50 hex coupling nut will fit, if given enough persuasion, the ID of the cut OEM shifter rod. I knew this from my Kakashifter build. So I could "pin 'n socket" weld in a coupling nut in the cut shifter rod, but then how to attach that to the u-joint, and the u-joint to the transaxle shift shaft...
...I'll let the pics explain!
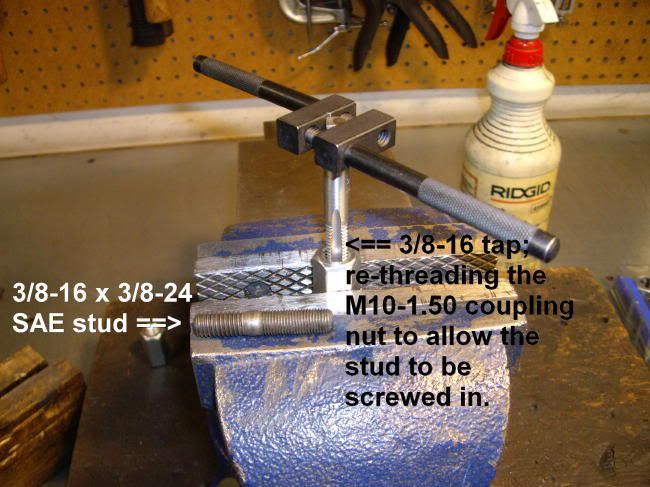


...yup, I can never just post-up in one...it's continued!
As sexy as the Kakashifter is, it's long length, besides attracting the ladies, also amplifies any slop in the shift linkage. So, I wasn't too surprised when I sat in the driver's seat shifting the gears to find the Kakashifter had a wee bit 'o slop.
Gee, who would of thought a 21 year old shift linkage w/a 16" shift lever on top might have a little play in it!
I decided to do something about it.
I got under the car and found that 99% of the free play in the K'box's shift linkage came from the shift rod to transaxle joint...this thing:
I remembered lxndr (remember him?) telling me a couple years ago that people have used the manual steering rack u-joint as a replacement for this joint, and, imagine that, I just happen to have a spare HF steering rack u-joint in my pile of goodies (btw, any 1/3g manual rack u-joint will work). This u-joint has no play whatsoever.
A quick mock up on a spare D16 'teg tranny I have (this mod will work on the D15 trans also) showed that the u-joint just might work. The fit over the tranny's shift shaft was loose, but, after pinching the u-joint attach neck closed a little in a vise, it became a very tight fit. Now, how to attach it to the trans and to the shift linkage rod...?
I searched and couldn't find any pics or a good explanation of how to take the splined, pinch-bolted, steering u-joint and attach it to the OEM shift linkage...so, I came up w/my own way.
Here's how I did it:
I knew was that a M10-1.50 hex coupling nut will fit, if given enough persuasion, the ID of the cut OEM shifter rod. I knew this from my Kakashifter build. So I could "pin 'n socket" weld in a coupling nut in the cut shifter rod, but then how to attach that to the u-joint, and the u-joint to the transaxle shift shaft...
...I'll let the pics explain!
...yup, I can never just post-up in one...it's continued!
#1161
Posted 04 February 2008 - 02:33 AM
-
- Turd Polisher
-
- Group: 2012 Contributor
- Location:Seattle, WA 98115
-
Drives: from point 'A' to point 'B' daily.
-
Image Gallery
View Garage
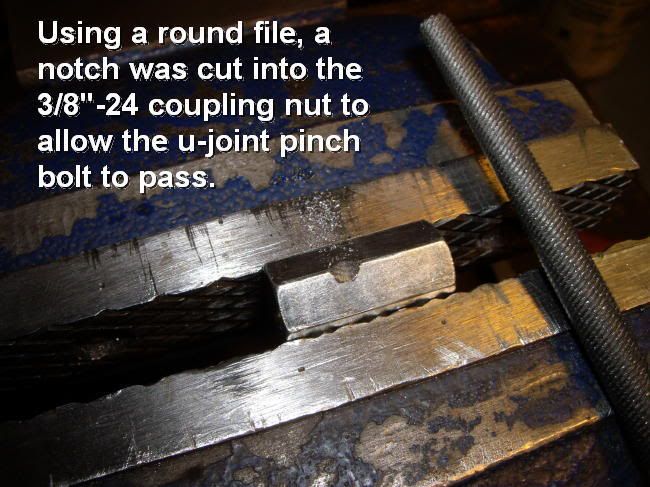
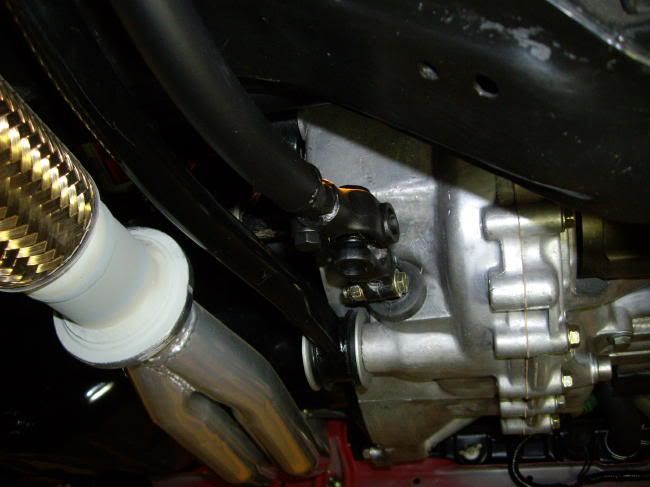
Steering U-Joint Shift Linkage...continued...
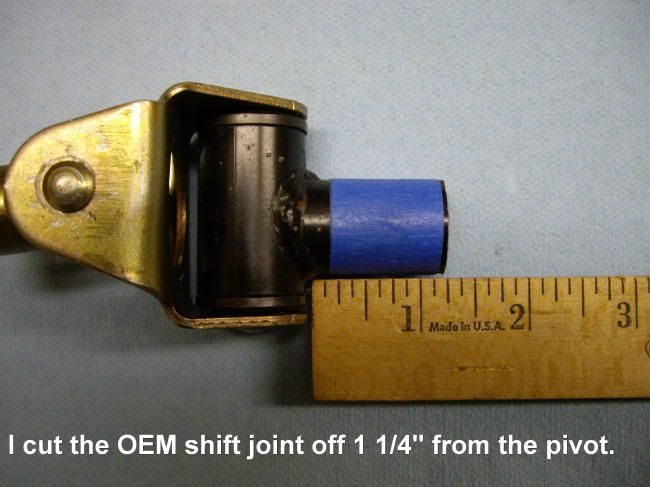
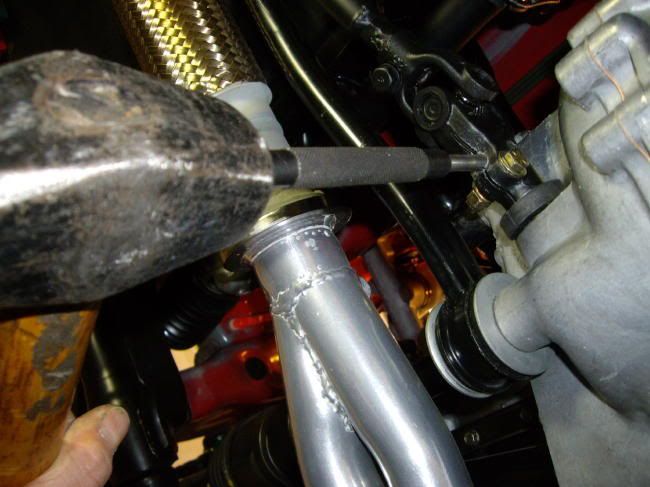
After cutting off the OEM transaxle shifter joint there was no turning back!

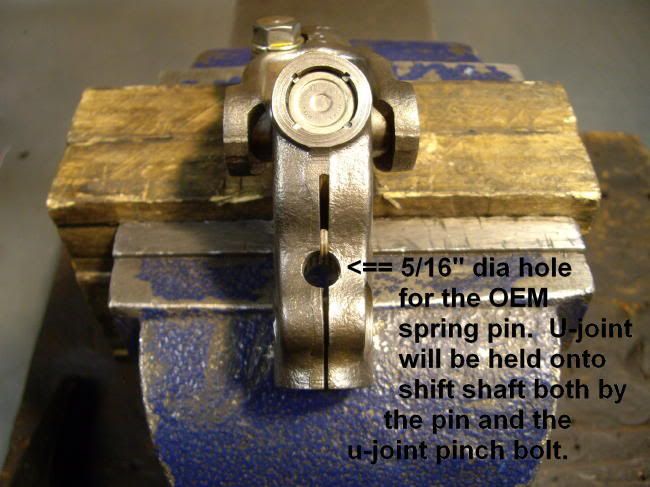
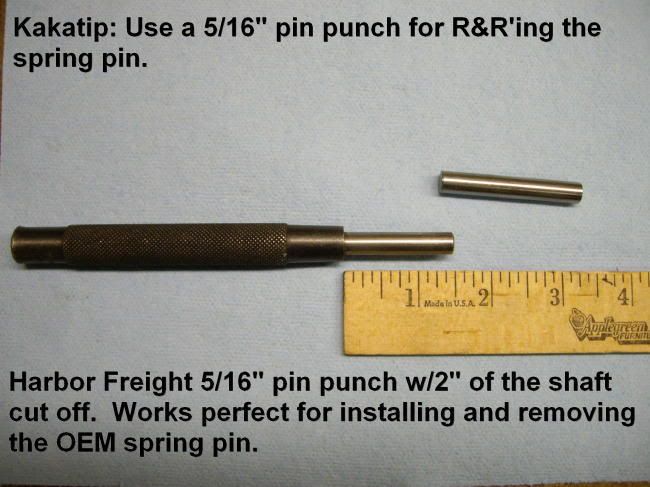
Next was drilling the spring pin (aka, the "bitch-pin") hole in the tranny side of the u-joint:
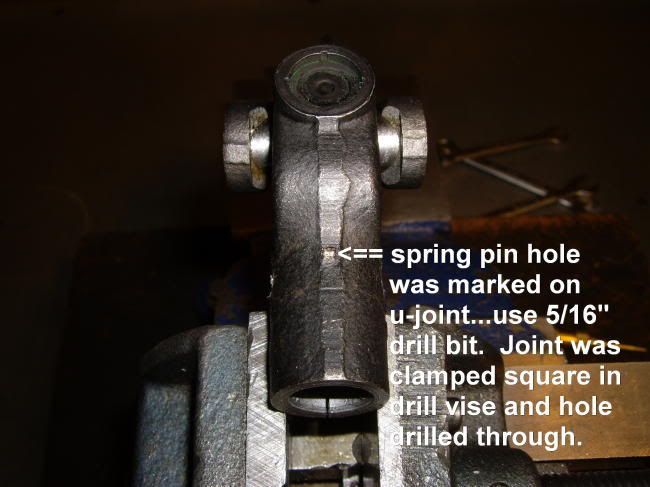
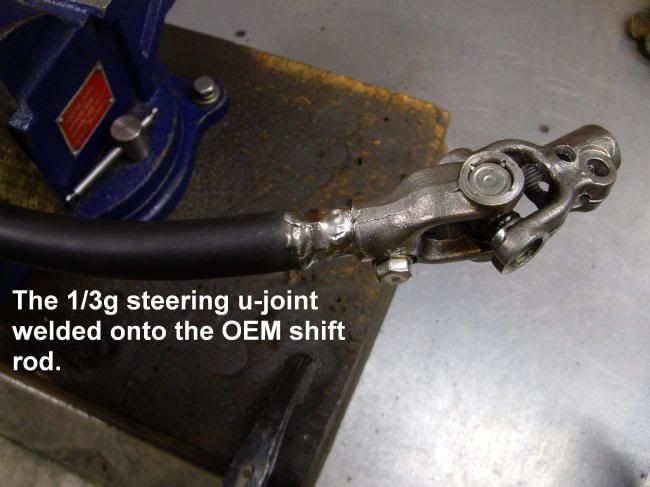
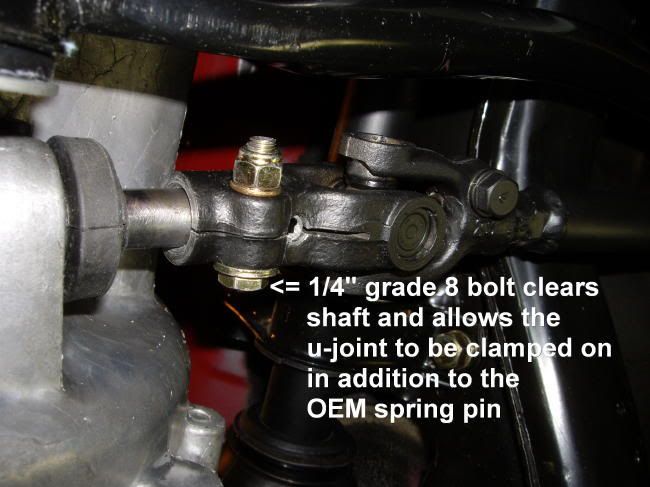
Then I mocked up the linkage on the car, attached the u-joint to the transaxle, then rotated the shift rod (it still could be rotated on the stud) until the shift rod and the Kakashifter were properly orientated. I marked the orientation on the shift rod to u-joint stud connection, remove it from the car and welded it up on the bench:
People, don't fear the "bitch-pin"...Honda used it for a reason:

See, easy-peasy!
...more...
After cutting off the OEM transaxle shifter joint there was no turning back!
Next was drilling the spring pin (aka, the "bitch-pin") hole in the tranny side of the u-joint:
Then I mocked up the linkage on the car, attached the u-joint to the transaxle, then rotated the shift rod (it still could be rotated on the stud) until the shift rod and the Kakashifter were properly orientated. I marked the orientation on the shift rod to u-joint stud connection, remove it from the car and welded it up on the bench:
People, don't fear the "bitch-pin"...Honda used it for a reason:
See, easy-peasy!
...more...
#1162
Posted 04 February 2008 - 02:34 AM
-
- Turd Polisher
-
- Group: 2012 Contributor
- Location:Seattle, WA 98115
-
Drives: from point 'A' to point 'B' daily.
-
Image Gallery
View Garage
Steering U-Joint Shift Linkage...continued...
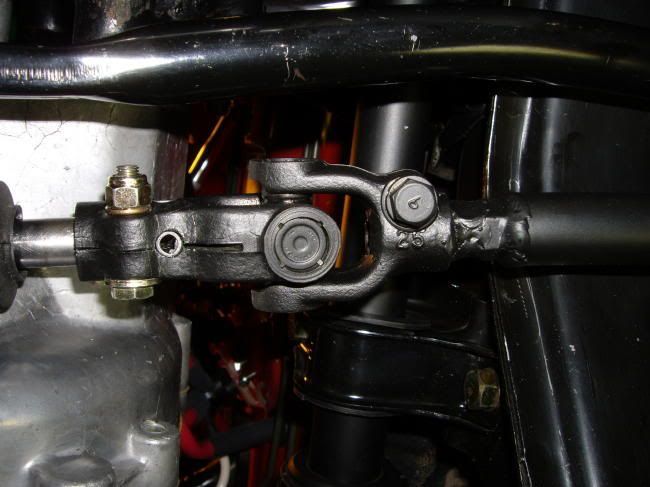
So, there you have it...the steering u-joint shift linkage, no slop here!
The free play at the Kakashifter is greatly reduced...it's a worthwhile mod.
Cheers!
So, there you have it...the steering u-joint shift linkage, no slop here!
The free play at the Kakashifter is greatly reduced...it's a worthwhile mod.
Cheers!
#1163
Posted 04 February 2008 - 07:07 AM
-
- Project CI2-VIC Team Lead
-
- Group: 2012 Contributor
- Location:Eastern NC
-
Drives: 16 Ford RS, 84 Civic 2000S (B20Z2), 98 Civic EX
-
Image Gallery
View Garage
#1164
Posted 04 February 2008 - 10:42 AM
-

- 1980's birth control, brought to you by Honda.
-
- Group: 2014 Contributor
-
Drives: The work car, way more than I'd care to admit
View Garage
I just don't understand how you find the time to do such a thorough job
He who dies with the most toys, wins.
#1165
Posted 04 February 2008 - 11:17 AM
-
- Turd Polisher
-
- Group: 2012 Contributor
- Location:Seattle, WA 98115
-
Drives: from point 'A' to point 'B' daily.
-
Image Gallery
View Garage
QUOTE (zakats @ Feb 4 2008, 07:42 AM) <{POST_SNAPBACK}>
I just don't understand how you find the time to do such a thorough job
You really want to know? Ok...here's the top three ways:
1. I don't watch TV (much)
2. I plan out in my head and/or on paper the design and build sequence prior to going into the garage. While issues always arise, pre-planning helps me know what tools and parts I may need and approximately how much time the job will take. That way I can get any tools/parts I may need and schedule the work when I know I'll have enough time to complete the work.
3. I don't watch TV.
Thanks.
#1166
Posted 04 February 2008 - 11:18 AM
-
- corvette contender
-
- Group: Contributing Mod
- Location:Hanover Pennsylvania
-
Drives: your car if i find the keys
-
Image Gallery
i dont understand why you made it so complicated with the nuts and bolts. why not just weld the u joint to the linkage?
- 1985 CRX SI likes this
When I die, i want to go asleep peaceful.......... not screaming and freaking out like everyone else in the car
"i left the bar a little after you and ended up flipping my car in the arbys drive thru"
IM A LOSER!!! my car pulls harder when spinning than any "highly modified" EW

Team BUrnOUt founding member
"i left the bar a little after you and ended up flipping my car in the arbys drive thru"
QUOTE (cbstdscott @ Dec 10 2008, 03:27 PM) <{POST_SNAPBACK}>
Another loser who can not get traction. I feel sorry for him.
IM A LOSER!!! my car pulls harder when spinning than any "highly modified" EW
Team BUrnOUt founding member
#1167
Posted 04 February 2008 - 11:37 AM
-
- 1980's birth control, brought to you by Honda.
-
- Group: 2014 Contributor
-
Drives: The work car, way more than I'd care to admit
View Garage
QUOTE (kakabox @ Feb 4 2008, 10:17 AM) <{POST_SNAPBACK}>
2. I plan
what is this word "plan?"

and not watching tv?! why thats un-american! kidding, I watch about 2 hours of tv per week plus the news here and there- I call that 'very little'
He who dies with the most toys, wins.
#1168
Posted 04 February 2008 - 12:19 PM
-
- Turd Polisher
-
- Group: 2012 Contributor
- Location:Seattle, WA 98115
-
Drives: from point 'A' to point 'B' daily.
-
Image Gallery
View Garage
QUOTE (crxls @ Feb 4 2008, 08:18 AM) <{POST_SNAPBACK}>
i dont understand why you made it so complicated with the nuts and bolts. why not just weld the u joint to the linkage?
Good question.
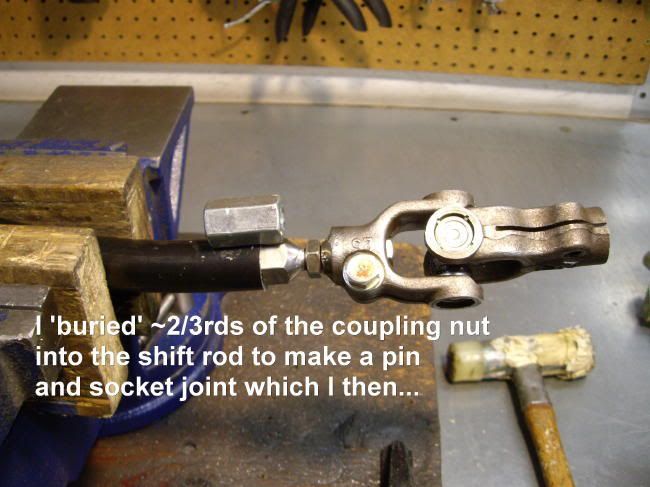
I wanted a strong, fatigue resistant welded connection. I felt I could not achieve that by just 'butt' welding the u-joint to the 'thin wall' OEM linkage rod. So I came up w/a 'pin and socket' style connection using hardware I already had in stock.
Typically, for thin wall tube applications, pin and socket welded joints are much stronger and last longer in fatigue than welded butt joints. The 'pin' insert helps to support the welded joint by distributing the loads over a larger area, hence, reducing the stresses at the weld. That's a good thing for weld life in a constant cyclical load enviroment like the shifter linkage!
Also, the stud threading into the coupling nut allowed me to easily mock up the linkage on the car and rotate the linkage rod to where the shift lever (inside the car) was positioned where I liked it...yeah, a minor detail, but, that's just the way I roll!
Cheers!
#1169
Posted 04 February 2008 - 12:22 PM
-

- This thing should fit!
-
- Group: 2013 Contributor
- Location:opɐɹoloƆ 'suılloƆ ʇɹoℲ
QUOTE (kakabox @ Feb 4 2008, 09:17 AM) <{POST_SNAPBACK}>
3. I don't watch TV.
Nice! I think it's a generational thing J. I don't watch TV either. In fact, we don't even get TV at my house because the reception is so bad!
Hell, I don't even have a cell phone. I must be really old....
Nice write up J! As usual
David

#1170
Posted 04 February 2008 - 01:58 PM
-

- I Love Jet Noise
-
- Group: 2013 Contributor
- Location:Virginia Beach, VA
-
Drives: 1986 CRX Si (1986-2010), 1995 Dakota, 2001 325iT, 2009 Eos when my wife's away
QUOTE (kakabox @ Feb 4 2008, 12:19 PM) <{POST_SNAPBACK}>
Good question.
I wanted a strong, fatigue resistant welded connection. I felt I could not achieve that by just 'butt' welding the u-joint to the 'thin wall' OEM linkage rod. So I came up w/a 'pin and socket' style connection using hardware I already had in stock.
Typically, for thin wall tube applications, pin and socket welded joints are much stronger and last longer in fatigue than using welded butt joints. The 'pin' insert helps to support the welded joint by distributing the loads over a larger area, hence, reducing the stresses at the weld. That's a good thing for weld life in a constant cyclical load enviroment like the shifter linkage!
Also, the stud threading into the coupling nut allowed me to easily mock up the linkage on the car and rotate the linkage rod to where the shift lever (inside the car) was positioned to where I liked it...yeah, a minor detail, but, that's just the way I roll!
Cheers!
That there sounds like aerospace talk to me! Another good design by Kakabox - thin-walled flight control pushrods or torque tubes almost always have inserts at the end connections.


Community Forum Software by IP.Board
Licensed to: Red Pepper Racing