 Sign In
 Create Account
Update:
I am now a member of the Wagovan Clan.
It's like having gold-plated testicles, only its for you signature, not your privates.
Thanks for looking.
Finished paint pics coming next post.

Dan's '87 Civic Rt-4wd Wagon Build!
Started by OG Wagon, Jul 08 2008 08:52 PM
262 replies to this topic
#31
 Posted 17 August 2008 - 06:08 PM
-
- Leadfoot
-

- Group: 2009 Contributing Member
- Location:Mooresville, NC
-
Drives: 1986 Crx Si
 Back to top
#32
Posted 19 August 2008 - 10:48 PM
-
- Leadfoot
-
- Group: 2009 Contributing Member
- Location:Mooresville, NC
-
Drives: 1986 Crx Si
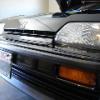
Back from paint!


Sorry for the delay in pics! Car actually came back yesterday.
I've just been so busy with teacher work-days, and baby-Eleanor.
I'm very happy with the outcome. My body work was decent.
I still have a LOT to learn though.
Everything will be back on the car soon, with the hood latch properly aligned as well.
I've had some problems reassembling the latch after I installed the radiator last weekend.
I'll get it fixed, just haven't had the time.
I'll post more pics once all the black pieces get paint, and are back on the car.
The trim molding in the center of the bumpers will get paint too.
Then, red pinstriping all the way around.
What your seeing is kind of the "rough draft". There is still painter's tape on some parts of the car.
Maaco in Matthews, NC gets my stamp of approval. For $320, and 5 days turnaround time, they can't be beat.
Try them out!
Thanks for looking!
- OG

WagoCats HOOOOOOOO!!!!!
#33
Posted 19 August 2008 - 10:49 PM
-
- Leadfoot
-
- Group: 2009 Contributing Member
- Location:Mooresville, NC
-
Drives: 1986 Crx Si
more...


"until next time we meet...."


"until next time we meet...."

Edited by OG Wagon, 19 August 2008 - 10:53 PM.
WagoCats HOOOOOOOO!!!!!
#34
Posted 19 August 2008 - 11:21 PM
-

- Leadfoot
-
- Group: Members
- Location:Australia
-
Drives: 1986 civic hatchback
Nice work
Looks amazing
Cant wait to see this finished
Looks amazing
Cant wait to see this finished
QUOTE(SHOGUNOVDDRK;835304)
the import scene has kinda become like emo's.... its killing itself whilst looking overdressed and in drag
QUOTE(phyregod;835835)
Sig worthy. But mine is full.
#35
Posted 20 August 2008 - 01:51 AM
-
- SeeArghh-Ex
-
- Group: 2009 Contributing Member
- Location:California
-
Drives: 1986 Honda CRX Si
looks sweet! og wagon for sure!
edit:whoot third pepper! LOL
edit:whoot third pepper! LOL
Edited by AndrewSi, 20 August 2008 - 01:52 AM.

#36
Posted 20 August 2008 - 11:24 AM
-

- I pitty the fool aint got no honda
-
- Group: Members
- Location:Richmond / Staunton, Virginia
-
Drives: 1985 CRX SI, 1985 Civic Wagon Turbo, 1971 n600, 1972 n600, 1972 n600, 1991 miata, 2002 turbo protege 5
-
Image Gallery
 View Garage
OMG!!!! Your wagon looks amazing!!!! I love the painted bumpers!! I have been meaning to photo shop a picture of what it would look like but I dont need to now.
Awesome wagon!
Awesome wagon!
QUOTE (cbstdscott @ Feb 28 2010, 10:43 PM) <{POST_SNAPBACK}>
I suck

 If a Hatch is Bread van, then what is a Wagon? A bread bus?
Wagoboost project, 7psi and giggling


Turbo Si Wagovan clan member
#37
Posted 20 August 2008 - 11:49 AM
-
- Slowpoke
-
- Group: 2009 Contributing Member
- Location:MI
-
Drives: 85 crx si, 86 crx dx (deceased)
#38
Posted 20 August 2008 - 03:21 PM
-
- Leadfoot
-
- Group: 2009 Contributing Member
- Location:Mooresville, NC
-
Drives: 1986 Crx Si
Thanks for all of the positive feedback guys!
I'm at work today trying to get all of the black plastics painted.
Hoping to get everything back on the car, and wrapped up this weekend.
This might or might not happen. Either way, there WILL be pics.
Interior Pic Delay= Waiting on my Nardi steering wheel hub. SHOULD be here by
the end of the week, just in time for me to install it and snap some pics of the completed
interior as well. I'm REALLY excitied about this interior! MAD props to E-AT Civic
for his great audio equipment, and to George for the CRX EQ audio console.
Update:
Black Parts: Cleaned, Prepped, Painted


I used Dupont Adhesive Promotor on all parts.
Then, depending on what part it was, it got one of three different types of paints.
Rubber items: SEM Bumper Paint
Plastic Items: Dupli-color Trim Paint (GREAT product, VERY impressed)
Metal Items: Valspar Satin Spray Paint (This crap SUCKS!! I should have bought Krylon )
)
Plan: Rubber parts get another coat tomorrow morning. Parts go back on Saturday morning.
Thanks for looking,
- OG
I'm at work today trying to get all of the black plastics painted.
Hoping to get everything back on the car, and wrapped up this weekend.
This might or might not happen. Either way, there WILL be pics.
Interior Pic Delay= Waiting on my Nardi steering wheel hub. SHOULD be here by
the end of the week, just in time for me to install it and snap some pics of the completed
interior as well. I'm REALLY excitied about this interior! MAD props to E-AT Civic
for his great audio equipment, and to George for the CRX EQ audio console.
Update:
Black Parts: Cleaned, Prepped, Painted


I used Dupont Adhesive Promotor on all parts.
Then, depending on what part it was, it got one of three different types of paints.
Rubber items: SEM Bumper Paint
Plastic Items: Dupli-color Trim Paint (GREAT product, VERY impressed)
Metal Items: Valspar Satin Spray Paint (This crap SUCKS!! I should have bought Krylon
)Plan: Rubber parts get another coat tomorrow morning. Parts go back on Saturday morning.
Thanks for looking,
- OG
Edited by badpenny, 12 April 2009 - 02:25 PM.
WagoCats HOOOOOOOO!!!!!
#39
Posted 20 August 2008 - 10:40 PM
-

- Leadfoot
-
- Group: 2011 Contributing Member
- Location:Edmonton, AB
-
Drives: 2009 AUDI TT 3.2L, Project Teg powered Austin Mini Van
-
Image Gallery
Paint looks good. I read back a page to see how much prep work you had to do yourself. Just a question on the primer. Did you use rattle cans or a spray unit of some sort. I may have to do a similar thing because of cost and need to find out how much work is involved in the primer application after body imperfections are repaired. JS
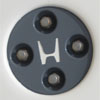
If you want one of these Logos send me a PM
Austin Mini Van with DOHC Honda HP
http://www.angelfire.com/droid/strudel
Honda reliability and power combined with Mini cachet and style.
#40
Posted 21 August 2008 - 06:49 AM
-
- Leadfoot
-
- Group: 2009 Contributing Member
- Location:Mooresville, NC
-
Drives: 1986 Crx Si
QUOTE (strudel @ Aug 20 2008, 11:40 PM) <{POST_SNAPBACK}>
Paint looks good. I read back a page to see how much prep work you had to do yourself. Just a question on the primer. Did you use rattle cans or a spray unit of some sort. I may have to do a similar thing because of cost and need to find out how much work is involved in the primer application after body imperfections are repaired. JS
Yeah, I just used Dupli-color rattle-can primer. It was great stuff. In fact, I have been extremely impressed with ALL of the Duplicolor products that I have used thus far. It has a sweet spray tip, that just makes things very precise, uniform (no random blobs/or speckles shoot out), and effortless (A LOT of less pressure is needed for this tip they use).
My process was to fill the deeper low spots, then sand them down with 60-100-150-220. Then I would spray some primer on top of it and move to the next spot. It was the same process for any of the lighter scratches. I just didn't use body filler on them. I would just would start sanding them at 150 to blend them in, then smooth up the area with 220, then primer, and move on. By the time you start from one part of the car, then go all the way around fixing the problem spots, your back to the place you have started and it's been enough time for your first primer spot to have dried, and be ready for final sanding. Now, go over the whole car with 400-grit to 800-grit to smooth out the surface. Once thats done, your ready for paint. I'm no expert though, I'm sure there is something that could have been done much more professionally. However, I found success with this method, so I thought I would share.
TIP: One thing I will make sure to do next time is to have to different colors of painters tape, like a blue and a green. BEFORE i start ANYTHING as far as body work, I'm going to go around the car and label ALL paint imperfections. If it needs filler on a spot, it gets a blue piece of tape on top of it. If it just needs to be sanded down (light scratches, bumps, bubbles, etc...) it gets a green piece of tape on top of it. Because when you get started sanding, priming, etc... It's really easy to miss all of the little stuff in all of the sanding dust and overspray from primer, etc... I would keep thinking I was done, and then see little spots everywhere. If they needed to be filled, well, there goes another half hour waiting for the bondo to dry, plus all the mess of whipping up more bondo. I was about to spaz out man! The little pieces of tape you lay down will be easy to find in all of the dust. Just go to all the blue pieces first, (remove the tape, duh!) fill them, and let them dry. While the bondo is setting, go to all the green pieces of tape, and sand them down. This should save A LOT of time. Just a tip!
WagoCats HOOOOOOOO!!!!!
#41
Posted 21 August 2008 - 03:48 PM
-
- Slowpoke
-
- Group: Members
- Location:Puerto Rico
-
Drives: civic dx 85

#42
Posted 29 August 2008 - 11:33 PM
-
- Leadfoot
-
- Group: 2009 Contributing Member
- Location:Mooresville, NC
-
Drives: 1986 Crx Si
Hey,
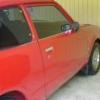
Sorry for the delay in pics. Sans the soon-to-be-reprinted RT-4WD decals and rain-x wipers, here is the finished exterior! Let me know what you think.
Try to picture the car dropped. Just squint your eyes a little bit, and it drops it!


...
Sorry for the delay in pics. Sans the soon-to-be-reprinted RT-4WD decals and rain-x wipers, here is the finished exterior! Let me know what you think.
Try to picture the car dropped. Just squint your eyes a little bit, and it drops it!


...
WagoCats HOOOOOOOO!!!!!
#43
Posted 29 August 2008 - 11:34 PM
-
- Leadfoot
-
- Group: 2009 Contributing Member
- Location:Mooresville, NC
-
Drives: 1986 Crx Si
...and a few more pics:


Hope you like! More progress to come soon, so stay tuned!


Hope you like! More progress to come soon, so stay tuned!
WagoCats HOOOOOOOO!!!!!
#44
Posted 30 August 2008 - 01:38 AM
-
- Slowpoke
-
- Group: 2009 Contributing Member
- Location:MI
-
Drives: 85 crx si, 86 crx dx (deceased)
DAMMMMMMMN!!!!! That is super nice! The second shot looks like a brochure shot!!!!!
That color is right on too! I love it.
That color is right on too! I love it.
#45
Posted 30 August 2008 - 06:04 AM
-
- Slowpoke
-
- Group: Members
- Location:Puerto Rico
-
Drives: civic dx 85


Community Forum Software by IP.Board
Licensed to: Red Pepper Racing