0
Help Finishing The Devac?
Started by phenams, Nov 09 2012 10:26 AM
9 replies to this topic
#1
Posted 09 November 2012 - 10:26 AM
OKAY SO I HAVE SOME PLUGGED ALREADY BUT I NEED HELP WITH THE REST. THERE ARE DIFFERENT WAYS HERE SOME WITH THE CANISTER AND SOME WITH ANOTHER TO PUT MORE AIR IN ???
BUT I WANT TO GET RID OF EVERYTHING!!! MAKE MY BAY LOOK CLEANER AND SIMPLE. N LESS POSSIBILITIES FOR VACUMM LEAKS
N I DONT REALLY KNOW THE NAME FOR THE NIPPLES THINGS...SO I DID IT THIS WAY SO IT CUD BE THE SIMPLEST WAY N NOT GET CONFUSS.
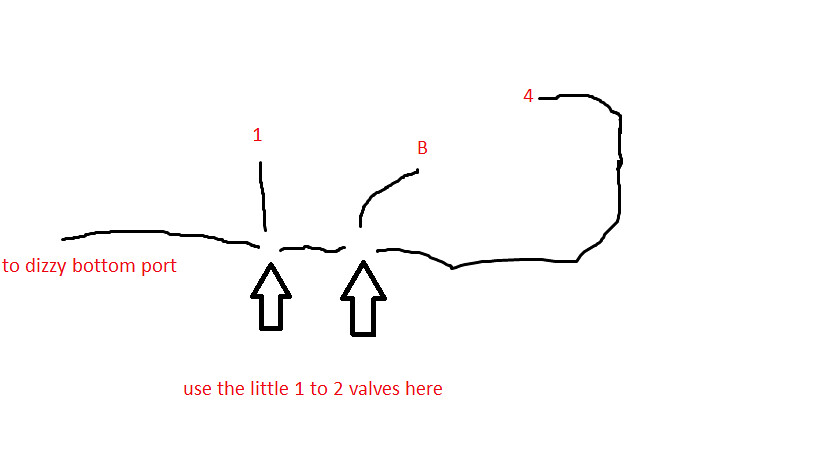
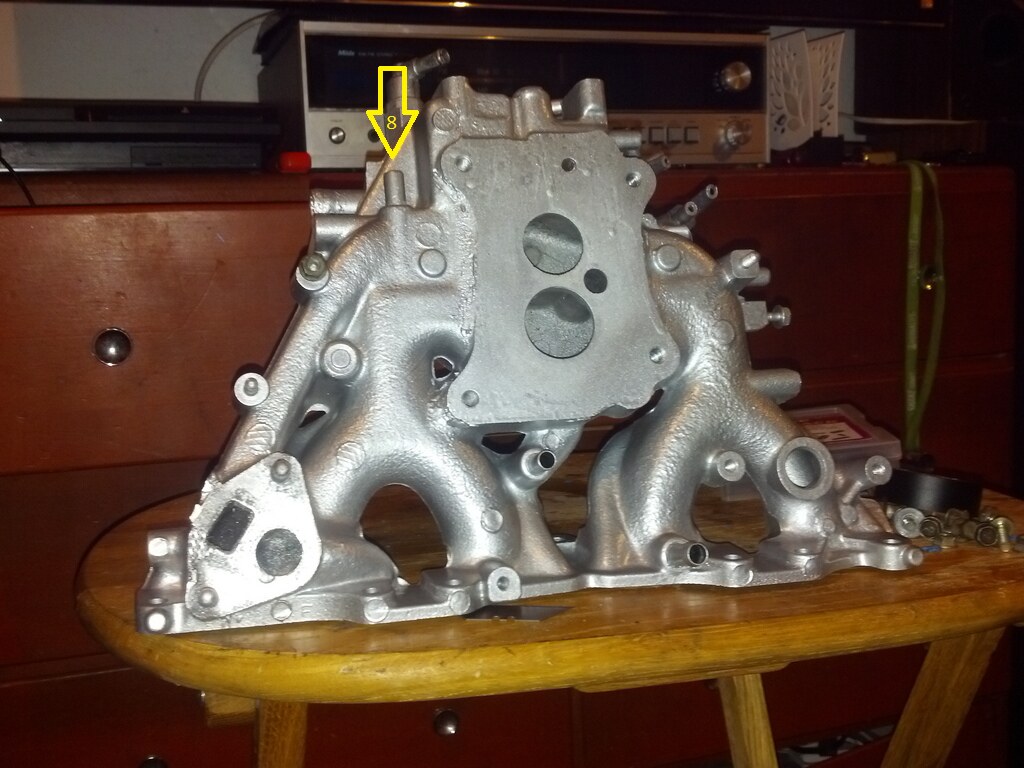
on the front i have A, 2, 3 plugged up from the others pics. now wat else do i have to do i seen some have B valve completely gone and other have it on. do i connect this and to where exactly. i saw one had 4 to a two way spliter and 1 and another hose connected to it.but yet to find out.
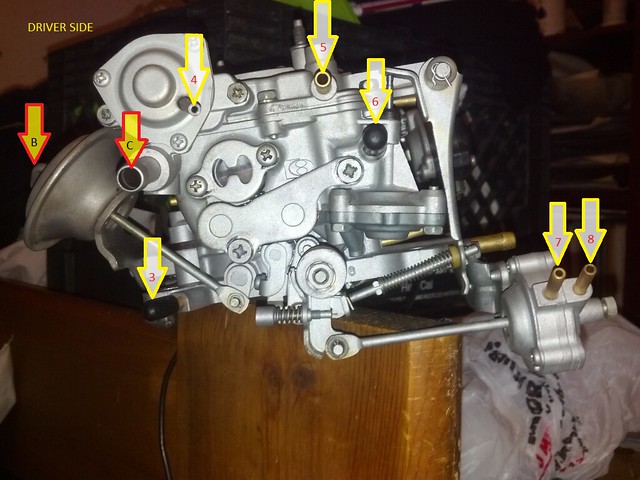
driver side i have 3, 6 plugged and 5 i know is the gas feed line. and the rest where they go or just leave uncapped.
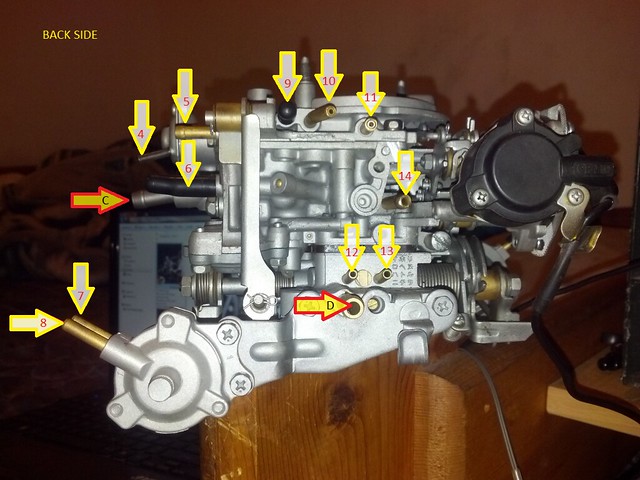
on the back i only have 9 plugged n D goes to the manifold. same here wat about the rest?
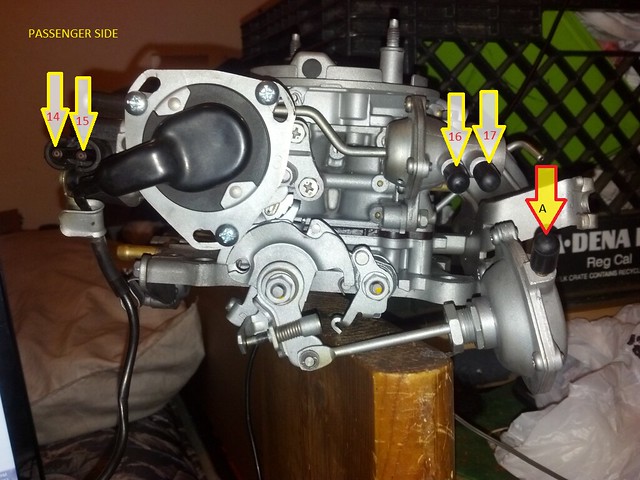
n on the passenger i saw someone plug 14 i think ?? 16, 17 plugged.
this is my 86 crx dx 1500 n i want to have what ever lines it need to make her run without all the clutter so please help me.
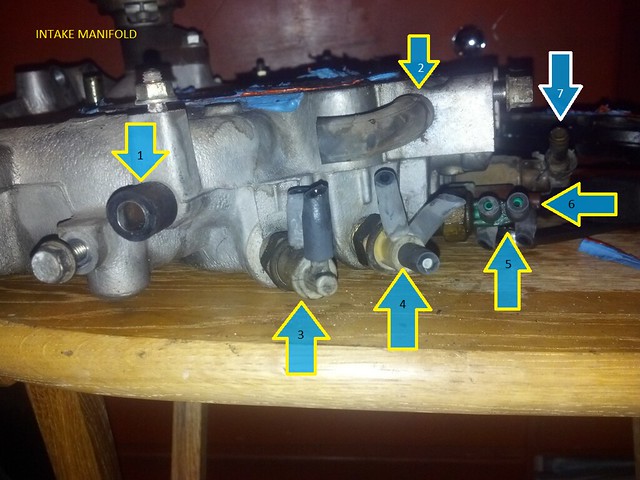
if im correct 1, 2 are capped. but where is the brakeboster hooked up too? and what about all those fittings 3, 4, 5, 6.?
#2
Posted 20 November 2012 - 08:37 PM
If I am correct in remembering 3,4,5,6 the brass fittings are one way valves and can be left uncapped.
QUOTE (Ghost-One @ Jun 22 2004, 06:08 PM)
They got that engine out withtheir mighty facial hair cant you see
Team BUrnOUt Member # 3
#3
Posted 20 November 2012 - 08:38 PM
Ahh yes this is what you need. CRXFANATIC has pics of what to plug in his gallery
http://www.redpepper...lbum08/albun80/
QUOTE (Ghost-One @ Jun 22 2004, 06:08 PM)
They got that engine out withtheir mighty facial hair cant you see
Team BUrnOUt Member # 3
#4
Posted 21 November 2012 - 04:10 PM
thanks hoopty dx.
but i found out how to plug mine up..n i left the air jet controller(i think thats wat is called).
here is a pic.
n idk if you can see the C clamp but i broke the intake manifold trying to put a block off plate....
n i have to clean up the lines everywhere. i think some zipties will come in handy.
also this goes to anyone with a devac...do you guys put the stock air contraption back on??? or you leave it like this on my pic?? or can i put one of those muscle car air filters u know the ones with the crome all around???
#5
Posted 22 November 2012 - 12:05 AM
you can put the muscle car kind you just have to chop yours up and frankenstein them custom
QUOTE (Ghost-One @ Jun 22 2004, 06:08 PM)
They got that engine out withtheir mighty facial hair cant you see
Team BUrnOUt Member # 3
#6
Posted 22 November 2012 - 04:48 PM
U have any diagrams or kinda of pic of wat ur talking about.
- phenams likes this
#7
Posted 04 December 2012 - 12:43 PM
okay so i forgot to put it up but here it is im post the pic n il tell u guys what to cap n wat not too.
cap;
A, 3
leave uncap
1,2,B
follow this n ur good for the front lines.
here 5 is your fuel line
C,7,8 are left uncap
cap;
3,6
n u know wat to do about 4.
okay if u are using ur air jet controller. that is the thing with three lines. this helps from flooding ur carb with gas. then ...
cap;
9, 14
run a hose from 12 to 13 making a U shape.
D goes to 7 on the intake manifold not the carb.
last side is
14,15 are uncap
cap;
16,17,A
make sure to double check ur work!!!
cap;
1.2
uncap;
3,4,5,6
n 7 goes to D on the back of the carb.
also cap 8 on the manifold bottom pic
this is ur air jet controller n it needs to be hook up. NO FLOODING!!!!
A to 11
B to 10
C to 2
that should be everything, its better to use new vacuum lines so u know that none of ur lines are cracked. also on the manifold i made sure that the caps wouldnt come off by using small hose clamps instead of zip ties. just a better option to me. u can leave ur valves on but i was going for a cleaner look so i went with block of plates; u can make ur own but unless u make some thick ones ur better off buying the ones KAYMO has here. another thing is the base plate insulter on the carb make sure it has no cracks bcuz those are notorious for leaks. if ur on a budget>>>then silicone is ur best friend.coat it on both side like a skin just make sure u let it cure 24 hours.before use. other that that u shud be good. GOOD LUCK on anyone trying it out.
ps this is not for California bcuz of smog. unless u can find someone to do u a favor u will never pass. sorry.
any questions let me know il check from time to time here if not PM me.
cap;
A, 3
leave uncap
1,2,B
follow this n ur good for the front lines.
here 5 is your fuel line
C,7,8 are left uncap
cap;
3,6
n u know wat to do about 4.
okay if u are using ur air jet controller. that is the thing with three lines. this helps from flooding ur carb with gas. then ...
cap;
9, 14
run a hose from 12 to 13 making a U shape.
D goes to 7 on the intake manifold not the carb.
last side is
14,15 are uncap
cap;
16,17,A
make sure to double check ur work!!!
cap;
1.2
uncap;
3,4,5,6
n 7 goes to D on the back of the carb.
also cap 8 on the manifold bottom pic
this is ur air jet controller n it needs to be hook up. NO FLOODING!!!!
A to 11
B to 10
C to 2
that should be everything, its better to use new vacuum lines so u know that none of ur lines are cracked. also on the manifold i made sure that the caps wouldnt come off by using small hose clamps instead of zip ties. just a better option to me. u can leave ur valves on but i was going for a cleaner look so i went with block of plates; u can make ur own but unless u make some thick ones ur better off buying the ones KAYMO has here. another thing is the base plate insulter on the carb make sure it has no cracks bcuz those are notorious for leaks. if ur on a budget>>>then silicone is ur best friend.coat it on both side like a skin just make sure u let it cure 24 hours.before use. other that that u shud be good. GOOD LUCK on anyone trying it out.
ps this is not for California bcuz of smog. unless u can find someone to do u a favor u will never pass. sorry.
any questions let me know il check from time to time here if not PM me.
Edited by phenams, 04 December 2012 - 12:51 PM.
#8
Posted 11 December 2012 - 06:27 AM
i put a nice spectre air filter on mine heres what it looks like. http://s1292.beta.ph..._17431.jpg.html yeah i know my motors dirty i just dont have the time to clean it right now and its cold outside haha
sorry officer I didnt know that was the high way number, I thought it was the speed limit!
#9
Posted 11 December 2012 - 01:43 PM
i put a nice spectre air filter on mine heres what it looks like. http://s1292.beta.ph..._17431.jpg.html yeah i know my motors dirty i just dont have the time to clean it right now and its cold outside haha
cool do u have any pics from the side n does it rub against the hood??
#10
Posted 17 December 2012 - 04:40 PM
yeah it rubbed so i had to do some cutting (i was too lasy to get a different hood.) http://s1292.beta.ph...a81cdf.jpg.html not that bad just dont let no one sit on the hood lol
do you mean a side view of the carb?
Edited by sleepycivic, 17 December 2012 - 04:41 PM.
sorry officer I didnt know that was the high way number, I thought it was the speed limit!