 Sign In
 Create Account
I know you guys said I should do this (recommended) only if the car is running decently as it is, but my car went south (so-to-speak), and would no longer start. I don't know what happened. I have already CUT the vacuum lines to take the manifold completely out, to swap heads for a different one, but I think I'll do this and see how she handles. I'll go to a junkyard and buy another carburetor to keep handy just in case (I have a spare manifold I can mount it to). The way I see it, the vacuum lines are already "ruined" (I put in quotes because I'm sure their new size could fit another area), so either way I'd need to pull the emissions box (the black box on the left of the carb when in front of the car - mine doesn't have the other one) to replace all the lines.
Besides, vacuum caps are $1.99 for a box of 6-8, and vacuum line is 1.29/ft.
Lots of info on this thread, I like it! Keep ya posted and how well it turns out!

Devac Write Up.
Started by anassa, Jan 04 2008 07:04 PM
96 replies to this topic
#76
 Posted 22 May 2012 - 01:24 AM
-

- Slowpoke
-

- Group: Members
- Location:Spokane, WA
-
Drives: 1984 Toyota Hilux 2WD
 View Garage
 Back to top
#77
Posted 15 June 2012 - 07:49 PM
-

- Leadfoot
-
- Group: Contributing Mod
- Location:Oley, Pennsylvania
-
Drives: 2008 Cadillac CTS4
-
Image Gallery
View Garage
Was planning on following the photos in this thread as a guide to follow as I re-do my devac (properly). And then I noticed my carb is slightly different:
So what do you fellas think?
So what do you fellas think?
Adding power makes you faster in the straights. Subtracting weight makes you faster everywhere. - Colin Chapman
#78
Posted 16 June 2012 - 01:21 AM
-
- Slowpoke
-
- Group: Members
- Location:Spokane, WA
-
Drives: 1984 Toyota Hilux 2WD
View Garage
Was planning on following the photos in this thread as a guide to follow as I re-do my devac (properly). And then I noticed my carb is slightly different:
So what do you fellas think?
I think you're intake manifold is shiny, and I like it!!!!!
#79
Posted 16 June 2012 - 01:54 AM
-
- Leadfoot
-
- Group: Contributing Mod
- Location:Oley, Pennsylvania
-
Drives: 2008 Cadillac CTS4
-
Image Gallery
View Garage
Viable option?

Adding power makes you faster in the straights. Subtracting weight makes you faster everywhere. - Colin Chapman
#80
Posted 23 June 2012 - 09:27 AM
-

- I pitty the fool aint got no honda
-
- Group: Members
- Location:Richmond / Staunton, Virginia
-
Drives: 1985 CRX SI, 1985 Civic Wagon Turbo, 1971 n600, 1972 n600, 1972 n600, 1991 miata, 2002 turbo protege 5
-
Image Gallery
View Garage
Its been my experience that a single vacuum to the distributer on these cars does not work. But you could easily give it a shot and. See if it works for you.
If i were in your shoes I would put softer springs inside the distributer so it would centrifically advance.
If i were in your shoes I would put softer springs inside the distributer so it would centrifically advance.
QUOTE (cbstdscott @ Feb 28 2010, 10:43 PM) <{POST_SNAPBACK}>
I suck

 If a Hatch is Bread van, then what is a Wagon? A bread bus?
Wagoboost project, 7psi and giggling


Turbo Si Wagovan clan member
#81
Posted 23 June 2012 - 12:26 PM
-
- Slowpoke
-
- Group: Members
- Location:Spokane, WA
-
Drives: 1984 Toyota Hilux 2WD
View Garage
Its been my experience that a single vacuum to the distributer on these cars does not work. But you could easily give it a shot and. See if it works for you.
If i were in your shoes I would put softer springs inside the distributer so it would centrifically advance.
Mind showing us a write up on how to do that? Curious because while I may be good around the engine, I don't do much modding
#82
Posted 01 July 2012 - 06:09 PM
-

- In the left lane
-
- Group: 2013 Contributor
- Location:Western KY
-
Drives: 87 Civic Dx hatch with 1.5 CVCC and auto trans, devaced 87 CRX HF with rebuilt 1.3
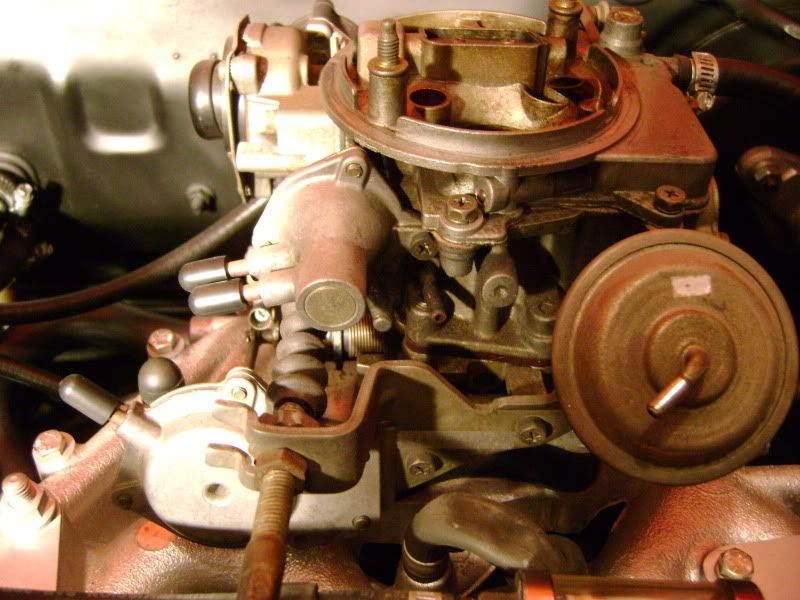
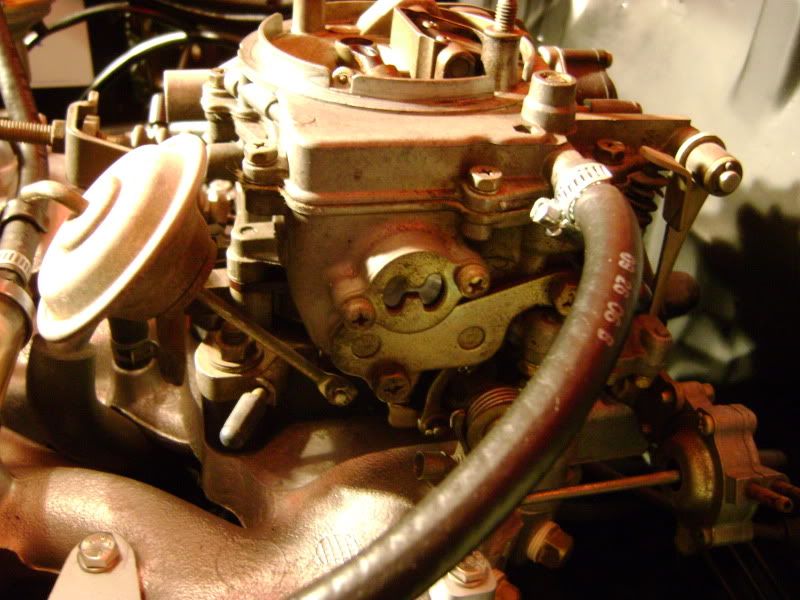
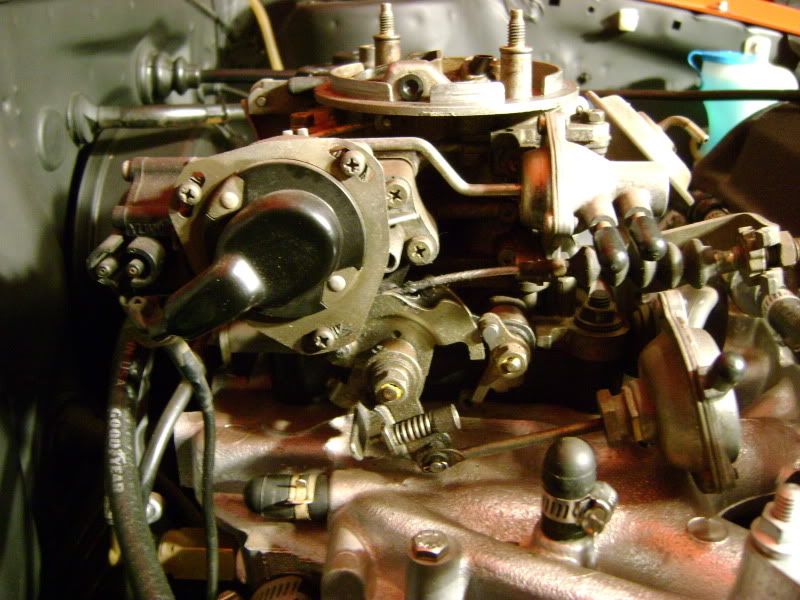
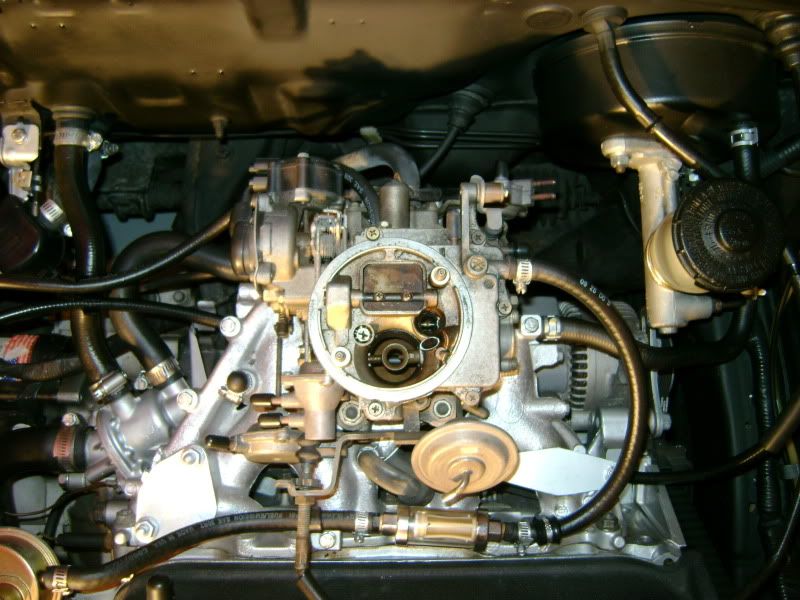
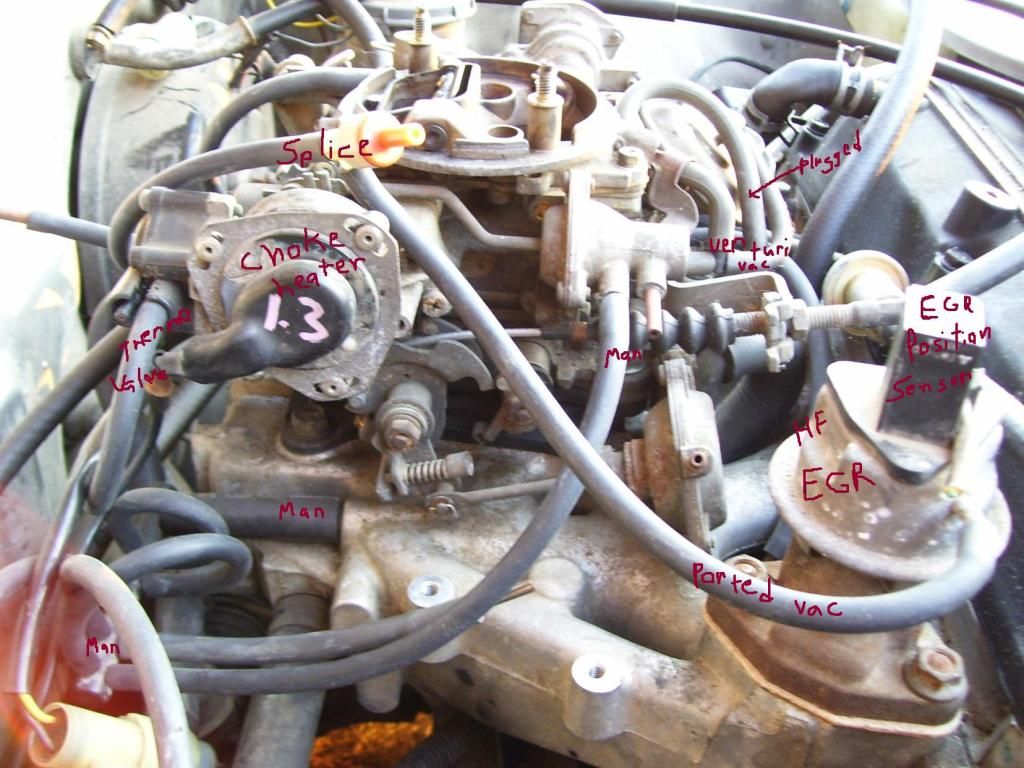
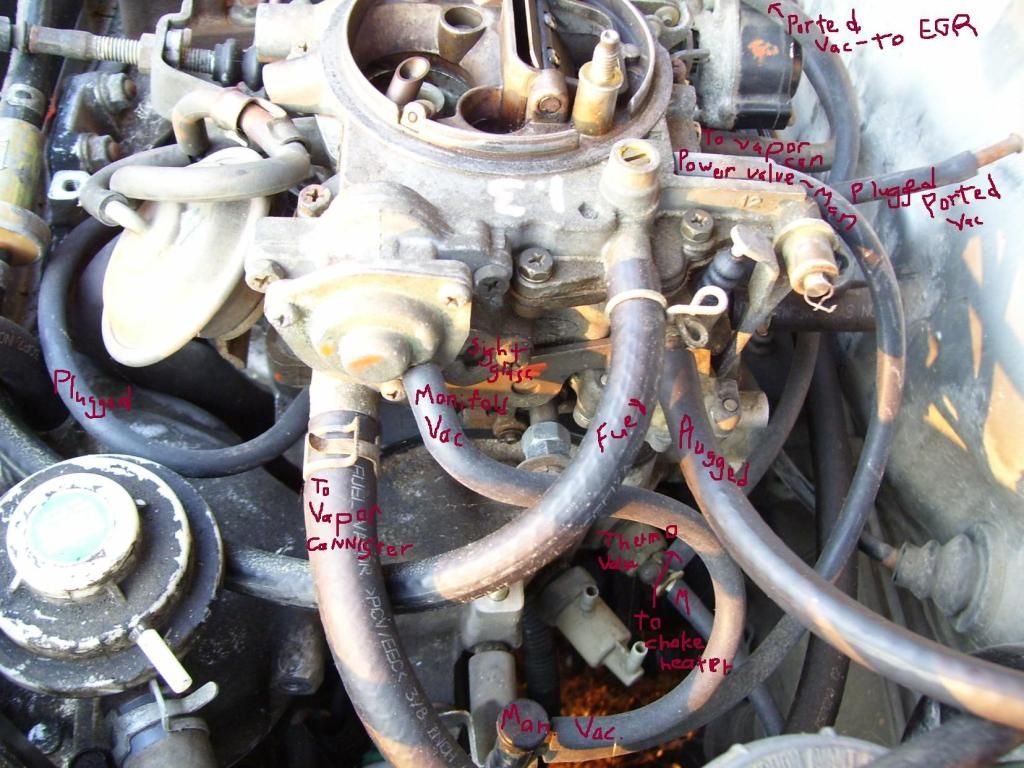
Devac method for those interested in maximum mileage.
This method gets rid of the black vacuum control boxes, but retains the vapor canister and EGR.
The pics are of an 87 CRX HF with a D13 engine (from 87 civic) and a carb from a D13 (carb code stamp is EA17B). Note that the top of the 1.3 carb does not have any fittings for the altitude compensation valve (on the 1.5 carbs, there are 2 extra fittings beside the power valve fitting).
As others on this post have stated, leaving the altitude compensation valve connected, will help your mileage.
Benefit of using a carb from a 1.3: The vehicles with a 1.3 did not have an oxygen sensor. The typical 1.5 emissions system with an oxygen sensor had a carb that was jetted a little rich. The control box would allow a controlled vacuum leak into the manifold to lean it out based on the oxygen sensor signal. So any time you remove the black box of a car with an oxygen sensor, it will run a bit richer than it would if everything was working correctly.
The 1.3 carb is jetted leaner because this system is not present. The venturi is also a little smaller than a 1.5 carb.
Notes: "man"= manifold vacuum. The "Back vent" is actually venturi vacuum.
On the EGR vac line, the orange and white fitting is a one way valve that I was using as a splice because I ran out of long pieces of hose.
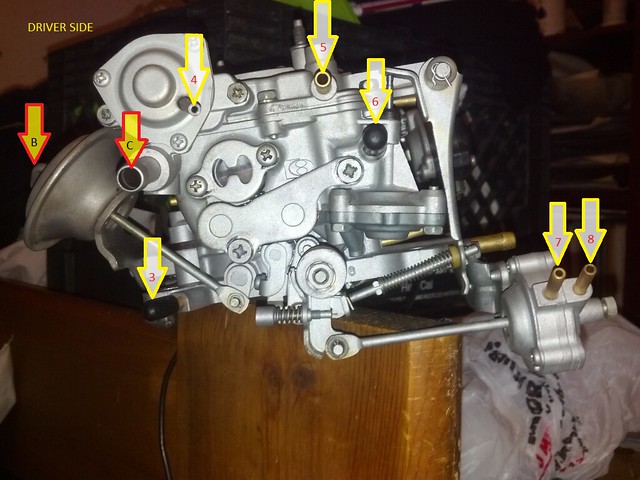
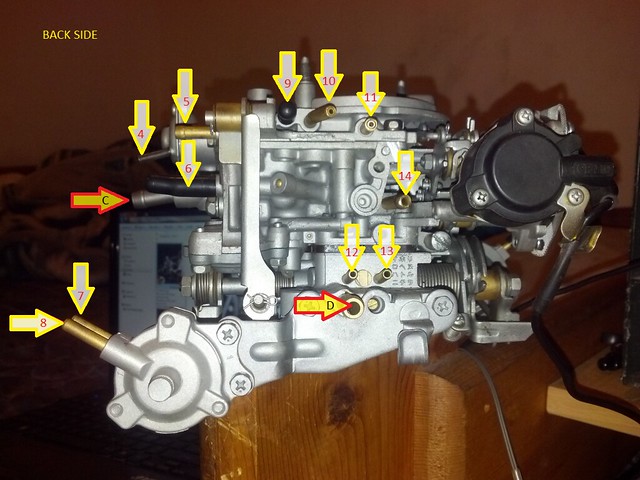
There are 2 ported vac fittings at the very base of the back of the carb. I routed one to the thermostatic valve seen in the passenger side pic and the other is plugged. The thermo valve is normally closed and opens when the intake manifold heats up.
The main wire to the choke heater and the double wires going to the back of the carb (the fuel cut off solenoid) need to stay connected.
Running manifold vacuum to to power valve fitting on the carb is really important to help your mileage- as is using manifold vacuum to work the distributor advance (and making sure your advance diaphragm is not busted). You should be connecting to the bottom fitting on the advance diaphragm, but mine is busted, so I am just hooked to the top (it give less advance than the bottom fitting).
My job is not neat/pretty, but the engine runs well at all rpms. It is only a little fussy for the first 15-30 seconds after it is first started when cold.

Fuel consumption graph for a few tanks (this car has a trans from an 84 CRX 1300): http://www.gassavers...iewgaslog/2577?
FYI- I stopped driving the car because I was just using it for long trips. I am a cheapskate and the extra money for a new battery, insurance and registration was not made up by the gas money I was saving driving it. It is now parked in the yard (and NOT for sale) and waiting in case one of my other vehicles is hit or I hit a deer etc..
This method gets rid of the black vacuum control boxes, but retains the vapor canister and EGR.
The pics are of an 87 CRX HF with a D13 engine (from 87 civic) and a carb from a D13 (carb code stamp is EA17B). Note that the top of the 1.3 carb does not have any fittings for the altitude compensation valve (on the 1.5 carbs, there are 2 extra fittings beside the power valve fitting).
As others on this post have stated, leaving the altitude compensation valve connected, will help your mileage.
Benefit of using a carb from a 1.3: The vehicles with a 1.3 did not have an oxygen sensor. The typical 1.5 emissions system with an oxygen sensor had a carb that was jetted a little rich. The control box would allow a controlled vacuum leak into the manifold to lean it out based on the oxygen sensor signal. So any time you remove the black box of a car with an oxygen sensor, it will run a bit richer than it would if everything was working correctly.
The 1.3 carb is jetted leaner because this system is not present. The venturi is also a little smaller than a 1.5 carb.
Notes: "man"= manifold vacuum. The "Back vent" is actually venturi vacuum.
On the EGR vac line, the orange and white fitting is a one way valve that I was using as a splice because I ran out of long pieces of hose.
There are 2 ported vac fittings at the very base of the back of the carb. I routed one to the thermostatic valve seen in the passenger side pic and the other is plugged. The thermo valve is normally closed and opens when the intake manifold heats up.
The main wire to the choke heater and the double wires going to the back of the carb (the fuel cut off solenoid) need to stay connected.
Running manifold vacuum to to power valve fitting on the carb is really important to help your mileage- as is using manifold vacuum to work the distributor advance (and making sure your advance diaphragm is not busted). You should be connecting to the bottom fitting on the advance diaphragm, but mine is busted, so I am just hooked to the top (it give less advance than the bottom fitting).
My job is not neat/pretty, but the engine runs well at all rpms. It is only a little fussy for the first 15-30 seconds after it is first started when cold.
Fuel consumption graph for a few tanks (this car has a trans from an 84 CRX 1300): http://www.gassavers...iewgaslog/2577?
FYI- I stopped driving the car because I was just using it for long trips. I am a cheapskate and the extra money for a new battery, insurance and registration was not made up by the gas money I was saving driving it. It is now parked in the yard (and NOT for sale) and waiting in case one of my other vehicles is hit or I hit a deer etc..
Edited by Bubba, 02 July 2012 - 07:06 AM.
#83
Posted 01 July 2012 - 09:21 PM
-

- Slowpoke
-
- Group: Members
-
Drives: 1987 Honda Civic CRX HF (Carbed)
Nice work. I like your theory. I will look into mine as soon as possible. My vacuum advance has 1, not 2 hoses like yours. I'm assuming I can just do my 1.5 carb devac just as such. Someone in this previous write-up, mentioned that you probably cant devac a carb with a 1 hose advance control. If this entire procedure is all possible, I can install 1.3 jets into my carb later. As for the O2 sensor, I just clip the wires, because I am taking out my black box, so this automatically deletes any signal? Hopefully this procedure is all that straight foward. I know I dont have any vac leaks thus far. I just want to get rid of the confusion under hood. I will keep you updated on my situation. You are very helpful, and I appreciate it much. Mickey:)
Edited by mickcrx, 01 July 2012 - 09:44 PM.
#84
Posted 02 July 2012 - 07:11 AM
-
- In the left lane
-
- Group: 2013 Contributor
- Location:Western KY
-
Drives: 87 Civic Dx hatch with 1.5 CVCC and auto trans, devaced 87 CRX HF with rebuilt 1.3
There is no reason why you can't do this with a single hose style distributor vacuum advance (as seen on the HF)- just hook it to manifold vacuum for the best mileage. You should check it with a vacuum pump- the rubber diaphragms fail quite often- which will result in a sizable vacuum leak and a poor idle.
#85
Posted 10 July 2012 - 01:23 PM
-

- Leadfoot
-
- Group: 2018 Contributor
- Location:Chicago, IL
-
Drives: 1986 Honda CRX DX
-
Image Gallery
View Garage
Its been my experience that a single vacuum to the distributer on these cars does not work. But you could easily give it a shot and. See if it works for you.
Just before I sold my CRX I was on the brink of discovering this too. The theory is sound but I don't think the port we're using on the carb has enough ported vacuum to actuate the distributor diaphragm. It definitely doesn't have enough to actuate the secondary diaphragm because if it did, the throttle would stick (With the car off, pull vacuum with a hand-pump on the secondary diaphragm and move the throttle; you'll snap to full throttle with no way to get out without cutting the vacuum on the hand pump. Now imagine that happening on the highway!). That's why I came up with the zip-tie mod, to get around the two secondary issues (Secondary simply not working on devacced cars, and the throttle sticking issue).
Experiments need to be done to find a port on the carb with a strong
DarkHand
#86
Posted 11 July 2012 - 06:57 AM
-
- In the left lane
-
- Group: 2013 Contributor
- Location:Western KY
-
Drives: 87 Civic Dx hatch with 1.5 CVCC and auto trans, devaced 87 CRX HF with rebuilt 1.3
Experiments need to be done to find a port on the carb with a strong ported vacuum, i.e. low vacuum at low RPM, and high vacuum at high RPM. The distributor needs to be connected to whatever port that ends up being, but keep the secondary off it!
This sounds to me like you are looking for a venturi vacuum source (more vacuum as engine load increases).
If I remember correctly, there are 3 venturi vacuum ports on these carbs- the one that works the secondary opener and the other two are larger fittings- one is just below the fuel line and is labelled "plugged" in my last pic. The other (also a larger sized line) goes to the vapor canister forward fitting and goes to the rear of the carb just below/beside the choke heater unit- I have it labeled as "back vent" in my second pic.
Venturi vacuum is typically weak. If you are wanting to use venturi vacuum for advancing the dist to get more power, perhaps another solution would be to find/fit a vacuum advance unit with a weaker return spring.
Just to clarify- in my devac writeup above, the "ported vacuum" that I was using to work the EGR refers to manifold vacuum taken at a spot just above where the throttle butterfly closes fully (that's why these ports are at the very base of the carb). This type of vacuum is pretty much like manifold vacuum except it is zero when the throttle is closed (at idle).
Edited by Bubba, 11 July 2012 - 06:58 AM.
#87
Posted 16 August 2012 - 11:11 AM
-
- Leadfoot
-
- Group: 2018 Contributor
- Location:Chicago, IL
-
Drives: 1986 Honda CRX DX
-
Image Gallery
View Garage
Just to clarify- in my devac writeup above, the "ported vacuum" that I was using to work the EGR refers to manifold vacuum taken at a spot just above where the throttle butterfly closes fully (that's why these ports are at the very base of the carb). This type of vacuum is pretty much like manifold vacuum except it is zero when the throttle is closed (at idle).
You're right, I got my terms backwards there.
It's venturi vacuum that's needed!
DarkHand
#88
Posted 21 August 2012 - 01:20 AM
-

- Granny
-
- Group: Members
Does anyone have a saved copy of this write up? All of the images are dead from the original post.
#89
Posted 22 October 2012 - 03:55 PM
-

- Slowpoke
-
- Group: Members
- Location:Mid east Indiana
-
Drives: 1987 Civic Wagovan
View Garage

#90
Posted 08 November 2012 - 04:25 PM
-

- Slowpoke
-
- Group: Members
- Location:Ontario, California
-
Drives: 10 mini cooper S, 91 accord, 86 crx
-
Image Gallery
View Garage
OKAY SO I HAVE SOME PLUGGED ALREADY BUT I NEED HELP WITH THE REST. THERE ARE DIFFERENT WAYS HERE SOME WITH THE CANISTER AND SOME WITH ANOTHER TO PUT MORE AIR IN ???
BUT I WANT TO GET RID OF EVERYTHING!!! MAKE MY BAY LOOK CLEANER AND SIMPLE. N LESS POSSIBILITIES FOR VACUMM LEAKS
N I DONT REALLY KNOW THE NAME FOR THE NIPPLES THINGS...SO I DID IT THIS WAY SO IT CUD BE THE SIMPLEST WAY N NOT GET CONFUSS.

on the front i have A, 2, 3 plugged up from the others pics. now wat else do i have to do i seen some have B valve completely gone and other have it on. do i connect this and to where exactly. i saw one had 4 to a two way spliter and 1 and another hose connected to it.but yet to find out.
driver side i have 3, 6 plugged and 5 i know is the gas feed line. and the rest where they go or just leave uncapped.
on the back i only have 9 plugged n D goes to the manifold. same here wat about the rest?
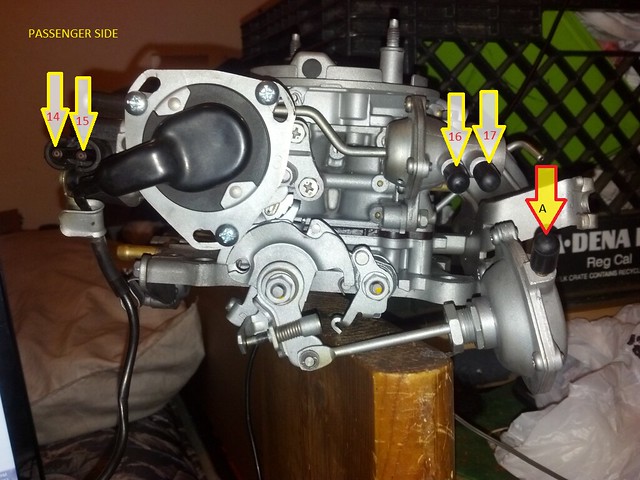
n on the passenger i saw someone plug 14 i think ?? 16, 17 plugged.
this is my 86 crx dx 1500 n i want to have what ever lines it need to make her run without all the clutter so please help me.
BUT I WANT TO GET RID OF EVERYTHING!!! MAKE MY BAY LOOK CLEANER AND SIMPLE. N LESS POSSIBILITIES FOR VACUMM LEAKS
N I DONT REALLY KNOW THE NAME FOR THE NIPPLES THINGS...SO I DID IT THIS WAY SO IT CUD BE THE SIMPLEST WAY N NOT GET CONFUSS.
on the front i have A, 2, 3 plugged up from the others pics. now wat else do i have to do i seen some have B valve completely gone and other have it on. do i connect this and to where exactly. i saw one had 4 to a two way spliter and 1 and another hose connected to it.but yet to find out.
driver side i have 3, 6 plugged and 5 i know is the gas feed line. and the rest where they go or just leave uncapped.
on the back i only have 9 plugged n D goes to the manifold. same here wat about the rest?
n on the passenger i saw someone plug 14 i think ?? 16, 17 plugged.
this is my 86 crx dx 1500 n i want to have what ever lines it need to make her run without all the clutter so please help me.
Edited by phenams, 08 November 2012 - 04:28 PM.


Community Forum Software by IP.Board
Licensed to: Red Pepper Racing