Jump to content


Restoring Kosei K1's


  • You cannot reply to this topic
24 replies to this topic

#1
lxndr

  • All work and no play makes LXNDR a dull boy. All work and no...
  • PipPipPipPipPip
    • Group: Members
A while back I picked up a set of "old school" Kosei K1's that were on a car that was imported in pieces from Japan. I scored them cheap because of one major flaw...

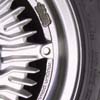
They were painted pink!


I promptly went to work stripping the pink off with the small hope of keeping the original finish which happened to be an odd grey/green color, almost like an Army green.

This didn't work...

I found that the reason they were repainted was to hide the damage and curb rash in the original finish.

Here's what they looked like after stripping them down with Jasco paint and epoxy stripper, and a wire brush attached to my cordless drill.

In this picture you can see how I decided to repair the curb rash by carefully smearing a glob of JB-Weld around the rim (left side of wheel).

After the JB-Weld dried for a day, I painted some primer around the rim in preperation for the next step...


The ghetto lathe!


Edited by lxndr, 15 September 2006 - 11:01 PM.


#2
RARECRX

  • Officially retired.
  • PipPipPipPipPip
    • Group: 2009 Contributing Member
    • Location:Nor Cal
    • Drives: 1987 crx si,1985 CRX si, 2009 RS6,pimp'd out corolla,
    • Image Gallery
    Garage View Garage
powdercoat them.. Its pretty cheap!!!...

#3
badpenny

  • tinker, tinker....BOOOOOOM!!!! then I run around
  • PipPipPipPipPipPip
    • Group: Contributing Mod
    • Location:Hurst, Texas
    • Drives: Don't, because they don't run and I am a crappy mechanic.
    • Image Gallery
    Garage View Garage
A BMW site I was on had a really good method of correcting gouges and scratches in alloys, I will see if I can find it.
Honda, because it's hard to look baller in your mom's Volvo.Posted Image 
The entire tool selection at Sears or the contents of a Snap-On truck will do you no good if you do not know how to use them.

#4
lxndr

  • All work and no play makes LXNDR a dull boy. All work and no...
  • PipPipPipPipPip
    • Group: Members
The easiest way to remove the JB-Weld and reshape the rim was to use a file on the wheel as it's spinning on the "ghetto lathe". The primer was simply a guide so I could see when I was down to bare aluminum. I found that there were some large globs of JB-Weld that caused the file to bounce around on the wheel so I used my dremel to help smooth out the lumps.

Dremeling...


Filing...


Sanding...


More sanding...


When the wheel was on the car I also cleaned up the insides with 220 and 320 grit sand paper. I would not have done this if I had decided to polish the wheels.

The "ghetto lathe" wasn't as scary as it looks, I had the car in 3rd gear and just let the idle spin the wheels. I found that 1st gear was too slow and 5th gear was too fast. Notice my safety glasses, gloves and safe posture!

Actually, I thought about using gloves but decided it was safer to use my bare hands. This way there was nothing that could snag and pull my hand into the wheel!

Edited by lxndr, 15 September 2006 - 09:51 PM.


#5
C8V6C

That looks dangerous! This would be a nice DIY though, and it looks like you are doing a good job so far

844b096b-9fda-4214-b621-217bc4a6dce1.jpg


#6
projEKtjokes

  • Wanna see some mexican magic. . .
  • PipPipPip
    • Group: Members
    • Location:LA yton, Da 801 Utah
    • Drives: 84 Nissan S12 Silvia, 97 EK hatch and coupe, 90 Mitsu Mighty Max, 87 Si Hatch
QUOTE (lxndr @ Sep 15 2006, 07:50 PM)


I see you also have Don King in a head lock laugh.gif

user posted image


#7
lxndr

  • All work and no play makes LXNDR a dull boy. All work and no...
  • PipPipPipPipPip
    • Group: Members
AAAaahhh...

Look at that beautiful clean edge.


In this pic you can see where the JB-Weld filled in the curb rash and was smoothed out to be flush with the aluminum.

All done, rinsed and drying...


After they were completely dry, I masked them off and hung them by wires using a bolt and a couple of nuts through the valve stem hole as a hook.


Once they were hanging I degreased them, wiped them down with a tack cloth and started spraying several thin coats of etching primer on them.


Edited by lxndr, 16 September 2006 - 01:25 AM.


#8
lxndr

  • All work and no play makes LXNDR a dull boy. All work and no...
  • PipPipPipPipPip
    • Group: Members
After much trial and error, debates with my wife and friends, and 6 different colors of paint, it was decided that Rustoleum "antique brass" was the nicest color for these wheels.

Being that it's Rustoleum paint, I was concerned with how it would hold up to the abuse of being on a wheel so I picked up some Duplicolor "clear wheel coating" to finish them off with.


After lightly sanding the primer, here's the first thin color coat...


I wanted alot of paint build up on these wheels since they are made of cast aluminum and are very rough in texture. The first 2 color coats were wet sanded smooth with 400 grit, then the wheels were rinsed, degreased and hung back up for a third coat.

3rd coat

Edited by lxndr, 16 September 2006 - 12:15 AM.


#9
badpenny

  • tinker, tinker....BOOOOOOM!!!! then I run around
  • PipPipPipPipPipPip
    • Group: Contributing Mod
    • Location:Hurst, Texas
    • Drives: Don't, because they don't run and I am a crappy mechanic.
    • Image Gallery
    Garage View Garage
I would have repainted them Pink. Pink is the new Bronze. wink.gif
Honda, because it's hard to look baller in your mom's Volvo.Posted Image 
The entire tool selection at Sears or the contents of a Snap-On truck will do you no good if you do not know how to use them.

#10
lxndr

  • All work and no play makes LXNDR a dull boy. All work and no...
  • PipPipPipPipPip
    • Group: Members
I found that I was having a problem with overspray (which you can see in post above) so I decided to wet sand them with 400 grit and spray them one more time. However this time I used an old bucket and layed them face down to spray the insides. I then hung them up to dry which is what the next pic shows.

Nice and even!


After the insides were dry, I flipped them over and sprayed the face. The next pic shows them wet sanded, sitting on the bucket and ready for the final color coat. I elevated the wheel up from the bucket using a few rattle can caps.


I used the same technique for the clear coat but I won't bother to post pics because you can't see the clear coat. tongue.gif

Edited by lxndr, 16 September 2006 - 12:06 AM.


#11
lxndr

  • All work and no play makes LXNDR a dull boy. All work and no...
  • PipPipPipPipPip
    • Group: Members
Now at this point, I waited about a week and a half while the wheels were sitting in the sun on my back deck. This was to give the paint time to cure so the tire monkey can't gouge them when the tires are mounted. But seeing as how I painted these wheels over a month ago, you get the instant gratification of seeing them finished now.


But first...

Is there anything better than the smell of new tires?


Here they are!

Mounted and balanced


BTW, this picture shows the actual color suprisingly well (according to my monitor).

Edited by lxndr, 15 September 2006 - 10:54 PM.


#12
lxndr

  • All work and no play makes LXNDR a dull boy. All work and no...
  • PipPipPipPipPip
    • Group: Members
And here they are on the car with black aluminum valve stems and black Mugen lug nuts...


Next project, rebuilding the brakes!

#13
badpenny

  • tinker, tinker....BOOOOOOM!!!! then I run around
  • PipPipPipPipPipPip
    • Group: Contributing Mod
    • Location:Hurst, Texas
    • Drives: Don't, because they don't run and I am a crappy mechanic.
    • Image Gallery
    Garage View Garage
ohmy.gif *drool*
Honda, because it's hard to look baller in your mom's Volvo.Posted Image 
The entire tool selection at Sears or the contents of a Snap-On truck will do you no good if you do not know how to use them.

#14
Sgt. Pepper

Awesome job on the wheels! Although the pink was HAWT! wink.gif See, you CAN polish a turd! laugh.gif Can't wait for the brake rebuild since I'm doin' the same.

Edited by gen1CRX, 15 September 2006 - 09:44 PM.

Adding power makes you faster in the straights. Subtracting weight makes you faster everywhere. - Colin Chapman

#15
C8V6C

very nice man....you couldnt have done a better job....besides giving them to me of course tongue.gif

844b096b-9fda-4214-b621-217bc4a6dce1.jpg