Jump to content


Fiv Fast Idle Valve Fix For Surging Idle


  • You cannot reply to this topic
4 replies to this topic

#1
strudel

  • Leadfoot
  • PipPipPipPipPip
    • Group: 2011 Contributing Member
    • Location:Edmonton, AB
    • Drives: 2009 AUDI TT 3.2L, Project Teg powered Austin Mini Van
    • Image Gallery

For those of you having surging issues a lesson in how to possibly solve your problem


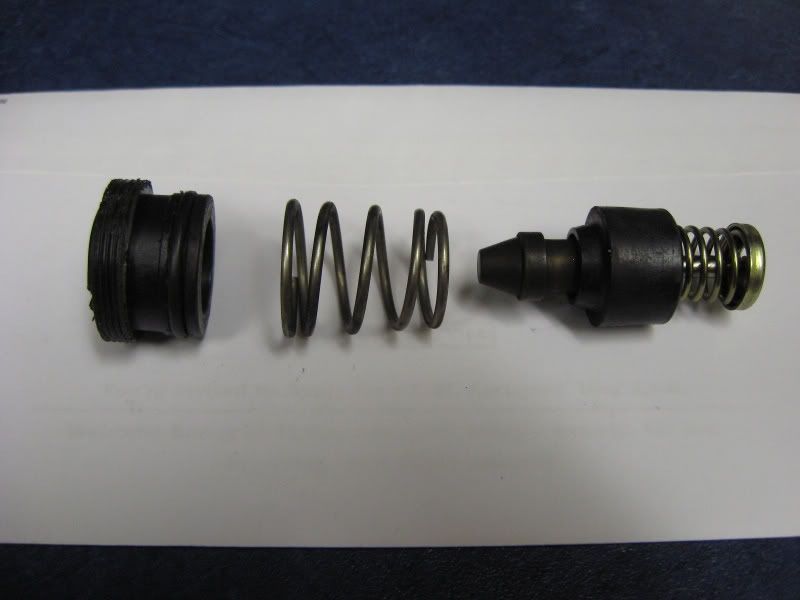
Sadly I don't have any more complete units and the one left over has the big plastic screw missing. They can easily be resurrected with a little care. First replace the o-rings as they get brittle over time and leak. You will feel how hard they are or cracked when you take them out. Do the fast idle screw first and see if that solves the issue. Then the one under the lid. Those are the easiest to fix. If that doesn't work there are the 2 on the outside body. Last but not least is the one on the large plastic screw itself. Use a wide chisel to unscrew it and get a new ring. Be careful with the threads as it is only plastic.


Then clean all the carbon out but make sure you remember how the pieces inside fall out to get them back the same way. Then comes the fun part and adjusting it. There is a thermo wax thing in the bottom that raises a pin that pushes the cone you took out into the hole in the plastic screw that seals off the air when hot and resumes normal idle. Here is where it gets a bit tricky to do right and not to damage anything.


I did it in a pot of boiling water to raise the pin. Then gently screwed the plastic screw down one turn at a time. You have to seal off a couple of small holes with your fingers and then blow into the outer holes to see if it seats and no air gets through. I hope you are a contortionist??  Alternatively leave it on the car and bring to temp so that the pin rises. Then gently start screwing in the plastic screw until the idle seems normal.  If you go to far there will be too much pressure on the pin in the bottom. Adjust the idle screw to proper rpm. 


That's as best of an explanation I can give to help you out. There is no magic just a bit of trial and error with the big screw. Perhaps a light coating of lithium grease so the o-rings don't contort when screwing things down. I went to a commercial seal company so that they could take the MM size of each ring but sometimes you are lucky and can find them in a hardware store. Thickness let alone diameter is important. Hope that helps. JS


IMG_2777.jpg


acd.png


If you want one of these Logos send me a PM

aan.jpg


Austin Mini Van with DOHC Honda HP
http://www.angelfire.com/droid/strudel
Honda reliability and power combined with Mini cachet and style.


#2
CRXer87hf

  • Speedy
  • PipPipPipPip
    • Group: 2013 Contributor
    • Location:Atlanta, GA
    • Drives: 1987 Honda CRX HF, 1985 Honda CRX SI, 2003 Land Rover Disco
    Garage View Garage

This is great information. I'm dealing with this issue now.  I'm going to trying your suggestions and see if they work tonight.  Thanks!


Build thread: "Skittle 2.0" - http://www.redpepper...l=&fromsearch=1
Build thread 2: "Red Daily"http://www.redpepper...topic=55687&hl=


My Classic Honda Blog - http://genone-blog.blogspot.com/


Road & Track magazine: "When they get around to listing the top good-time inventions of the late 20th century, we're willing to bet that right up there with the hang gliders, ultra lights, sailboards and jet skis you'll find the Honda Civic CRX. And we're willing to bet that the CRX won't be at the bottom of the short list--particularly if the CRX in question is an Si."


#3
oblivionnewtonjohn

  • Professional novice
  • PipPip
    • Group: 2014 Contributor
    • Location:Tennessee
    • Drives: 1986 Honda CRX Si

Man this is awesome, just went through this myself. I found the o ring for the plastic threaded insert luckily at the Honda dealership, generic non honda, he had a big box of o rings to try. The one that seals the thermo-wax valve, no luck, but I coated it with RTV. 


The once issue I did have is getting it back in and threaded, could not find a tool wide enough to fill both slots at once, so the top got eaten up quickly. Danny from NW Classic Honda sent me two.


I did have a piece of flat bar that I put on the grinding well to get it to fit the slots. But the other tips will be a Godsend when reassembling. Thank you for posting this! 


#4
strudel

  • Leadfoot
  • PipPipPipPipPip
    • Group: 2011 Contributing Member
    • Location:Edmonton, AB
    • Drives: 2009 AUDI TT 3.2L, Project Teg powered Austin Mini Van
    • Image Gallery

Man this is awesome, just went through this myself. I found the o ring for the plastic threaded insert luckily at the Honda dealership, generic non honda, he had a big box of o rings to try. The one that seals the thermo-wax valve, no luck, but I coated it with RTV. 

This comment intrigues me. Where exactly did you coat with RTV? If you are talking about the lid on the FIV then I would say that is OK to do. Please check the o-ring on the idle adjusting screw as well as that can leak air also. Just make sure you put the o-ring and washer back in the correct sequence. JS


If you want one of these Logos send me a PM

aan.jpg


Austin Mini Van with DOHC Honda HP
http://www.angelfire.com/droid/strudel
Honda reliability and power combined with Mini cachet and style.


#5
oblivionnewtonjohn

  • Professional novice
  • PipPip
    • Group: 2014 Contributor
    • Location:Tennessee
    • Drives: 1986 Honda CRX Si
The bottom o ring, to the wax valve housing, I coated it in RTV to add more "meat" seal to it as I couldn't find one locally that fit. Once I first took mine a part, I saw my issue, the inside o ring that fits the bottom of the threaded insert, was missing half and distorted from years of use.
Sent from Nok Nok