 Sign In
 Create Account
Any track updates w the new brakes?
greasemonkeyreborne 5x1g's's Content
There have been 58 items by greasemonkeyreborne 5x1g's (Search limited from 17-April 23)
#581537 Some Brake Upgrades
 Posted by
on Today, 12:43 PM
in
Competition
Posted by
on Today, 12:43 PM
in
Competition
#581536 Armrest Handle Repair
Posted by
on Today, 12:42 PM
in
1G CRX
GT, post up when you do it. Looks like CSP's got a winner
#581535 Update 2024: 17th Annual Road Trip 1987 Honda Crx - Dallas To Panama
Posted by
on Today, 12:25 PM
in
1G CRX

Desoldered the switch rail (bent out the tabs holding each switch in place). A real PITA
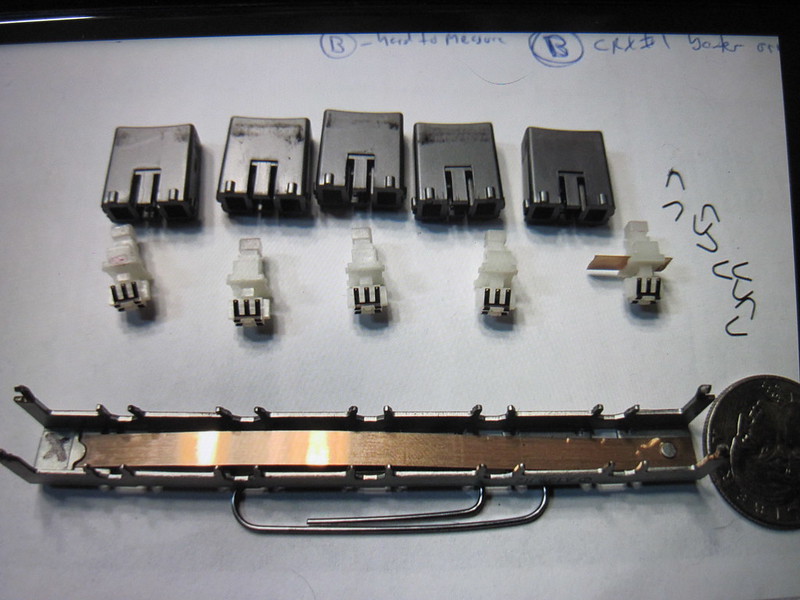
Pulled apart the switch rail to find 10 mini springs and a long ribbon spring (see the tiny 10 springs upper right corner). Do this in something like a sandblasting booth. I made a cubby w white sheets. sheets also dampen the springs if they launch. Acts as a "catch". Glad I did as the little springs (upper right in photo) are very small and will fling if not grabbed firmly w tweezers.
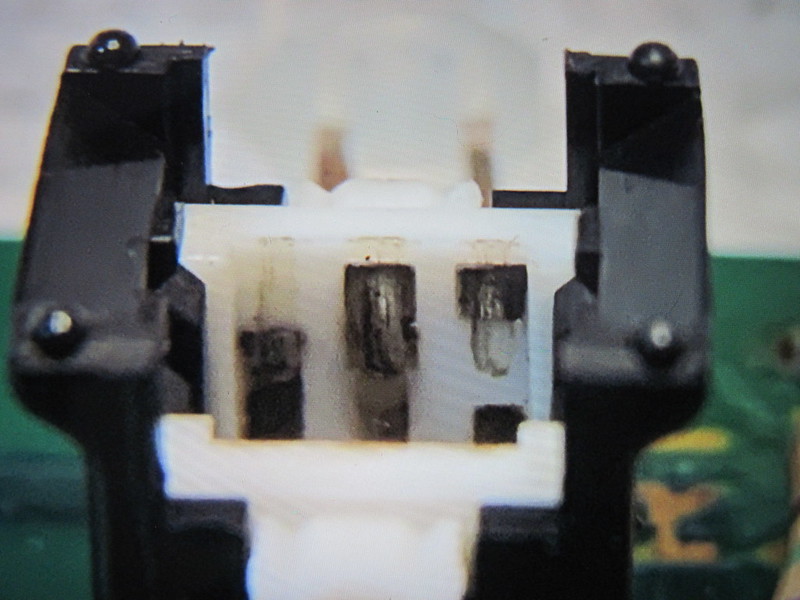
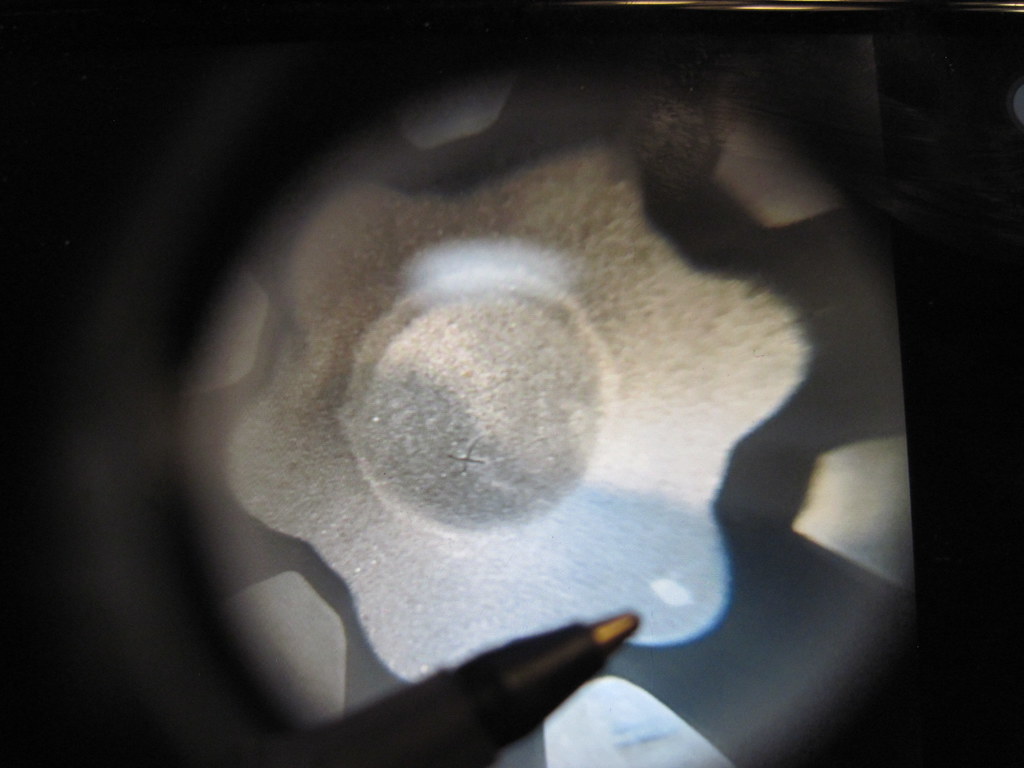
Inside of switch assy. There are 6 contacts total per switch.. Notice the fouling where the slide marks are.
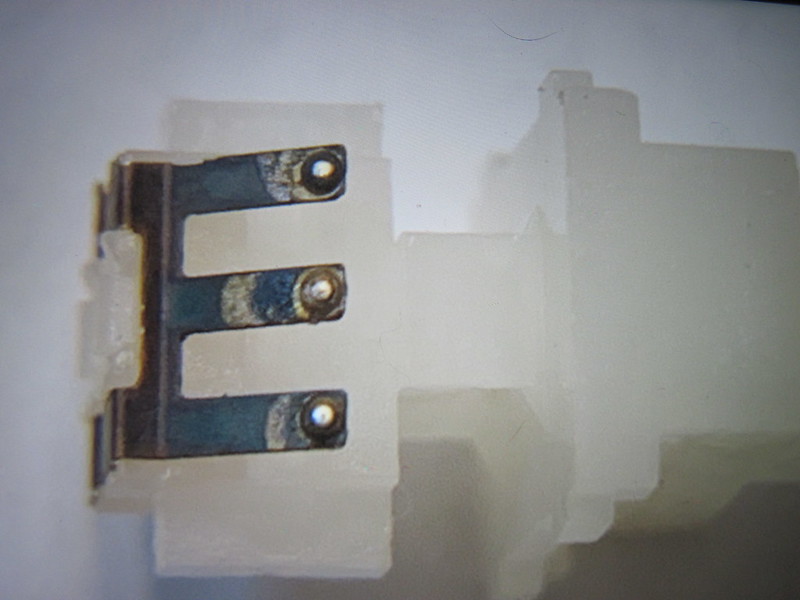
Other part of the switch. This is an indented ball feature. I don't recommend to sand it down. I believe the balls need to be there for best operation.

Used a felt polishing wheel on this part. And 800 grit paper on the black mating part. Since the base switches are made of nylon, I used MEK (old original blend) to clean off the contacts w/o melting the plastic. MEK takes everything off. Picked out the residue left over from using Q-tips.

The buttons pop in and out via a ribbon spring. This was another PITA as it interferes w assembly/disassembly of the switches w the 10 micro springs. Removed the rivet and installed the fastener to the right. Redoing this rivet w the fasteners was another PITA. That detail will be on RPR.

Pix of the micro springs (2x) per white switch. I had to destroy another CC just to figure out best way I could remove/instal them. Made a little hook to carefully slide these out. Huge PITA.

Dry run test. Reinstalled the switch bar w cleaned contact, no springs. spent ten min pressing/wiggling the bottoms and alls good so far. The 'hi-def" switch on this one is a little tight on tolerance. Taking it apart again to reinspect, sand the contacts on the black part of the switch for the "hi-def" position. to see if it can be made better.
More to come. Next step is to reassemble the unit "pre-solder". Since I sanded the contacts and removed the corrosion coating. Will apply silicon dielectric grease. The sanded surface will create abrasion and allow corrosion. Assuming silicon will prevent that. Once this checks out, then I'll do the final assembly and call it a day.
1 of 9 of my used units work properly. Not that this is a show stopper to driveability. Probably only does it while driving so you'll never hear it. I'm sure it'll fail the motor eventually.
Part number for the front portion of the Climate Control unit is 39301-sb2-972. This part was long gone 18 years ago when I was looking for one for a restoration project. I had bought it for the face plate at the time to do a concourse restro. The alternate number I was able to get was 39301-sb2-013. Faceplate and CCA same, but the signage is different. Made a good "golden test unit".
This climate control design is only specific to the 84-87 CRX. Civics, accords and preludes of same era have different design.
#581534 Update 2024: 17th Annual Road Trip 1987 Honda Crx - Dallas To Panama
Posted by
on Today, 12:18 PM
in
1G CRX
I've had an observation driving this car over the decades on road trips. Every now and then, I'd feel variations of airflow near the pedals against my ankles. Other times it appeared the cabin air diversion mechanism would self adjust from upper vent, lower vent... on its own. I had assumed it was a gust of wind or a semi passing by causing drafts around the car affecting the cabin airflow.
2 years ago when I removed the dash to change out the fuel lines, was lying upside down w my head near the pedals connecting harness and HW.... was moving the speedo bezel around w the climate control attached.. and the actuator motor that adjusts the air direction was sputtering and changing the dampener location on its own (ignition switch was on at the time.)
Last year I removed the climate control (CC) and swapped CRX #9's 129K CC module. Did several road trips and still noticed the variation of airflow directions while driving.
This past week I'd tap on the CC buttons or firmly hit the CC unit and the actuator motor would move and twitch.
Swapped another actuator motor. Same results.

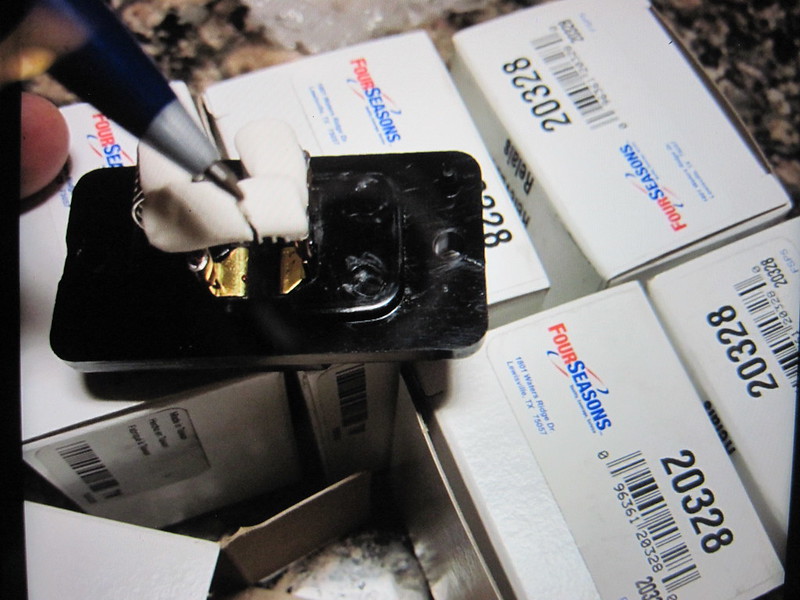
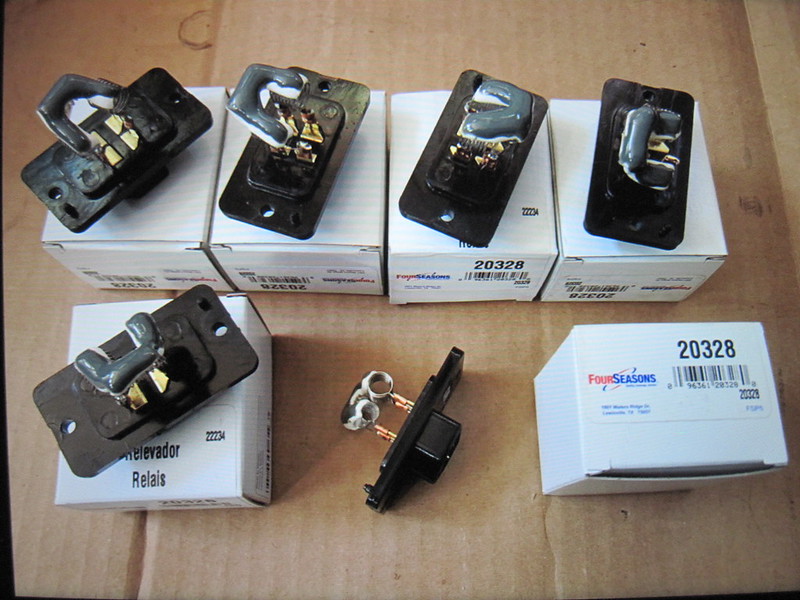
I pulled out all my used CC's and only 1 out of the 9 wouldn't budge when wiggling the button or tapping on the CC. Then I pulled out an NOS unit and tried that one and it worked perfectly.

I left the original actuator motor in place. Installed the spare motor on the black towel to the upper left to prevent any obstruction of the arms and vent-door creating drag. Ruled out wiring, connectors.... The black motor w the golden arms would either twitch/jump back and forth very quickly, or it would move to another position the switch wasn't set to. This explains why I'd feel the air flow changing while driving.... Hitting bumps on the road would shake the CC unit causing motor to readjust.

Root caused issue to the switches. Pressing down on one switch, then wiggling that individual stitch side to side would duplicated the situation. Bad contacts on the switches. Going through all 9 CC's, not all the switches did it. Condition only happens on the switch that is on and lit up. Some of the older, higher mileage CC's did this condition on all five switches. The "Recirculation" switch doesn't do it, Its a different design.
This will be a abbreviated repair version. Need to put together a more detailed post on RPR and attach the thread here later.
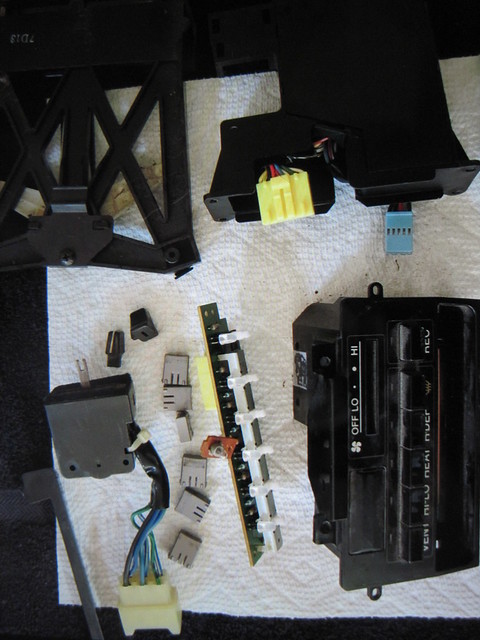
Tore down the CC to get to the switch CCA.
#581533 Update 2024: 17th Annual Road Trip 1987 Honda Crx - Dallas To Panama
Posted by
on Today, 12:12 PM
in
1G CRX
More house keeping......

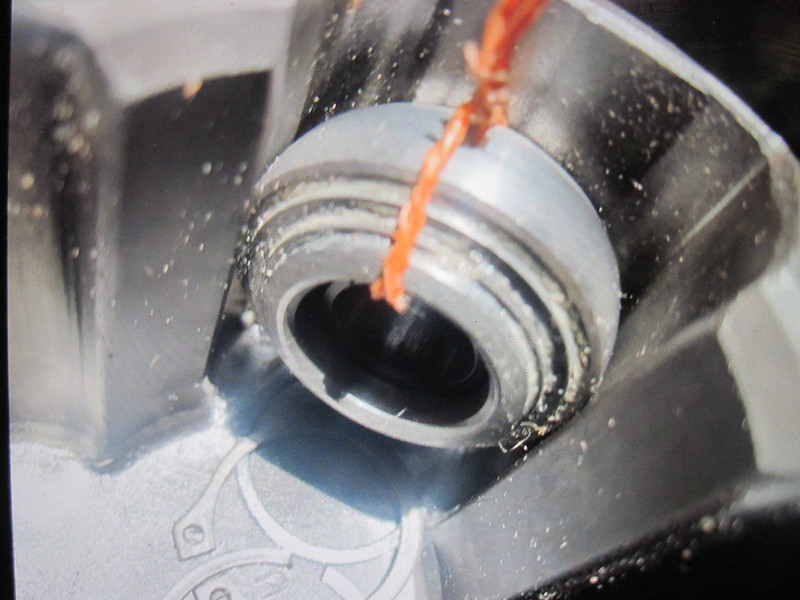
Proper seal compression for a static seal is around 20%, dynamic is 10%. At least that's how I use to design using quality Mil-Spec rubbers. Gives enough to seal while reducing compression set. Looking at my oil filler cap, the seal probably has 1-2% compression left. Wasn't leaking but figured replace it anyway.
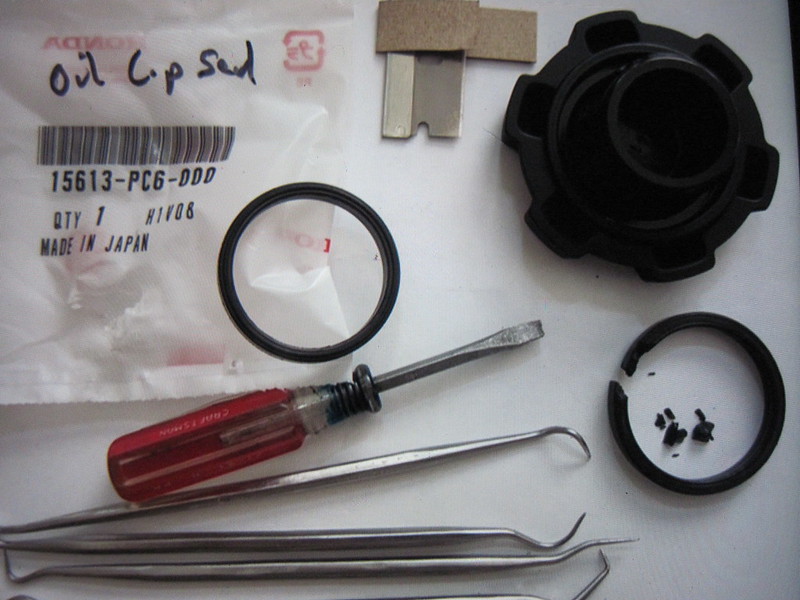
Seal is just under the ball of the pen. square cross section w 2 finger ribs. Had to cut and pick it out. Was careful not to scratch the oil cap sealing groove. 36 yr old rubber was pretty stiff. The NOS seal is good and pliable. I'd assume the new seal in about 25 years old based on when I bought it. So far, the only NOS OE rubber causing me issues due to age are the CV boots. I had changed most of the dynamic seals and coolant hoses on the engine/tranny back in 2004 w Honda OE. And those are still holding. I'm more inclined to continue using old OE Honda rubber. I've had some cheap chinese gas powered tools w failed fuel/oil seals within 5yrs of age. Honda did an incredible job w their design and materials compounding back in the day for these parts to last so long.
Plastic panel repairs....

I'm not interested in upgrading my plastic body panels yet. But i have to live w the visible cracks until I repaint the car some day. But each dent and scratch holds a memory from the past. Adds character. There's 2 cracks visible right at the rubber molding guard from my repair a few months ago. One to the left, other to the right (middle crack on top I broke out trying to get the sill off).
I pulled the car our of a nice warm garage 2 years ago to play in the snow when it was 10F. Drove to a gas station. Took about 5 minutes. while I was in the car when the gas was pumping, I heard several faint pops and cracks. I knew exactly what was happening. The plastic shrinks faster than steel. It took those few minutes to shrink enough to crack the plastic as the metal wasn't catching up. And when you get cold enough, the plastic shrinks more than the metal and you get an interference fit = cracked plastic. I try not to drive the car below freezing whenever possible. Cold weakens the plastic, then contraction from cold shrinking.... Not a good thing for 36 year old plastic panels.
The door cap cracked also on that cold trip. There's black electrical tape holding the plastic piece from breaking off the rest of the way. Will pull the door cap off at a later time and bond that back together and file the edges of the door back to give it more clearance in the future.
DOOR HINGES... -- follow up
Prior to shimming my doors back up to align properly, the door would make a thunk as I'd drive off from body torsion or something. Guess the door would reset itself in position. Since I did the shims to the lower hinges. The noise has gone away.
MOLD/MUST ODOR..... --- follow up
Since cleaning the carpets and interior, the car smells great when I open the door after left sitting for a while. The only pieces I didn't clean are the engine firewall deadner and the rubber/felt deadeners over the rear wheel wells.
Planning another trip to Austin in a month or 2. Looking forward to driver again as the weather has been really nice here lately.
#581516 Update 2024: 17th Annual Road Trip 1987 Honda Crx - Dallas To Panama
Posted by
on 02 March 2024 - 10:40 PM
in
1G CRX
Misc car work

Swapped the drivers seat belt unit I rebuilt a while ago. Had to pull up the side plastic liner to get to the hardware

While I had the hatch open, one of the bumper/aligners was jacked a little. Pressed it down and it popped out. Slider tabs broke off from age. A chunk of the tab is the small piece in my hand. Pen to the upper right shows where it came from.

I had been grabbing pieces off junked cars for as long as I can remember. I store the parts in a climate controlled room hopefully slowing the degradation process. Over the past few years, I've finally been able to consolidate the parts together and create an inventory database. Now i know what I have and where it is. The spring launched out as the part popped out. Luckily was able to find it.

Grabbed the worst of the parts from storage. There's a crack across the bottom in the center of the replacement part, but the tabs looked good. Laying them side by side, can see the years of impression set into the right side of the part to the right, where the pen is pointing. I'm sure someone is making SLA's of these by now.
Its a challenge maintaining an old car w OE parts driven/used so much. Perpetual repairs. Metal parts.. fine. Its the plastics and rubber. Then exposed to the southern sun or heat soaked engine bay. Not a favorable condition.
#581515 Update 2024: 17th Annual Road Trip 1987 Honda Crx - Dallas To Panama
Posted by
on 02 March 2024 - 10:30 PM
in
1G CRX
CV AXLE JOINT DISASSEMBLE AND OBSERVATIONS.......
Brief summary. More detail on this link
https://www.redpeppe...ack#entry580243
INNER SHAFT JOINT

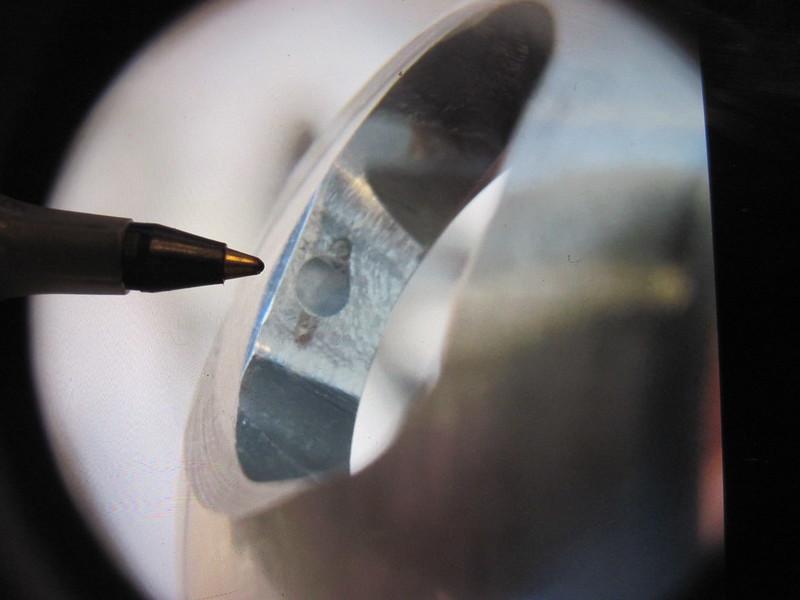
This is the inner joint housing of a remanufactured axle I took apart in 2020 (far contrast to the inner housing that was perfect in the preceding posts from a couple weeks ago). Can see where the reman company ground the outer race. I see little wear over the section my pen is pointed to. I assume it wasn't in service long. Doesn't look that bad considering they did the resurfacing by hand as noted by inconsistent grind pattern.
This particular slot of three was ground the most and had a slightly over sized needle bearing in it (.005" over). This bearing marked w twistie, (twistie is holding the bearing together as I removed the circlips to disassemble) wouldn't fit in the other 2 slots. Issue here is the bearing wouldn't slide all the way into the housing slot it was machined to fit and sticks right at the point you see it in the pix. Their grinding wasn't done in parallel. Interference would cause excessive grinding of metal, shortening the life of the joint.
This explains to me why reman axles feel gritty and far from smooth as I rotate them new out of the box. The inner housing is the simple one to grind. The outer joint is complex geometry you'll see below. This is why I sure don't want to use a reground outer joint. Someone in the shop eyeballing w the grinder.
OUTER JOINT.
The outer joints are not supposed to come apart per Honda. I'm pretty sure reman companies us a hydraulic press to yield the square cross sectioned circlip holding this joint to the shaft. This particular shaft came from an unmolested HONDA OE joint that was smacked hard enough to crack the knuckle. Assuming the joint was bad from impact, I took a hammer and was able to whack it off the shaft

Marked the joint components. Critical to tap on the joint where the 3/8" extension bar is (between the balls). then the balls pop up enough on the opposite side to get them out w a small screw driver. They pop out w moderate force. Also note where the screw driver is.... the first ball has to come out at this casted-in feature of the cage.
The balls actually interference fit into the cage. See the small divet ground into the cage where the ball rests. You can see where the ball popped out of the divet and left marks side to side while in use.

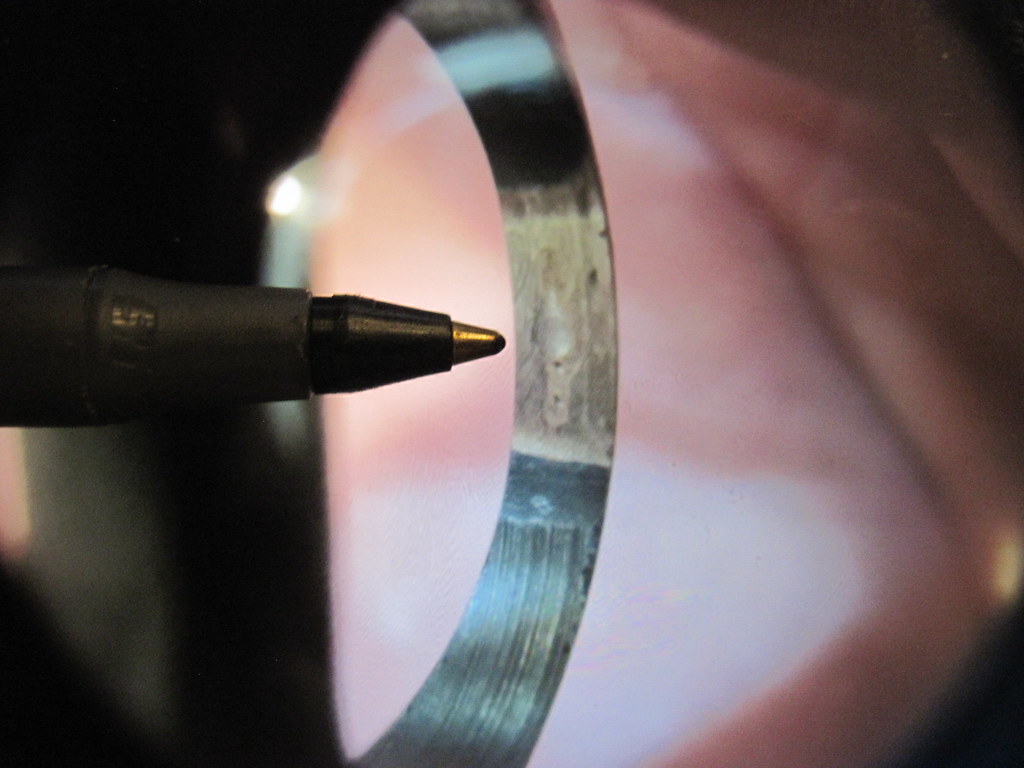
Here's a pix of the inner race. There are 2 distinct wear lines here where the ball worn into the race. I'd assume over time as this wears deeper, this causes the clicking in the joints as the balls roll in and out of the wear path as the joint rotates???
I know both of these Joints were Honda OE. The inner was reground. The outer was virgin. I found tool markings from Honda's sub suppliers to identify (stamped into the housings)
AFTERMARKET JOINTS.
Searching the net for aftermarket joints a few years back, there were several options back in the day. I go way out of my way to steer clear of cheap chinese crap. Much rather over pay for parts made by reputable companies. Making sure even the metal doesn't come from China as best as I can.

a
Heres a Joint from Germany by a company called Lobro. Now I have no idea the build quality until I install and see how they wear. From the image, the heat treating is obvious. Honda appears to have heat treated the entire joint, not just spot treated the inner inside bearing contact area of the joint. Note in the pix where the pencil points to the circlip. This circlip has a rounded cross. So the Lobro was designed to pop off the axle easily. The Honda is square and its not designed for removal.
Someday, I hope to remove good Honda OE outer joints, reverse them and place on the opposite shaft (drivers to passenger and vis-a-versa).
#581512 Two Car Shows In Two Days!
Posted by
on 02 March 2024 - 02:50 PM
in
General Posts
Cool to get you car next to Hondas Mugen!, Watched the video. Awesome!!!!
Car cleaned up really nice. It’s in really great shape
#581511 87 Crx Honda Cv Axle Joint Rebuild, Slop/backlash New Vs Used
Posted by
on 02 March 2024 - 02:48 PM
in
1G CRX
I was exploring after market cv joints. Couldn’t find anything on the inner joints. Found several part numbers for the outers. Appears mostly from European market. I bought some Lobroes from Germany. Made In Germany. Hoping their reputation for metallurgy and tolerances holds up. These are shelved for now. But figure it’s an option to replace my outers. Other brands were available, but couldn’t the where they were made on the packaging. So I didn’t get any others. I’m sure I have plenty of used axles to pull from to remake several sets of quaility axles to support my cars. As long as the boots get replaced quickly upon failure, should get 200k out of these Honda axles

Notice the heat treatment from the inside of the housing. I’m certain Honda heat treated the entire joint as I could could not metal stamp numbers into the outer housings of Hondas as mentioned before. Flattened my hardened stamp.
The Lobreo joints came apart very easy. Just grab the cage, rotate 90 degrees and the balls fall out. No tools needs. Feels like the Honda OE joints are more stout
#581510 87 Crx Honda Cv Axle Joint Rebuild, Slop/backlash New Vs Used
Posted by
on 02 March 2024 - 02:16 PM
in
1G CRX
INNER RACE OF OUTER JOINT

Pen points to grooves worn into the drive side of the inner race. I expected the wear area to be uniform over a small area as the bearings slide back and forth in these slots making 360 rotations under load. Assuming 6 ball bearings yielding uniform load.
OUTER RACE. / HOUSING OUTER OE JOINT

Similar wear marks on opposing sides of the grooves machined into the outer housing.
This outer housing came off my CRX #9 I bought outright from a junkyard before anyone else picked off it a decade ago I’m certain this was the original axle outer joint from a 129k car.
This car was not drivable. And the inner joint was pulled apart from the heavy impact. So I have no idea how this axle drove prior.
I’m thinking these grooves worn into the races must cause the “clicking” as the joint wears???
MEASUREMENT / BACKLASH ERRORS
At a later time, I’ll pop this on a shaft wo the circlip and measure it to see if I can quantify
Looking at the inner housing, it feels like the boots help the joint close to the position where the wear of the inner race/grooves would have occurred. I believe the inner joint mesurement are decent.
The outer joint has specific grooves worn in the races by the bearings. My measurement set up places the shaft in axial alignment to the shaft. So the bearing are most likely no in the grooves shown about into the races. Best I can do at this time.
#581509 87 Crx Honda Cv Axle Joint Rebuild, Slop/backlash New Vs Used
Posted by
on 02 March 2024 - 01:47 PM
in
1G CRX
OUTER JOINT OBSERVATIONS / DISASSEMBLY

Honda CRX 1G OE outer joint. Honda did not design these for disassembly. Looking into the splined hole, there’s a groove where a square cross sectioned circlip snaps in. I’d assume the rebuilders use a hydraulic press to pull this joint out of the shaft. This joint came from a 129k crx hit so hard the knuckle cracked. So I was able to whack on it w a hammer and it actually came off. I think it was luck in this case. I tried it on another very loose reman joint. Pounding so hard, it was denting the joint. That one never came off.
I marked the joint components to keep them clocked
 The Honda joint is like a rubics cube to take it apart. The cage has a depression molded into 2 places clocked 180 apart. Lift the cage as high as it will go. I used a 3/8” extension to tap the far side down as seen to the right of the pix. Important to tap gently and between the bearings. Then used a screw driver to pop out the bearings. Found out the bearings interference fit to the cage. So they pop out w moderate force
CAGE

The bearings interference fit inside the cage slots. Pix of the thicker side of the cage toward the transmission. Can see the divot machined for the bearing. The scrape marks I assume came from me trying to tap the joint too hard to pop it apart.
wheel side of cage. Thinner. Same concept
I was hitting the 3/8” extension bar too hard and the joint in several locations til I could figure out how to take it apart. Pen points to the impact of a bearing on the housing were I messed up and hit it too hard.

All the bearings looked really good. Some had very faint lines probably from the accident impact. This ball matches the slot where I left a damage mark on the housing. Hard to get a focused close up of the mirrored bearing. The pen points to a smudge to the surface of the bearing. I’m thinking I can reuse this joint, but reinstalled to a passenger side to negate the wear by using the opposite side. I’d replace this particular bearing though as that smudge is rough to my fingernail rubbing across it
#581508 87 Crx Honda Cv Axle Joint Rebuild, Slop/backlash New Vs Used
Posted by
on 02 March 2024 - 01:01 PM
in
1G CRX
Some updates
AXLE CONTACT W FRAME CAUSING AXLES TO BEND
My car was a salvage title back in 1988. I know the hood and drivers fender for sure was replaced at a minimum. The drivers fender cracked beyond repair several years ago and I replaced w another used OE fender. Definite body distortion as I had to bend and shim metal mounting points to get the new fender to remount without bending or distorting the replacement fender. I’m sure the frame is off a little allowing close proximity to the drivers axle. Guessing this axle contact might be more of an issue for me due to the 1988 damage.

Out of the 37 used axles, 23 are drivers. Have to verify, but there were 6 of these axle w scrape damage like this pix. It’s about 1 in 4 with axle contact. These mostly came from junkyards. The accident causing them to be in the junkyard could be the reason for the bending axle issues?…
Ive been practicing bending my axles back. Honda Helms manual says not to reuse bent axles and don’t provide straightness specifications.
INNER JOINT OBSERVATIONS

This is the inside of a good, near perfect inner joint housing. Pen points to wear area as mentioned before. The sharpie arrows point to directions of rotation. Pen shows drive contact and wear point.

This is a reman axle I opened up back in 2020 when rebuilding my axles back then. Pen points to the plain the roller bearings contact. They machined the surface to refresh. I assume they used some sort of manual CNC w a jig to touch this up. Doesn’t look bad. Looking at is closely, you can see inconsistencies in the machining. I’d assume would cause excess wear of the new joint. This joint had little wear as the machining marks are not worn smooth yet

Same housing above w the machine roller bearing in position. There are 3 slots. This slot was machined from above. The roller bearing is oversized OD by .005”. They didn’t grind the surface all the way down, or did it out of parallel. It won’t slid down the shaft any further than this. Another accelerated wear condition from poor craftsmanship. As I recall, the other 2 slots had OE sized roller bearings w lightly machined slots. There was a little play. I’d assume this joint would be ok. Wouldn’t last as long as an unmolested OE.
twist tie is holding the roller together as the side clips were removed. Can see the clips at the bottom of the joint. It’s not suspending the roller in the slot
#581505 Update 2024: 17th Annual Road Trip 1987 Honda Crx - Dallas To Panama
Posted by
on 13 February 2024 - 11:03 PM
in
1G CRX
17th ANNUAL ROAD TRIP: DALLAS TO PANAMA CITY.

Clocked 2256 miles. Now at 303,756 miles. Cheapest gas was 2.79 in TX, most expensive $3.89 right on the beach in Florida. My daughter and I spent several days on the trip. Met up w my brother in Florida. Had a great time. Glad to get the opportunity to take a trip w her.
Car drove great. No issues. Getting some tire vibration. I rotated the tires before the trip. Noticed some excessive wear in some areas. Had to have come from over loading the car on the last trip to Michigan and NY - distorting the suspension. I had replaced the rear axle a while back and noticed a little pull from it. Its time to get the alignment checked. I'm assuming I'll need shims for the rear spindle. No rain. Don't know if the floor boards leak after sealing w urethane. But not looking to find out.


Drove the coast line back as much as we could. Stayed over in Mississippi on the beach. Had an awesome dinner on the water during a sunset.

I guess this is a jeep thing... Hanging around the beach and got "ducked". Someone left these wrapped on the front wipers. Has the Martigra flare.

Then a quick stop in the French Quarter of NO. Last time this car was here was 1994. That was a 2 1/2 week cross country trip back in the day. Nice to come full circle.
I was looking back at the Redpepperracing post I started back in 2009. Apparently, my first road trip started in 2008 after the car was resurrected from storage to live its second life. Brings it to the 17th annual trip, not 16th. Looks like its been on around 27 out of state road trips since 2008. Spending way too much time on maintenance. But only had her towed once bc I ran out of gas thinking it was the main relay.
I'm sure they're be another Michigan/NY trip and Denver trip later this year.
#581504 87 Crx Honda Cv Axle Joint Rebuild, Slop/backlash New Vs Used
Posted by
on 09 February 2024 - 10:53 PM
in
1G CRX
I didn’t think I would get through these used axles before the Florida trip to sort out a good one for rebuild. So I worked an alternate route. I was able to get one of my local auto supply houses to order 3 drivers axles rebuilt. I selected the best of he three. Basis was to rotate the inner/outer joints…. And pay particular attention to the outer joint. If it rotated rouge, then it was pulled apart and reground.. I selected the joint that felt tight and rotated smoothly
After getting the reman axle home, i removed the boots to inspect the joints…..

The inner joint turned out to be near perfect w little wear. I’m pretty sure this is OE. The pen shows the contact point of the bearings on the tulip. Rubbing my finger over this spot, I can’t feel any depression into the metal from wear at all
Then I open the outer boot.. Cleaning the grease out…. Had about 10 drops of clean water drip out. SOBs at the reman company power washed the joint, didn’t let it dry. Just slapped grease back I got the joint. After solvent cleaning the outer joint and blowing w compressed air…. I inspected the balls and races…. All looked good. No scoring for grinding.
I placed the shaft in my straightening fixture. This reman shaft had the paint scraped off near the torsion bar housing. And it was bent. Apparently the rebuilders dont care about axle straightness either. Too me 6 hours to straighten this axle to near perfect. It was worth my time as the joints were in such great shape.

another thing the reman company did was paint the entire shaft head to toe. I used MEK to wipe off as much of the paint as I could. They even painted the entire inner shaft part that inserts inside the transmission. And the sealing surface as well where the pen tip points to. Cleaned this off as well. Also note in this image the hub seal was missing. Non of the 3 reman axles has them. Instead of using nos, I pulled off a good used seal off a low mileage oe shaft.

Rebooted and greased the reman shaft w NOS. Grabbed a set of oe boot bands off one of the used axle sets. Honda sells inner and outer grease separately. Their grease tends to be more pliable than the reman grease. I’d suspect the reman grease comes in 50 gallon generic drums. Makes me feel better to use OE grease. My original shafts lasted 259k and could have kept going. I’m a believer in Hondas design and reliability engineering
this reman drivers shaft refitted w OE grease and boots is now installed into the Beater at 301k. A trip to Florida is coming up. Will test out the humming noise…
#581502 87 Crx Honda Cv Axle Joint Rebuild, Slop/backlash New Vs Used
Posted by
on 09 February 2024 - 09:03 PM
in
1G CRX
Did some more axle work.
my NOS drivers axle shaft installed in 2020 bent from impacting the drivers side torsion bar housing when I drove a roller coaster back country road. I’m guessing when the car came out of the dip, became airborne, the axles and drivetrain flexed downward from the engine mounts. This interfered w the torsion bar housing, impacted the axle, bending it. Car was also a rebuilt salvage title back in 1988. Impact was on front drivers side. This damage probably help create the interference condition by distorting the frame
 pen top shows where the housing scapes the paint off the axle on impact

I used my hydraulic press to straighten the axle at the point of where the paint was scraped away. When I bent this back, I still had a little wobble upon rotation on the shaft up close to the outer joint. I reinstalled the shaft. And replaced the original front 270k wheel bearings while I was at it

I ground down the top of the torsion housing as much as I felt comfortable w to give me additional clearance in the future.

painted the spot to monitor.. notice the rubber grommet showing the amount of clearance.
then I drove 5400 miles to Michigan and NY and back. ( also hauled 750# back w me, really over loaded the car). Got a little hum from the drivers wheel bearing area half way through the trip. Thinking that shaft wobble might have caused either the outer cv joint, or wheel bearing to begin to fail???
Now I’m really anal about my cars running as they were designed. Especially the 80’s Japanese cars since they were built so simply, and well….

and this is the extremes of my analness…. I’ve collected 37 axles over 30 years.
Since the 2020 rebuild, I believed there to be three paths to replacing axles. 1) Chinese new. 2) rebuilt axles (reman). 3) finding good Honda axles never previously rebuilt, and reboot them. My gut was best path was to buy as many original Honda axles possible, QC tolerances and select best sets to reboot

I placed each axle in this set up. Measured the slope w the red channel wrench…. Converted to rotational slope in degrees. I’ll publish findings later. Need to find a way to easily quantify this data.
bottom line, I used the NOS axles as a baseline (.7 degrees slop), compare the against my original 259k axles I removed from service. ( 2.85 degrees slop - and still good working, vibration free, click free joints). This gives me a range of working axles.
now I remeasured these axle sets this recent go around (NOS & original 259k axle sets) I’m getting a 20% measurement delta. So each time I quantify measurements in the future, I’ll start w these 2 sets as a relative starting point. The obvious variability is how much pressure I apply to the channel wrench varies. Yielding different measurements
Out of these 37 axles, I probably have 3-5 really good sets I can reboot yielding 1 to 1.4 degrees over each axle. This range seems to be consistence w 75-100k used original axles. This judgement comes from several axles I was able to obtain mileage from the junkyards.
another note, I had 6 of the drivers axles w paint rubbed off the shaft just like mine did from impacting the torsion bar housing. So this is a common issue. Maybe 1 in three cars. But could be due to axles collected from junkyards by rebuilders were from accident cars stressing the engine mounts on impact causing the paint to scrap and bending axles.
I’ve labeled and quantified all these axles. So I can grab from the stock as I need to for the other cars
#581501 Update 2024: 17th Annual Road Trip 1987 Honda Crx - Dallas To Panama
Posted by
on 09 February 2024 - 08:36 PM
in
1G CRX
CSP….. I looked up ceddasauto.com. He still has the hinges. Appear to be brass bushings to replace. And a new bolt as a replacement pin. Looks like a good solution
thnx again for tip
#581500 Update 2024: 17th Annual Road Trip 1987 Honda Crx - Dallas To Panama
Posted by
on 09 February 2024 - 08:12 PM
in
1G CRX
Plastics repair time!
I pulled off the drivers plastic sill (rocker) panel to inspection for rust in the rocker area a few weeks ago. The sill panel cracked 2 years ago near the gas filler when I pulled her out of a 45f garage and drove it in 0F winter freeze storm. The rapid thermal contraction cracked my door caps and lower rocker sills. Common problem. Not to mention 36 year old plastics.

Years ago back woods hunting in Michigan, I drove through a large puddle/bowl down a 2 track. Placed a patch on the outside to hold it together and prevent further cracking. fortunately, this never cracked the whole way through.

This last October trip, the drivers door sagged and punched a hole into the sill via the door corner. To the lower right of the hole, there's a crack starting at a 45d angle downward. This same 45d angled crack is on the passenger side as well. Must be body flex taking its toll on the aging plastics.

When I removed the rubber bumper guard trim, the plastics broke more. Using the 3M 2216, gluing it back together in stages. Used wire to hold in place while it cured.

After refitting the final piece, used modeling clay to fit check clearances between the sill panel and unibody

a
Used Saturn S series front door skins to rebuild the CRX sill from the back side. Went overkill and really beefed up this area.

Cut long strips to reinforce the length of the interior sill as well. Parts a bit heavier now w the additional plastic and glue. But its pretty solid now. No interference w the body. Was running out of time for the Florida trip. So stopped here. Will pull it off after the trip to reinforce some other areas.

I had collected 4 front door panels off 96-99 Saturn S series cars at a junkyard. The 3 1/2 panels left over in the pix to the left (silver/white). I try to buy my plastics up North as less heat and UV damage is assumed. These I got here in Texas. Purposely pulled silver and white as those colors reflect UV the best. Before i pulled these off the cars, I used a pair of pliers to bust a corner out of the panels. As long as the break was a "tear" and not a "crack", they're good! As i cut strips off the door w the recipocating saw, I purposely broke sample areas of the material. The areas tore and turned white as I yielded them. So these used panels are great repair material to use. GM still has some of these panels NOS in stock. I happened to find an NOS panel on ebay and just got it in for 1/3 the price. Its the grey primered one to the right in the picture. I'll save this one for when i need the strongest repair.
I mentioned this before Honda made their body panels out of ABS/PC engineered thermoplastic. I cant find any spec data from past articles for Honda. Dow Chemical made the Saturn door panels from 1990 to 2005. Apparently it was Pulse B250 from 1990-1999. And Pulse b270 from 2000-2005. Both materials are ABS/PC. The change in 2000 increased the thermal dimensional stability by about 30F to help correct panel warping in the sun. And to maintain better dimensional stability.
ABS/PC is pretty tough trying to bend it by hand when its fresh material. I'm pretty sure the The Honda and Saturn materials are a 99% CTE match. This car sees ranges of 115F-0F here in Texas. This point is critical to me so the bond won't also create additional cracks in another spot or break apart from thermal cycling. 3M 2216 I had tested and used over several military programs. Good stuff. Flexes a little w temperature. Its the best way to repair these panels I can think of. Correct matching repair material and a super strong aerospace epoxy.
While i had the 2216 out, I reinforced the fan resistors I bought this past year as well.
The dampening material over the coils was cracked out of the box. As these age from use, the white material flakes off. Hoping to keep this together longer.
Corrected the batch. 2216 doesn't conduct electricity. I did the best i could to keep it off the coils anyway.
Cars ready for the trip. All back together.
A post I did years ago on RPR about Honda plastics. http://www.redpepper...ics#entry580541
Another post I did on Hondas panels. http://www.redpepper...ics#entry580374
These haven't been updated in years and lost their original images. I'll update them when I can w the new findings.
#581499 Update 2024: 17th Annual Road Trip 1987 Honda Crx - Dallas To Panama
Posted by
on 09 February 2024 - 07:40 PM
in
1G CRX
Treating the floor board rust and searching for water leaks..

Drivers side rust hole/seam failure just under clutch pedal. Chipped away the rust. Wire brushed the metal down. Treated w Phosphoric acid. This is not a 100% fix. Later on I'll prep properly and weld in sheet metal. Appears the rocker panel looks good. I've used this acid treatment for years on body work having great luck w rust not coming back or coming back very slow. Goal here is to neutralize the rust. Since I dont drive in the rain much and never see salt, I'm good w this for the time being.

Passenger side after same treatment. Area is smaller, but a rust bubble up on the rocker wall I don't like.

Not having the time to weld it up. I used a Loctite polyurethane roof/flashing sealant for the time being. I primed and painted the affected areas. Let is cure. Then applied the poly coating the interior rust. I laid down a .070" sheet of EPDM rubber, then cut 2 layers of roof flashing to dress the top. Since the floor board flexes a little if pressed in just the right spot, I needed this to give a little. I'm sure there's a better sealing product. Reached out to some body working buddies to query better products for semi flexible seams. If you have a good recommendation, lmk... This seal seams to be good enough to prevent water infiltration for my trips if I need to be in the rain temporarily.
Since I needed to know the condition of the body... I removed the lower drivers sill. It was cracking from the last trip and needed to be repaired anyway.

Good news is the rocker looks fine. Car spent a couple years in New Jersey, then Kentucky, then w me in Michigan and back to NYC. Car was undercoated by a PO before I got it. I'm happy w the condition considering how many years this car saw salt in the 1980's-90's.

Peeled the front drivers fender well liner back to remove hardware for the sill removal. Looks clean in side here as well. This view is the wheel well side behind the clutch pedal. The pen points to where one of the 4 sunroof drain tubes comes out. I need to open up the interior at both wheel wells and and confirm the tubes are clamped and tight. These tubes leaked before and i had fixed them back in the 90's. Issue might have come back allowing water to sit in the floor pans. Another issue might be A-pillar leaks around the windshield. I need to replace the cracked windshield I'll have my glass guy pull the shield and I'll do the bodywork then if needed.

In .attempt deaden the sound a little more, I laid down a thin layer of carpet on the floor before reinstalling the original carpet. There wasn't factory deadener over the hump where the exhaust runs. I have some spare fire wall deadeners from parted cars. Going to see later if I can double layer the fire wall to quiet the motor a little while on the highway. Difficult to talk on a cell - noisy. The carpeting and interior smells great. Will monitor the floor boards if I have to drive in the rain looking for water infiltration down the road. I"m sure I've got unresolved issues somewhere

Finally installed the dangling fog light switch from 2 years ago.

Raising the drivers door striker pushed the door back into alignment and worked great. But the latch drags too much from loose hinges and sage. Have to really slam the door. I did some calcs and figured I needed about .045" shimming on the bottom hinge set to lift the door about .250-300". Cut shims out of roof flashing.

Works great. Ball point pen shows shims. Door closes nice wo drag. The bottom hinge really was loose while I was doing the job. At some point, I'll need to pull a good set of hinges off a passenger door of of lower mileage car as they are reversible to rebuilt. Going to add .010" shimming the passenger door while I"m at it
a
#581496 How I Approached My Fire Suppression System
Posted by
on 03 February 2024 - 02:02 PM
in
Competition
Nice job! I like these videos you guys do together. Nice light weight instal
#581495 Update 2024: 17th Annual Road Trip 1987 Honda Crx - Dallas To Panama
Posted by
on 03 February 2024 - 01:50 PM
in
1G CRX
CSP, thnx for tip on chedda. I installed shims on the hinges. But notice the door can shift once I start driving. Unibody shifts a little
#581494 Update 2024: 17th Annual Road Trip 1987 Honda Crx - Dallas To Panama
Posted by
on 03 February 2024 - 01:14 PM
in
1G CRX
Prepping for the Florida Trip......
The car's front left wheel area started making a slight humming noise half way through the last trip to Michigan/New York. I was concerned I might have messed up restraightening that axleback in October causing either the outer joint or wheel bearing to prematurely fail. I had started an axle rebuilt post of RPR a while back. I'll update that w the detail and theory behind how I've been collecting the least used Honda OE axles that have never been rebuilt. The remanufacturers regrind the races, remove the surface of the hardened steel, install larger bearing yielding joints that will ultimately fail sooner. So I'm not a fan of remans. Since Honda NOS axles are no longer available, that leaves chinese after market axles. I've not heard good reviews of these chinese axles either. IMO, its worth the effort to rebuilt the best used OE axles I can find.
RPR axle rebuild post: (to be update shortly w procedures and data collected on some 30 axles sorted through)
the spot I straightened the axles last October. Bending caused from axle impacting torsion bar support here.
I wanted to isolate the noise. So I pulled the drivers axle (axle pulled was an NOS when installed 30-40K ago and still felt very tight -- thinking now this was not the problem) . And started the axle science project. I pulled 25 years worth of axles collected. The past 10 years, I've purchased only used OE Honda axles from the yards w original OE boots/bands. Goal was to hopefully find low mileage original axles to rebuild somewhat close to new.
Got them sorted, labeled with the purchase history, known mileage, noted OE vs aftermarket and serialized each one for ease of future location from stock. I'm expecting to get 3-4 really good sets of axles out of this pile. 2 major observations noticed: 1) the longer drivers axles outer joint appear to wear out faster than the shorter passengers outer joint. 2) The inner joints part number also match the Accord's inner axles (heavier car w a larger engine). Appears the inner joints wear much less. I believe they were manufactured better since used on Accords. My archilles heel is the drivers outer joint. The outer joints don't pop off the axles per Hondas design. I think rebuilders used presses back in the day?? I think I've found a way to remove good outer joints on a passenger shaft, then replacing that good joint for the more worn drivers outer joint. more to come on this later. It'll be a destrutive process. Thats also why I collected all the axles.
2 months ago. I didn't think I was going to have the time to sort through the used axles. I went to the local parts store. They ordered in 3 reman axles for me. I bought the one w the smoothest joints (assuming never been rebuilt) with the least amount of rotational slop.
I placed all these axles on the vise measuring/recording outer/inner joint rotational slop. (detail in the RPR post to be updated shortly).
This is the set up i use to measure joint slop. I measure the slop at the end of the pliers and convert to axial degrees. I start w NOS Honda axles. These yield about .35 degrees of slop per joint or .7 Degrees per axle. I use my original 259K OE (2.85 degrees total axle slop) as the high end range. Realistically, the best used OE axles I can find are between .9-1.3 degrees over the entire axle.
To my surprise, the reman axle I bought 2 months ago measured near best of the 30 axle group. So I opened the reman axle's inner joint to see if its been reworked to a crappy hand machined interference....
To my surprise, the bearings were smooth and all measured the same. This pix shows the inside of the inner tulip. Can see the surface blemish where the roller bearing contacts. Rubbing my finger over the surfaces, I can't feel a thing. This inner joint was a lightly used original OE joint.
Next step, removed the grease out of the outer joints. Surprisingly, about 10 drops of water came out of this reman joint as I was removing the grease..... disappointing. Solvent cleaned them, blew compressed air, inspected races/balls best i could as I couldn't disassemble. This joint looked great as well.
Rebooted/greased this reman axle w Honda NOS plus added honda bands. Appears this was a really good original OE axle acquired by the rebuilder I got it from. Its now installed in the car. I'll see what this trip yields w this noise issue the cars having.
The rebuilder spray painted the entire axle w metallic gray paint. Used MEK to wipe off most of the paint. They even painted over the polished sealing surfaces of the inner shaft interface to the transmission. Note the pencil point. I really don't want contamination circulating around my tranny oil. Lastly, their axle was bent. Took me several hours to work it back to near perfect straightness. Not happy with this rebuilder. Too many flaws and sloppy craftsmanship. It was a excellent base axle. Worth the effort to me. All corrected now
Took a couple days to sort through the axle stock, qualify and document. Replacement of the axle took 1.5hrs..... I'm not saying I'm doing it an efficient path. But knowing its OE quality, tolerance and metallurgy - its worth it to me
Walked in my son's room. Here's a screen shot off his computer screen of my car from his summer adventures w his buddies. He had fun.

#581491 Armrest Handle Repair
Posted by
on 19 January 2024 - 05:27 PM
in
1G CRX
Nice video
#581488 Update 2024: 17th Annual Road Trip 1987 Honda Crx - Dallas To Panama
Posted by
on 14 January 2024 - 11:16 AM
in
1G CRX
16th ANNUAL ROAD TRIP DALLAS TO PANAMA CITY
Visiting family. My daughter is taking off work to come w me. Looking forward to spending the time w her!
Time to get going on the car
Drivers door sagged enough to break out the lower sill

Drivers door closed. A little low

hinge sag w door popped open about 1/2”

Flipped the door strike to get rid of the wear on this part. Raised it up as far as it would go. Also brought the strike inward to get the door to close tighiter. Hoping to reduce highway wind noise from the top of the window

The car has alway had a slight musty smell when left closed up. I’ve had water leaks over time. Drove in the rain for three days on the Michigan trip. Wasn’t able to pull the carpet corners up like I normally would if I had to drive in the rain. Car reeked when I got back. And MadMax spilled a strawberry smoothie on the passenger floor this summer…. Result of no cup holders. I spilled my share of drinks as well. I pulled the carpet and rubberized felt liners. Soaked in the bath tub and washed several times. Soaked in a vinegar solution to try and neutralize any mold. Them soaked in Downey “unstoppables”. Process took 3 days including drying time

Obvious source are the rust seems in the floorboards. Chipped away the seam below the clutch pedal and it’s worse that I thought. There’s a gap on the passenger floor side as well

When I bought the car in 1993, my friends brother in law spilled a strawberry shake in the front passenger seat. Left for the Navy. I I got to clean it up a year later. Back then I pulled the front carpet and hosed it down on the driveway. When I did this. I had sunroof drain tube separation and water got to the floor boards. There was a little rust in 93 forming behind the seats. I smeared grease there an placed duct tape over it. Pulled it up and it worked great. Wasn’t the best solution back then, But it worked.

If the rust under minds the unibody, the ill go to plan B. I had bought this spare CRX as a rust/accident free 150k to to replace the Beater in the event I smacked a deer in Michigan someday. It’s the car on the far right
#581485 K Swap Knowledge Dump
Posted by
on 10 January 2024 - 10:18 AM
in
Swaps
Good deal on classic plate approach
A big push from the states for inspections stems from federal Highway construction funds. States need to manage emission levels to EPA guidelines to keep fed subsidies. In TX, we only have emission testing and hov lanes around Dallas, ft worth, Houston, San Antonio, Austin. If you own a non compliance car in the other 90% of Texas, ur fine
#581481 Now We Have Two
Posted by
on 09 January 2024 - 10:18 PM
in
1G CRX
Good deal! Last time I saw mesh…. They were gold. Like 20 years ago


Community Forum Software by IP.Board
Licensed to: Red Pepper Racing