 Sign In
 Create Account
It’s very tedious. I’ll have a separate post w much more pix and info once I reassemble and get it back on line. Appears the electronics are very solid. Weak point appears to be the buttons

Update 2024: 17th Annual Road Trip 1987 Honda Crx - Dallas To Panama
Started by greasemonkeyreborne 5x1g's, Nov 04 2009 09:41 PM
183 replies to this topic
#181
 Posted 18 April 2024 - 06:20 PM
-
- Leadfoot
-

- Group: 2018 Contributor
- Location:Foreign national in TX
-
Drives: 9 crx's: #1 228k 87si beater, #2 concours 25K, #3 108K 87si, #4 98K parts car, #5 213K 87si parts car, #6 84 straman, #7 86si 150k #8 67k parts #9 129K si for straman conversion
 Back to top
#182
Posted 20 April 2024 - 02:42 PM
-
- Leadfoot
-
- Group: 2018 Contributor
- Location:Foreign national in TX
-
Drives: 9 crx's: #1 228k 87si beater, #2 concours 25K, #3 108K 87si, #4 98K parts car, #5 213K 87si parts car, #6 84 straman, #7 86si 150k #8 67k parts #9 129K si for straman conversion
The Climate control reassembly has been on the back burner while working other projects.
Climate Control Phase II:
There's another abnormality with this unit I had fixed back in 1998. Back then (1995), my A/C worked great. I swapped a leaking radiator on this car. I went to run the AC. It came on for a few seconds and just shut down. Was in NYC at the time, didn't need AC so didn't bother working on it. Moved to Dallas in 1998. Hot as hell, so needed AC working again.
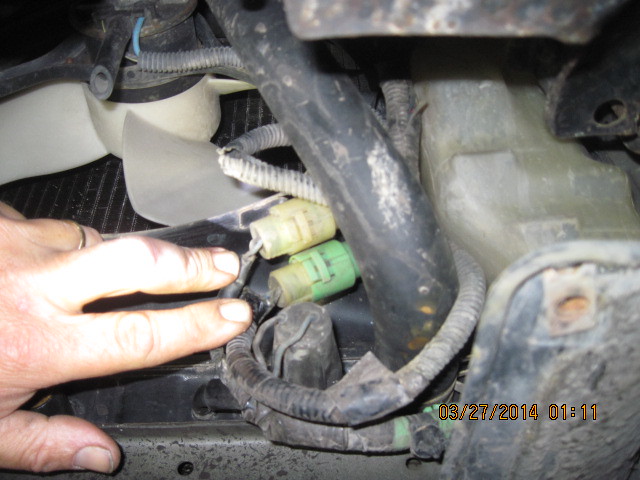
About 20 hours of testing the electrical components narrowed the issue down to a fried Climate Control. Issue was caused by swapping connectors in the picture above. Unfortunately, Honda didn't color code or make the connectors unique - other than one connector being green, while both mating connectors were white. By swapping these, it sends full amp current through the sensing ground wire (I believe it was black w a blue strip - wire). Same wire that goes through the AC relays/diodes, hi/lo pressure shut off, idle booster, relay timer, evap cold/freeze shut-off, fan switch, climate control and finally ending at the ECM. It was a challenge to ID and fix. One connector is part of the base engine bay wire harness. The other connector is the dealership add-on AC specific harness. Apparently, they can't be crossed

What gets blow is the Climate controls Amplifier CCA pictured above. I can't figure out which component gets damaged. Inspected the solder joints and components w a glass, I just can't tell.... I just know swapping this CCA fixes the problem. Now finding a CCA that isn't already blow is the tricky part. When I figured this out on CRX#1 back in 1998. I just drove the car w the assembly connector hanging out. Kept pulling used CC's from the junkie until I got one to work. Then, later that summer of 1998, CRX#2's AC didn't work. I replaced a damaged suction line on that one from a soft front end collision it had before I bought it. That one had a new hood and header panel. So i figured the radiator was new as well. And sure enough the Climate control on CRX2 was blown (PO's repair shop swapped the connectors). Went to the junkie and played musical parts til one worked.
When the CC gets blown by swapping the connectors, the AC button still lights up "green" when depressed. So you think its a refrigerant issue. It affects nothing else other than turning on the AC. The wiring scheme is the same for same era preludes, civic and accords. I'd have to assume this issue is common to the era.
Its a common issue. I've never seen any posts on this topic other than what I've done over the years. I"m really not sure how others have solve this. Its a cheap car, so no one probably cared about AC.
Keepin' it OEM
#183
Posted 20 April 2024 - 02:51 PM
-
- Leadfoot
-
- Group: 2018 Contributor
- Location:Foreign national in TX
-
Drives: 9 crx's: #1 228k 87si beater, #2 concours 25K, #3 108K 87si, #4 98K parts car, #5 213K 87si parts car, #6 84 straman, #7 86si 150k #8 67k parts #9 129K si for straman conversion

The other week one of these broke off. I had searched for these 20yrs ago via the Honda parts systems. No luck. I thought they were listed as "discontinued" even back then. So I gave up and just grabbed them off junkyard cars. Once Honda places a part as "discontinued" , it drops off the "dealer locate" system. That prevents dealerships from selling those parts overbought on their shelves back through Honda's dealer locate system. Dealerships are allow so many "dollars" worth of inventory or "piece parts" returned each year to the main wharehousing system. These small parts get lost through the system. Then they get tossed. This process might have changed today, but its what I dealt w acquiring parts for my projects 15-20 years ago.

Googled the P/N last night for kicks,.. and someone was selling a set. Got them this week. Saving for the concours car.
An RPR member Bobby out of Oklahoma had aquired these a different route several years ago. He cross referenced these parts to a late 80's acura. I forget the model. Probably a Teg. Acura sold the identical bumper rubber and spring but it was enclosed in a sheet metal assembly that bolts on to the trunk side of the hatch as a unit. He had shared that w me 10-15 years ago and I my local Acura dealership sourced them from their Japanese based wharehouse. Took a while to get them. Another route for those doing restorations. This was the only time I had ever gone through Acura to obtain CRX parts. I don't believe their parts systems talk to each other. At least 20 years ago they didn't
Keepin' it OEM
#184
Posted 20 April 2024 - 05:37 PM
-

- Leadfoot
-
- Group: 2016 Contributor
- Location:Phoenix AZ
-
Drives: K24 powered 86 CRX SI & 85 CRX
-
Image Gallery
 View Garage
Great score!
Victor
86 K24 Powered CRX SI (SMF Solo2, HPDE-4 NASA & TA-A Time Attack
85 CRX DX totally original
07 Harley FXST Softail
2021 Tacoma Tow/Daily


Community Forum Software by IP.Board
Licensed to: Red Pepper Racing