Jump to content


Project "red Daily" - 1985 Crx Si


  • You cannot reply to this topic
151 replies to this topic

#31
CRXer87hf

  • Speedy
  • PipPipPipPip
    • Group: 2013 Contributor
    • Location:Atlanta, GA
    • Drives: 1987 Honda CRX HF, 1985 Honda CRX SI, 2003 Land Rover Disco
    Garage View Garage

Progress:


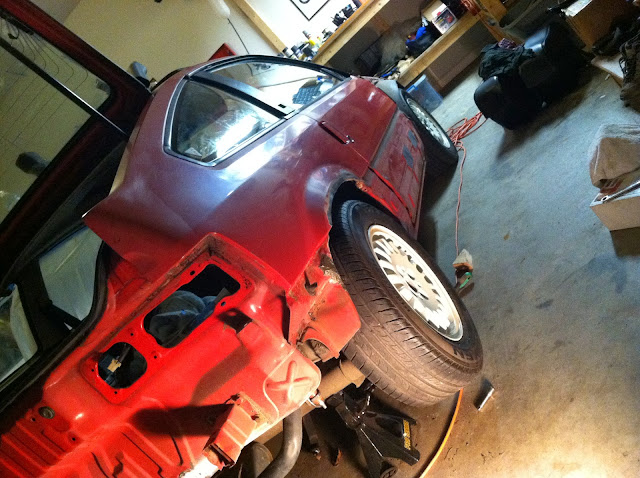
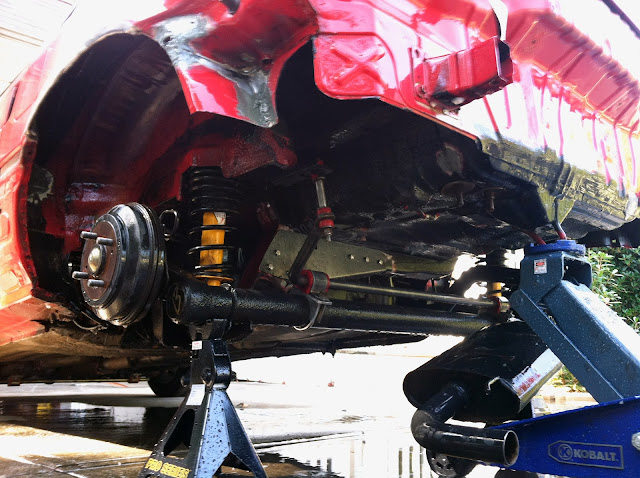
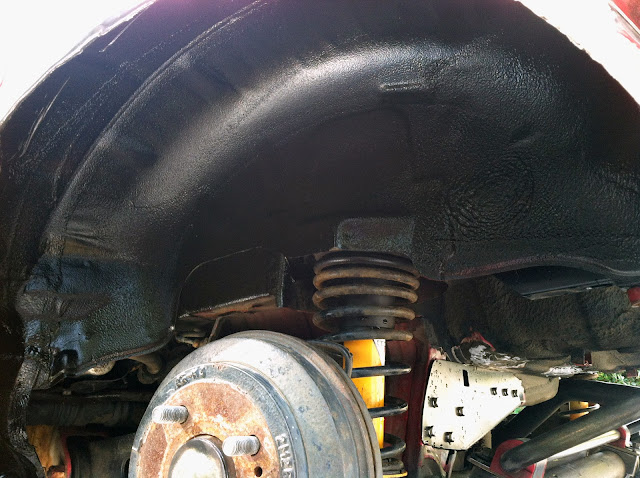
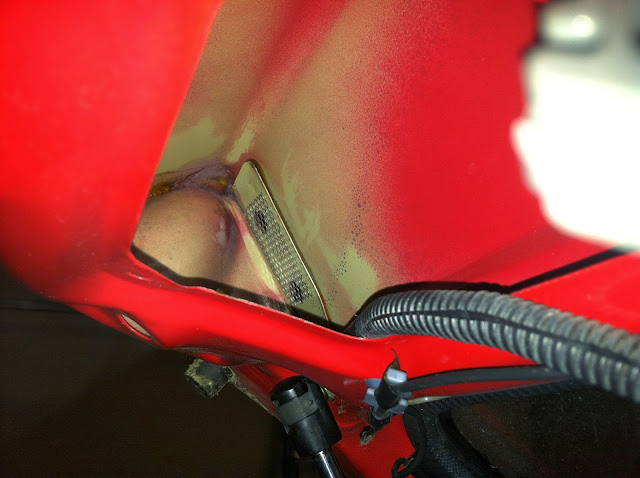
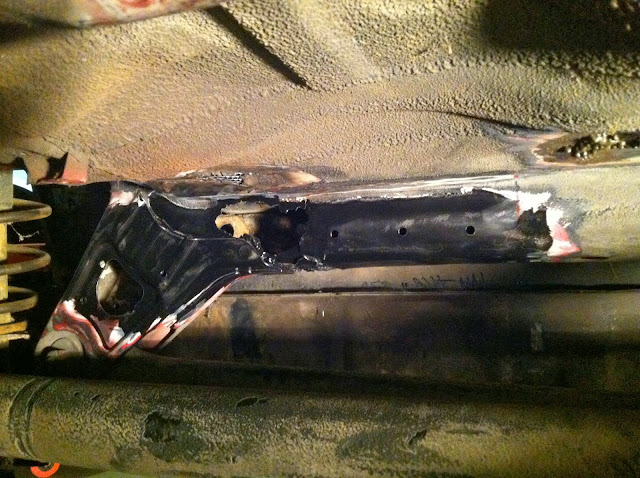
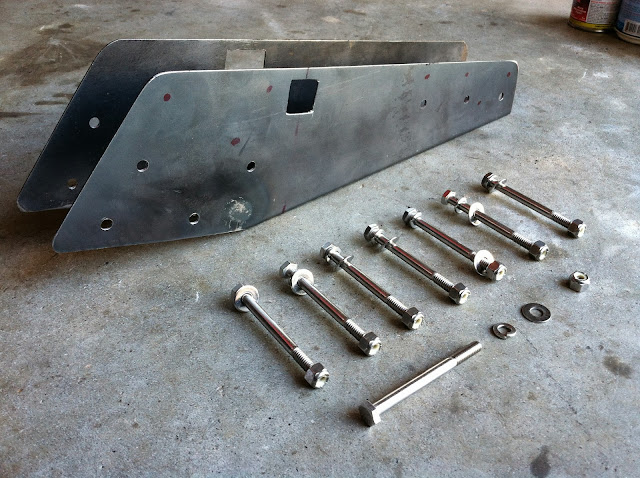
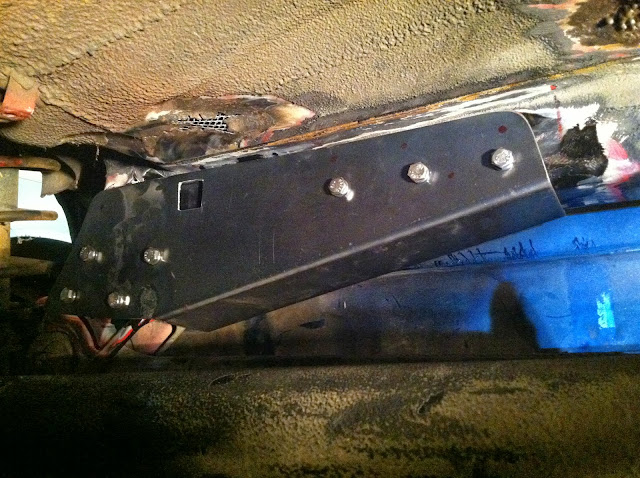
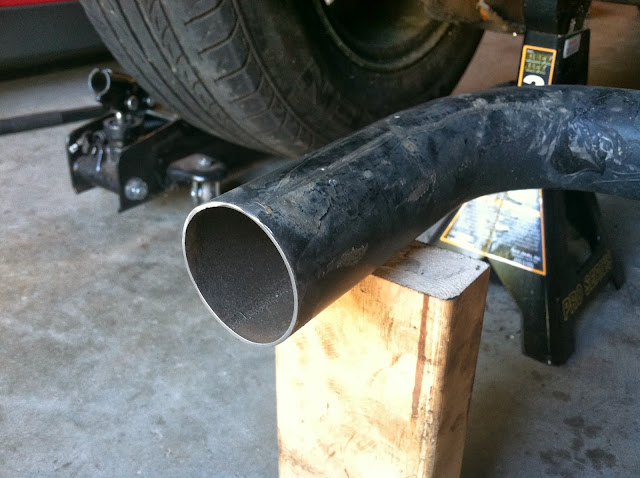
Well, I had the weekend free and finally got a bunch done.  The big thing was the panhard bar brace which was going to take the most time.  I started out sanding down the frame and got the weld-thru primer in order to prepare for spot welding when I decided to go a different route.  I realize, chedda, that the steel version was meant to be welded, but for the sake of time (which I'm running low on), and my own perception that having several bolts securing the two part together would be stronger than spot welding, I decided to bolt it down instead.  I was struggling to get the tank out which is mandatory for welding access, and after marking the points where the brace and the frame were touching, the weld points would just be in odd locations, based on the torsional forces that the brace would have to absorb.  If I have extra time as things come together, I might spot weld it as well.  So I drilled the holes and cut out the access hole for the tank strap hook.  Everything fits snugly and all I need to do is get some good hardware to finish the install.  More coming on this later.


photo%2520%252860%2529.JPG


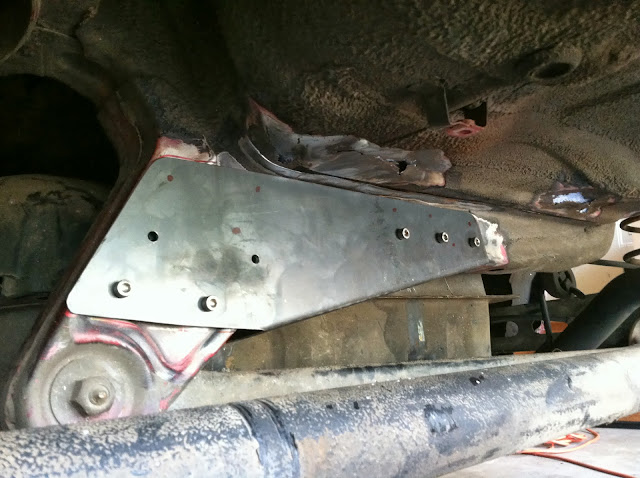
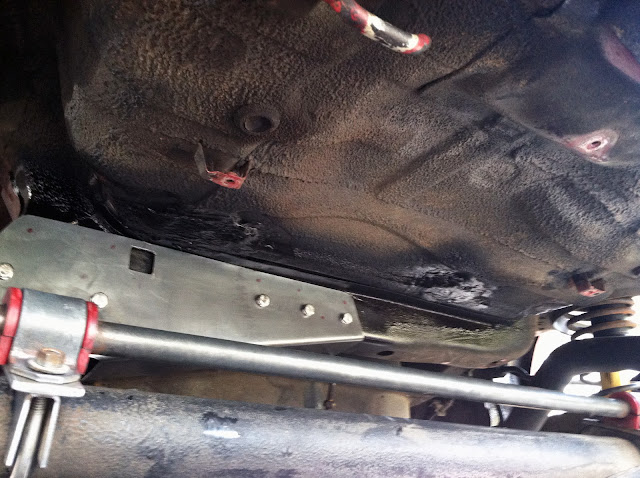
This shows all the bolt holes with some spare hardware I had that I used for positioning.  


photo%2520%252861%2529.JPG


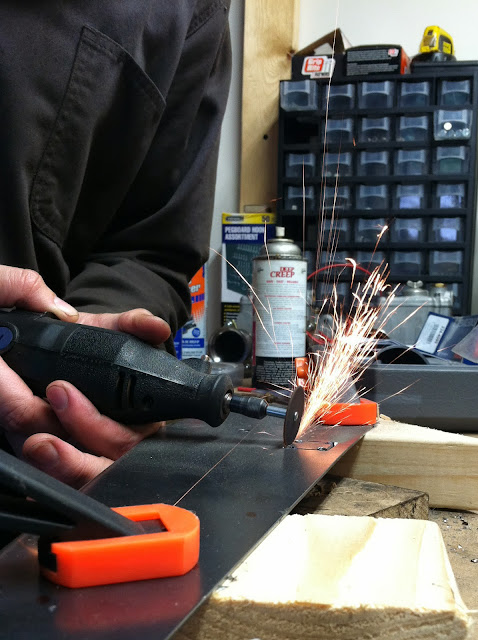
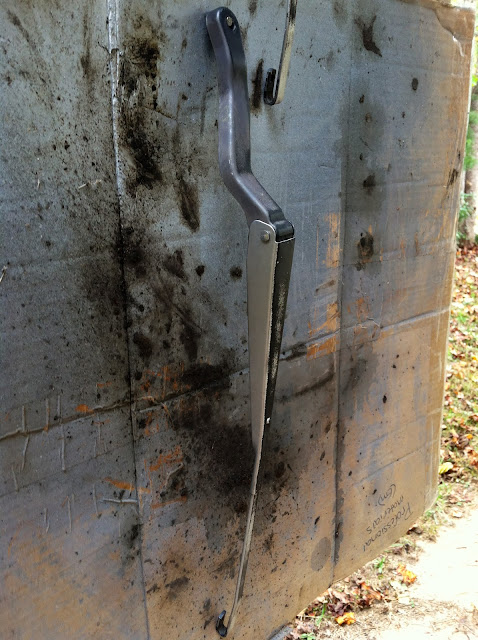
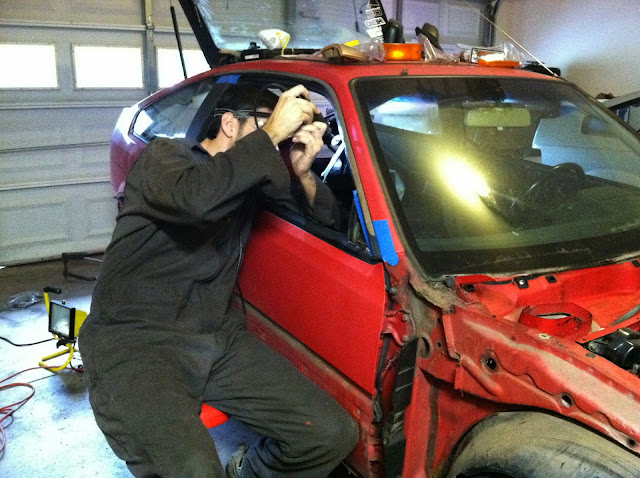
Action shot of me cutting the access hole for the gas tank strap hook.  


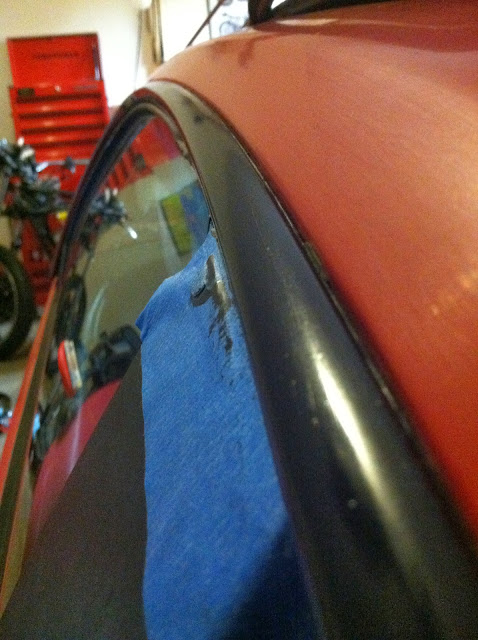
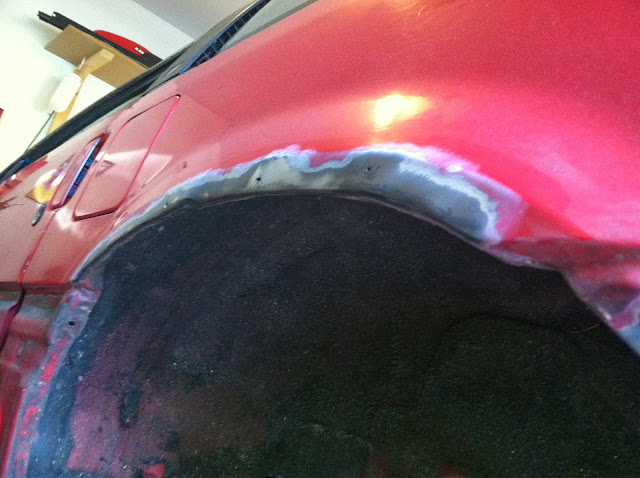
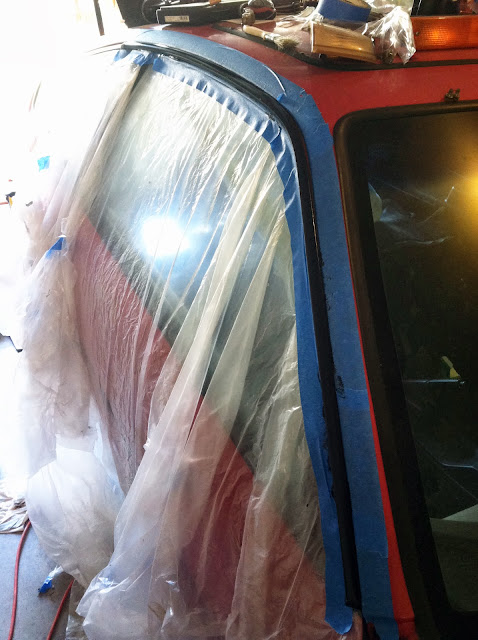
On the cosmetic side of things, I decided to take care of the rain rails, since they looked like crap.  I'm not sure how others have dealt with these things, since they are often dried up, cracked, and rusty, but my plan of attack was to paint them.  I knew the aluminum was in good shape, I just needed to get the over-molded plastic off, so here is what I did:


photo%2520%252857%2529.JPG


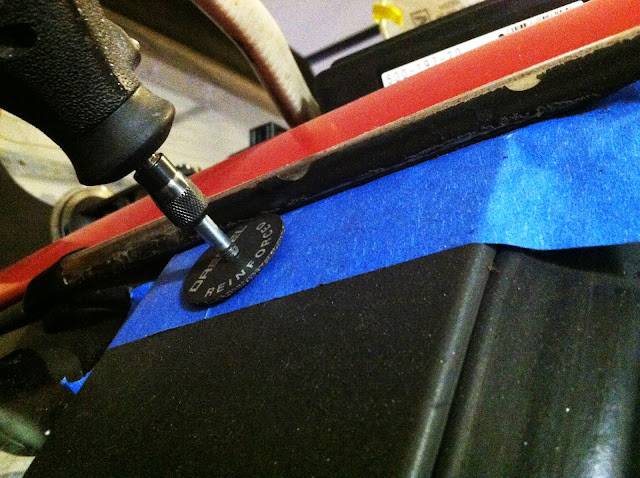
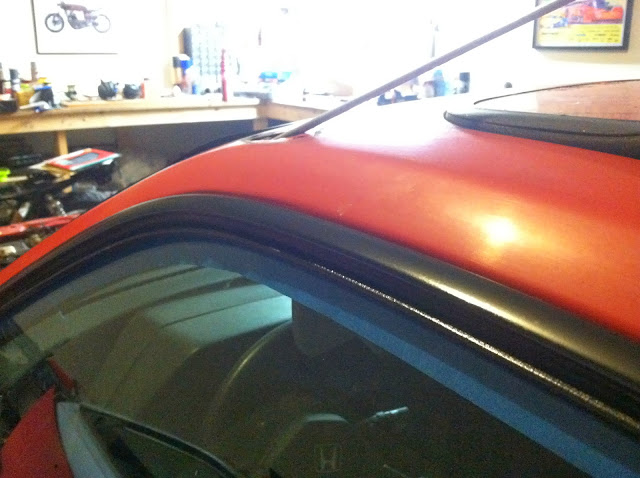
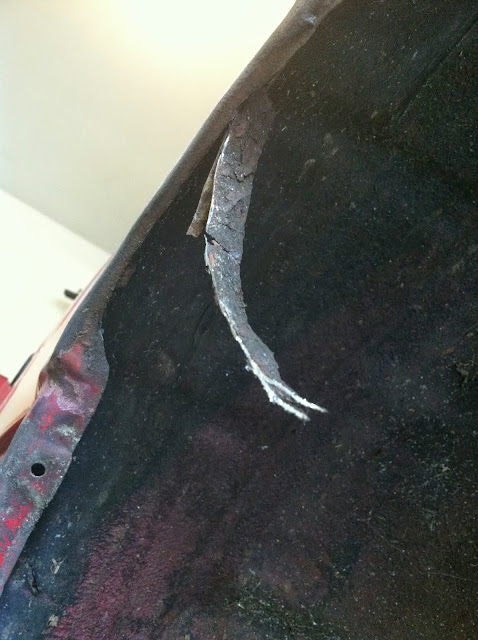
I got the dremel out and ran a cutting disc along the underside of the rain rail, as close to the body, and weather stripping as I could, making sure to just cut through the plastic and not the aluminum.  


 photo%2520%252858%2529.JPG


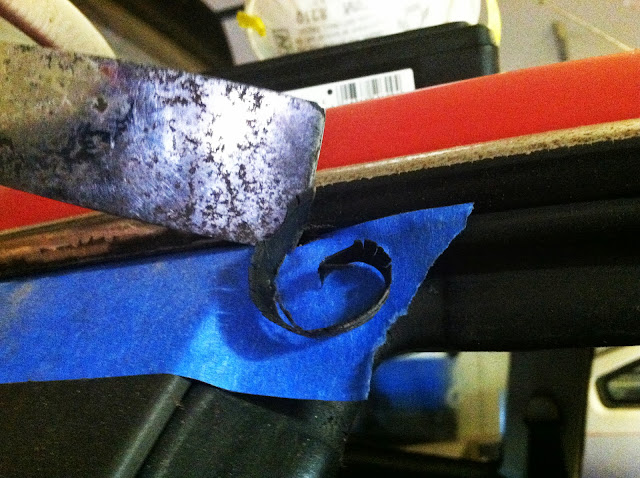
I then got a hammer and chisel and chipped the remaining plastic off the rail.


photo%2520%252859%2529.JPG


Then I got the dremel out again, this time with the wire brush attachment and sanded any remaining rust, plastic, and corrosion off the rail.  Using the wire brush will also allow you to sand down the remaining plastic edge that is barely visible at the bottom of the rail.  Now after a good wipe down with the denatured alcohol, it's ready for paint, which is coming later.


photo%2520%252863%2529.JPG


Another action shot for good measure... :)


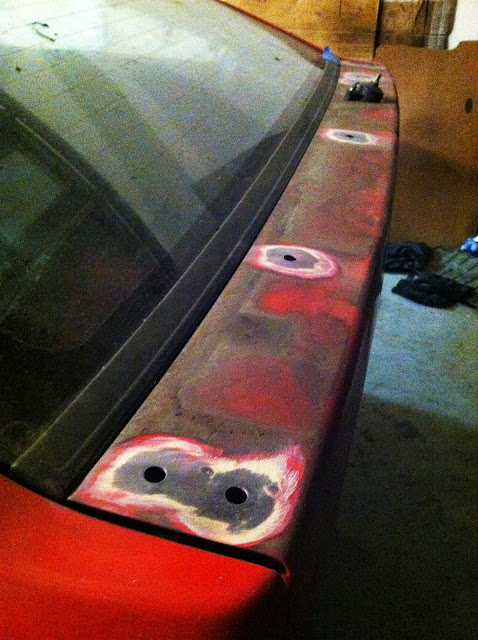
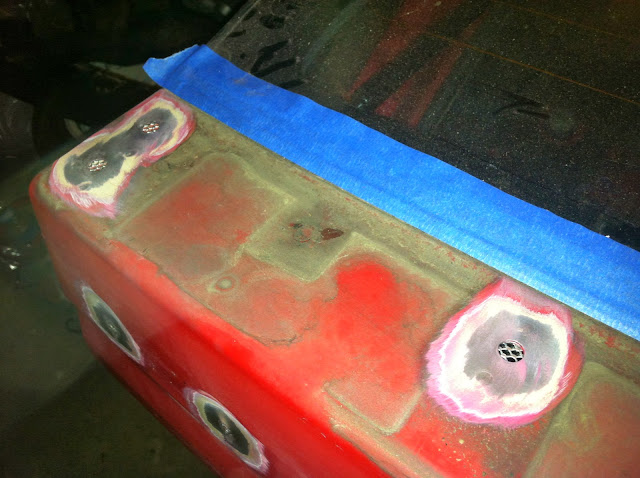
I was also able to lay down some patch material on the holes in the body...


photo%2520%252862%2529.JPG


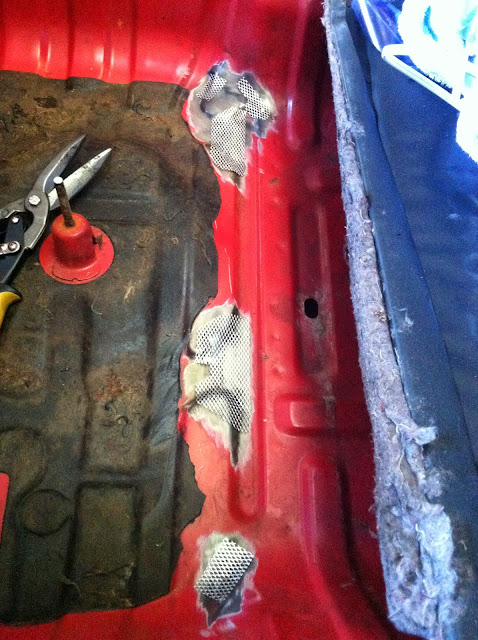
...now it's ready for fiberglass/bondo.


And lastly, I swapped out the old rotted sill trim with some better preserved parts that came with the car... makes a big difference. 


photo%2520%252864%2529.JPG


Build thread: "Skittle 2.0" - http://www.redpepper...l=&fromsearch=1
Build thread 2: "Red Daily"http://www.redpepper...topic=55687&hl=


My Classic Honda Blog - http://genone-blog.blogspot.com/


Road & Track magazine: "When they get around to listing the top good-time inventions of the late 20th century, we're willing to bet that right up there with the hang gliders, ultra lights, sailboards and jet skis you'll find the Honda Civic CRX. And we're willing to bet that the CRX won't be at the bottom of the short list--particularly if the CRX in question is an Si."


#32
CRXer87hf

  • Speedy
  • PipPipPipPip
    • Group: 2013 Contributor
    • Location:Atlanta, GA
    • Drives: 1987 Honda CRX HF, 1985 Honda CRX SI, 2003 Land Rover Disco
    Garage View Garage

Progress:


Well, another free Saturday has come and gone, and much has been done!  I'm starting to see light at the end of the project tunnel.  I was able to finished sanding all the rust spots, finished installing the panhard bar brace, and start patching the body.  


Step 1:


Complete the hunt for rust, and just when I thought I was done, I found some more.  Unfortunately this car has the rust bug bad, and I'm glad I got to it when I did, because another year sitting outside would have turned it to dust.  I also discovered that the floor pans have previously replaced, so that saves me a bunch of work.  There were a few spots, one specifically just behind the drivers side rear wheel well that was just a slight bubble in the paint, and then after I started sanding it, turned into this...


photo%2520%252825%2529.JPG


...this happened in several places too.  But I'm glad I caught it now.


I also had to deal with the rear wheel wells.  The car had been raced by a previous owner.  Based on my best guess, they had over-sized wheels on the car because they had poorly pinched the metal lip that runs along the upper wheel well against the body for added clearance.  This created a perfect place for water, dirt and whatever else to collect and cause horrible rust.  This had to be dealt with, so I decided to cut the lip off all the way around and patch the holes in the body.  Unfortunately, what I found after cutting it off, was pretty bad, but nothing I can't fix... just more work.  


photo%2520%252824%2529.JPG


photo%2520%252822%2529.JPG


photo%2520%252823%2529.JPG


Step 2:


Install the panhard bar brace.  I went out and got the hardware, so I was ready to go.  The first thing I did was cover the exposed, and rusted metal on the frame with POR-15 (rust stopping paint).  


photo%2520%252820%2529.JPG


Six hours later, it was cured, and ready for the brace.  It was surprisingly easy to install even though the clearances were extremely tight.  The hardware I decided to use (not based on my engineering skills, just my best guess) got 1/4" stainless bolts, lock washers, standard washers, and locking nuts...


photo%2520%25285%2529.JPG


After I tightened everything down, it felt solid as a rock.  I just hope it performs the way it should, the one possible flaw being my installation method.  Yes, I'm sure you noticed the whole cut in the brace, and you would be correct in assuming I cut the access whole for the gas tank strap hook on the wrong side first... ug, not one of my smarter moments. :)


photo%2520%252819%2529.JPG


Finally, I was able to take my first shot at bondo-glass.  It wasn't pretty, but the patching has begun.  I also installed the lowering springs and koni yellows in the rear.  More updates to come.


Build thread: "Skittle 2.0" - http://www.redpepper...l=&fromsearch=1
Build thread 2: "Red Daily"http://www.redpepper...topic=55687&hl=


My Classic Honda Blog - http://genone-blog.blogspot.com/


Road & Track magazine: "When they get around to listing the top good-time inventions of the late 20th century, we're willing to bet that right up there with the hang gliders, ultra lights, sailboards and jet skis you'll find the Honda Civic CRX. And we're willing to bet that the CRX won't be at the bottom of the short list--particularly if the CRX in question is an Si."


#33
CRXer87hf

  • Speedy
  • PipPipPipPip
    • Group: 2013 Contributor
    • Location:Atlanta, GA
    • Drives: 1987 Honda CRX HF, 1985 Honda CRX SI, 2003 Land Rover Disco
    Garage View Garage

Progress:


Even though it doesn't feel like it, I got a lot done this weekend.  I finished fiber-bondo-ing all the holes on the rear of the car.  All that's left to do on the rear, in regards to body work, is to sand down the fiber glass patches, clean them, and spray them with rubberized protectant.  Once that is complete I can re-install the rear sway bar, exhaust, and exhaust heat shield.  After the rear is complete, I can move on to the front wheel arches which need a few things patched.  I'm on the home stretch anyway.


I also got rid of the horrible exhaust tip that came with the 2.5" exhaust.  I still haven't figured out who the manufacturer is, but that tip was massive, and hideous.  It must have weighed 2-3 lbs.  It also stuck out way to far from the rear of the car.  All better now.  I'll probably replace it with a new tip, but that'll come later.


Red_1.JPG


Before...


Red_8.JPG


After.


I also addressed the sunroof switch which was working intermittently.  I took it apart and found that all the contacts inside were very dirty...


Red_6.JPG


...so I rubbed down each one with a Q-tip that had simplegreen on it.  Then I sanded the corrosion off with 400 grit sand paper...


Red_9.JPG


After I re-installed the switch, it worked much better, but it still won't activate the "fully open" function.  I can open it and close it, but it will not open all the way.  Any suggestions?


After painted the brackets on the rear sway bar with POR-15, I realized that it would look perfect on the rain rails.  It's self-leveling paint, and when it dries with it's satin finish and smooth texture, it looks a lot like the over-molded plastic that was on the rain rails originally.  So I painted the passenger side rain rail, and it came out great.  It looks factory fresh.  It needs one more coat, but I'm excited how well this worked out.  


Red_10.JPG


Before...


Red_7.JPG


After.  I'll post more detailed images when I finish.  


Build thread: "Skittle 2.0" - http://www.redpepper...l=&fromsearch=1
Build thread 2: "Red Daily"http://www.redpepper...topic=55687&hl=


My Classic Honda Blog - http://genone-blog.blogspot.com/


Road & Track magazine: "When they get around to listing the top good-time inventions of the late 20th century, we're willing to bet that right up there with the hang gliders, ultra lights, sailboards and jet skis you'll find the Honda Civic CRX. And we're willing to bet that the CRX won't be at the bottom of the short list--particularly if the CRX in question is an Si."


#34
Quinn

  • Slowpoke
  • PipPip
    • Group: Members
    • Location:Raleigh NC
    • Drives: S2000, SV650, OGCRX , CJ7 Diesel

Heads up :


POR15 will change colors when exposed to UV.  


Love your build...for shizzle!


#35
CRXer87hf

  • Speedy
  • PipPipPipPip
    • Group: 2013 Contributor
    • Location:Atlanta, GA
    • Drives: 1987 Honda CRX HF, 1985 Honda CRX SI, 2003 Land Rover Disco
    Garage View Garage

Heads up :


POR15 will change colors when exposed to UV.  


Love your build...for shizzle!


Oh really?! Damn.  What color does it change to?  Can I clear coat it, or seal it with something? 


...and thanks! :)


Build thread: "Skittle 2.0" - http://www.redpepper...l=&fromsearch=1
Build thread 2: "Red Daily"http://www.redpepper...topic=55687&hl=


My Classic Honda Blog - http://genone-blog.blogspot.com/


Road & Track magazine: "When they get around to listing the top good-time inventions of the late 20th century, we're willing to bet that right up there with the hang gliders, ultra lights, sailboards and jet skis you'll find the Honda Civic CRX. And we're willing to bet that the CRX won't be at the bottom of the short list--particularly if the CRX in question is an Si."


#36
CRXer87hf

  • Speedy
  • PipPipPipPip
    • Group: 2013 Contributor
    • Location:Atlanta, GA
    • Drives: 1987 Honda CRX HF, 1985 Honda CRX SI, 2003 Land Rover Disco
    Garage View Garage

Well, thanks for the heads up.  I did a little research and sure enough, the basic POR-15 is susceptible to UV damage, but they carry a product that is specific for prolonged UV exposure called, BlackCote.  You can paint it on bare metal or painted surfaces.  It only comes in gloss, so no more matching the factory look with the satin finish. :(  Still, the stuff sounds pretty indestructible, so I'm sure it'll do the job.  


bc3can230.jpg


Build thread: "Skittle 2.0" - http://www.redpepper...l=&fromsearch=1
Build thread 2: "Red Daily"http://www.redpepper...topic=55687&hl=


My Classic Honda Blog - http://genone-blog.blogspot.com/


Road & Track magazine: "When they get around to listing the top good-time inventions of the late 20th century, we're willing to bet that right up there with the hang gliders, ultra lights, sailboards and jet skis you'll find the Honda Civic CRX. And we're willing to bet that the CRX won't be at the bottom of the short list--particularly if the CRX in question is an Si."


#37
CRXer87hf

  • Speedy
  • PipPipPipPip
    • Group: 2013 Contributor
    • Location:Atlanta, GA
    • Drives: 1987 Honda CRX HF, 1985 Honda CRX SI, 2003 Land Rover Disco
    Garage View Garage

Quick Update:


Been busy the last few weeks attending the Barber Vintage Festival, but I was able to finish painting the rain rails (went ahead and purchased the Blackcote...worked great), put the rear sway bar on, and secure the gas tank.  Here is just a shot I took last night, showing how low it'll be riding once I'm done.  Excited to find out how well it handles!  This weekend will be the serious push to get this project finished.  


Almost_There.JPG  


Build thread: "Skittle 2.0" - http://www.redpepper...l=&fromsearch=1
Build thread 2: "Red Daily"http://www.redpepper...topic=55687&hl=


My Classic Honda Blog - http://genone-blog.blogspot.com/


Road & Track magazine: "When they get around to listing the top good-time inventions of the late 20th century, we're willing to bet that right up there with the hang gliders, ultra lights, sailboards and jet skis you'll find the Honda Civic CRX. And we're willing to bet that the CRX won't be at the bottom of the short list--particularly if the CRX in question is an Si."


#38
CRXer87hf

  • Speedy
  • PipPipPipPip
    • Group: 2013 Contributor
    • Location:Atlanta, GA
    • Drives: 1987 Honda CRX HF, 1985 Honda CRX SI, 2003 Land Rover Disco
    Garage View Garage

Progress:


Finally got the car out of the garage this weekend.  I even drove it... not far, but still.  Before pulling it out of the garage, I finished touching up the fiberglass patches (just sanding them smooth) to be ready to paint.  I then jacked it up, removed the rear wheels and scrubbed down the whole rear end to get the road dirt, fiberglass dust, and whatever else off the car so I could spray on the rubberizer.  After laying down plastic sheets and taping off the areas, I painted all the bare metal and fiberglass patches, and both wheel wells.  I used Rustoleum Rubbercoating.  Good stuff. 


Red_13.JPG


Car finally seeing sunlight...


Red_12.JPG


After a good scrubbing...


Red_16.JPG


Red_15.JPG


Red_17.JPG


The Rubberizer went on well and dried quickly.  Didn't take a lot of paint because it goes on pretty thick. 


Prior to all this, I decided to take the car out.  It was the first time in a while all for wheels and the suspension were completely in-tacked, so I took advantage of my opportunity.  It was slightly difficult driving it without a seat, but it was still worth it.  I didn't get very far, because something in the front end was dragging something fierce.  Turned out to be the sway bar bolt dragging on the left drive axle.  Front end is too low.  Easy fix.  


Here is the video I took:


http://www.youtube.c...h?v=55XeAKAEYK0


Soon after the rubberizer dried, it was back in the garage to move on with reassembly, and a couple more patches to the front wheel wells.  Getting close, however the sunroof is going to be my next big hang-up.  I still can't get it to open, and I'm not sure how to get it open manually without taking the headliner off (my manual has NOTHING in it about the sunroof).  I really don't want to t touch the headliner because it is in perfect condition.  Anyone deal with this issue before?


I also had the chance to paint the front and rear wiper arms with the POR15 Blackcote.  This stuff goes on wet and loves to drip, so do multiple "dustings", or it'll get messy. 


Red_19.JPG


Red_20.JPG


Build thread: "Skittle 2.0" - http://www.redpepper...l=&fromsearch=1
Build thread 2: "Red Daily"http://www.redpepper...topic=55687&hl=


My Classic Honda Blog - http://genone-blog.blogspot.com/


Road & Track magazine: "When they get around to listing the top good-time inventions of the late 20th century, we're willing to bet that right up there with the hang gliders, ultra lights, sailboards and jet skis you'll find the Honda Civic CRX. And we're willing to bet that the CRX won't be at the bottom of the short list--particularly if the CRX in question is an Si."


#39
CRXer87hf

  • Speedy
  • PipPipPipPip
    • Group: 2013 Contributor
    • Location:Atlanta, GA
    • Drives: 1987 Honda CRX HF, 1985 Honda CRX SI, 2003 Land Rover Disco
    Garage View Garage

Quick Update:


Took the spoiler off last night to discover even more rust.  Its disappointing because the metal portions of the spoiler are rotted completely.  Not only that, but the rust had started on the holes in the hatch.  I'm glad I caught it now, because it would have been serious if not addressed.  This means, no spoiler, and I'm just going to fill in the holes.  I actually prefer the spoiler-less look, but I was hoping to keep it as original as possible.  Oh well.  


Red_23.JPG


Red_22.JPG


Build thread: "Skittle 2.0" - http://www.redpepper...l=&fromsearch=1
Build thread 2: "Red Daily"http://www.redpepper...topic=55687&hl=


My Classic Honda Blog - http://genone-blog.blogspot.com/


Road & Track magazine: "When they get around to listing the top good-time inventions of the late 20th century, we're willing to bet that right up there with the hang gliders, ultra lights, sailboards and jet skis you'll find the Honda Civic CRX. And we're willing to bet that the CRX won't be at the bottom of the short list--particularly if the CRX in question is an Si."


#40
1stgenhybridCR-X

  • Slowpoke
  • PipPip
    • Group: Members
    • Location:san jose, CA
    • Drives: 86 crx

the wheel well paint looks like new factory condition- very well done gives some protection for sure, just had that done on my car before my suspension was installed, are you going to also paint the whole underbody of the car? Also do you have any pics of the finished window rail trim with the the new paint on them


#41
CRXer87hf

  • Speedy
  • PipPipPipPip
    • Group: 2013 Contributor
    • Location:Atlanta, GA
    • Drives: 1987 Honda CRX HF, 1985 Honda CRX SI, 2003 Land Rover Disco
    Garage View Garage


the wheel well paint looks like new factory condition- very well done gives some protection for sure, just had that done on my car before my suspension was installed, are you going to also paint the whole underbody of the car? Also do you have any pics of the finished window rail trim with the the new paint on them


Thanks! Yeah, it's good stuff.  The factory rubberizer that's on the underside of the car is in good shape, but for some small areas which I will be spraying.  So just some isolated patching, not the entire car.  I haven't taken any pics of the rain rails yet because the Black-cote, in dry weather, takes a long time to dry because its drying process is sped up with higher humidity.  I was waiting for it to dry completely because it seems to have more of a matte look, the more it drys.  I'll try to take some pics tonight.  


Build thread: "Skittle 2.0" - http://www.redpepper...l=&fromsearch=1
Build thread 2: "Red Daily"http://www.redpepper...topic=55687&hl=


My Classic Honda Blog - http://genone-blog.blogspot.com/


Road & Track magazine: "When they get around to listing the top good-time inventions of the late 20th century, we're willing to bet that right up there with the hang gliders, ultra lights, sailboards and jet skis you'll find the Honda Civic CRX. And we're willing to bet that the CRX won't be at the bottom of the short list--particularly if the CRX in question is an Si."


#42
CRXer87hf

  • Speedy
  • PipPipPipPip
    • Group: 2013 Contributor
    • Location:Atlanta, GA
    • Drives: 1987 Honda CRX HF, 1985 Honda CRX SI, 2003 Land Rover Disco
    Garage View Garage

Update:


Ok, here are some pics of the painted rain rails.  To note, it was good that I was able to sand down the POR15 that I had painted on them originally because it allowed me to get a really smooth surface.  If you decided to use this method, you don't need to use the POR15, but I would recommend several coats of primer before your final coats of the Blackcote.


photo%2520%252818%2529.JPG


photo%2520%252819%2529.JPG


photo%2520%252817%2529.JPG


I also did some more work on the hatch.  I used the same mesh patch that I used on the heavy rust spots to add some structure behind each hole.  This will help the body filler and fiberglass stay in place as the temperatures fluctuate.  More to come soon.  


photo%2520%252813%2529.JPG


photo%2520%252814%2529.JPG


photo%2520%252816%2529.JPG


Build thread: "Skittle 2.0" - http://www.redpepper...l=&fromsearch=1
Build thread 2: "Red Daily"http://www.redpepper...topic=55687&hl=


My Classic Honda Blog - http://genone-blog.blogspot.com/


Road & Track magazine: "When they get around to listing the top good-time inventions of the late 20th century, we're willing to bet that right up there with the hang gliders, ultra lights, sailboards and jet skis you'll find the Honda Civic CRX. And we're willing to bet that the CRX won't be at the bottom of the short list--particularly if the CRX in question is an Si."


#43
1stgenhybridCR-X

  • Slowpoke
  • PipPip
    • Group: Members
    • Location:san jose, CA
    • Drives: 86 crx
That looks excellent, I think I'll try this black cote for my rails and wipers as well

#44
CRXer87hf

  • Speedy
  • PipPipPipPip
    • Group: 2013 Contributor
    • Location:Atlanta, GA
    • Drives: 1987 Honda CRX HF, 1985 Honda CRX SI, 2003 Land Rover Disco
    Garage View Garage

Rain Rail Summary:


1) Hammer and Chisel - Removed over-molded plastic

2) Dremel with Wire Brush attachment - Removed excess plastic

3) Denatured Alcohol - Cleaned surface

4) POR-15 (sponge brush works best) - Hand painted surface (a spray primer can be used as well)

5) 320 Grit Sandpaper - Sanded paint smooth

6) Denatured Alcohol - Cleaned surface

7) POR-15 - Hand painted surface again (or primer)

8) 320 Grit Sandpaper - Sanded smooth again

9) Denatured Alcohol - Cleaned surface

10) BLACKCOTE - Painted one fairly thick coat (go over the area with light layers of paint, it will drip if too much goes on at one time)

11) Dry time - Give it at least 48 hours.  After 24hrs it was still tacky, so paint in a clean dust free environment for best results.  


Build thread: "Skittle 2.0" - http://www.redpepper...l=&fromsearch=1
Build thread 2: "Red Daily"http://www.redpepper...topic=55687&hl=


My Classic Honda Blog - http://genone-blog.blogspot.com/


Road & Track magazine: "When they get around to listing the top good-time inventions of the late 20th century, we're willing to bet that right up there with the hang gliders, ultra lights, sailboards and jet skis you'll find the Honda Civic CRX. And we're willing to bet that the CRX won't be at the bottom of the short list--particularly if the CRX in question is an Si."


#45
CRXer87hf

  • Speedy
  • PipPipPipPip
    • Group: 2013 Contributor
    • Location:Atlanta, GA
    • Drives: 1987 Honda CRX HF, 1985 Honda CRX SI, 2003 Land Rover Disco
    Garage View Garage

Progress:


Finally got some more done on the car.  Finished reapplying rubberizer to the front wheel wells, continued with filling the holes in the hatch, and I finally got the sunroof off.  Unfortunately the sunroof is pretty rusty, but all repairable.  More to come soon.  


Red_25.JPG


Red_24.JPG


Red_26.JPG


After taking apart the switch a second time and sanding the contacts down so the surfaces looked new, it finally opened all the way.  Unfortunately the motor sounded like it was on its last leg, and I had to help it open all the way.  Still, it's progress, and I'm ok just leaving it for now. 


Build thread: "Skittle 2.0" - http://www.redpepper...l=&fromsearch=1
Build thread 2: "Red Daily"http://www.redpepper...topic=55687&hl=


My Classic Honda Blog - http://genone-blog.blogspot.com/


Road & Track magazine: "When they get around to listing the top good-time inventions of the late 20th century, we're willing to bet that right up there with the hang gliders, ultra lights, sailboards and jet skis you'll find the Honda Civic CRX. And we're willing to bet that the CRX won't be at the bottom of the short list--particularly if the CRX in question is an Si."