 Sign In
 Create Account
I could really use a shift rod for my 87 Si. if you have one let me know, and please inspect the outer hole to insure it isn't worn out and widened which is the problem with mine and it allows too much play in the shifter. thanks.

Wtb 87 Si Shift Rod
Started by zoomster, Apr 13 2010 08:40 AM
20 replies to this topic
 Back to top
#2
 Posted 13 April 2010 - 11:58 AM
-
- Slowpoke
-

- Group: Members
- Location:Culpeper, VA
-
Drives: 91 CRX, 87 CRX, 91 318IS, 01 Forester
I saw a 1 gen on ebay last night. It doesn't say it's an si but I think they are all the same. If it's just the holes can't you weld a couple washers on the outer shoulders to get the hole back down to the right size? It's been a while since I've messed with one but I think it would work.
#3
Posted 13 April 2010 - 12:26 PM
-
- Slowpoke
-
- Group: Members
-
Drives: 1987 CRXSi
QUOTE (blue1gen @ Apr 13 2010, 12:58 PM) <{POST_SNAPBACK}>
I saw a 1 gen on ebay last night. It doesn't say it's an si but I think they are all the same. If it's just the holes can't you weld a couple washers on the outer shoulders to get the hole back down to the right size? It's been a while since I've messed with one but I think it would work.
Thanks for the suggestion, but i have no welding mojo so i would like to replace it. thought about drilling the hole and the shaft a larger diameter and replacing the pin, but would still like to replace, thanks again.

#4
Posted 13 April 2010 - 01:13 PM
-

- Mr.Ididntseeyousittingthereofficer
-
- Group: 2009 Contributing Member
- Location:Hickory, North Carolina
-
Drives: 74'vert Blazer, 84redrexHF (RIP), 87blackrexSI, 91STDhatch(resurrected for beater)(RIP again)
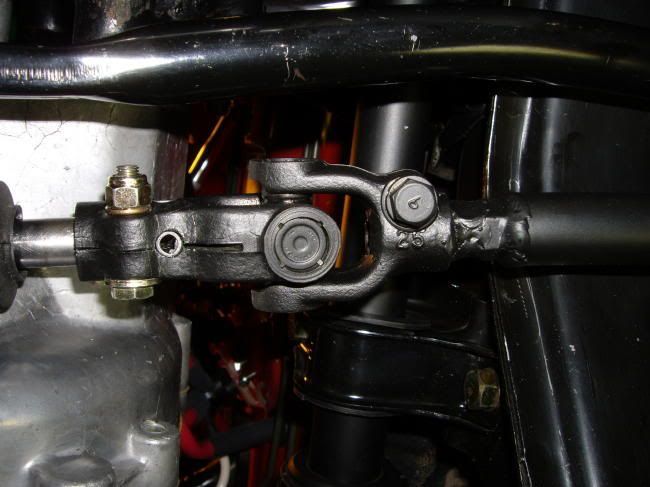
is your universal joint worn out too?
if its not, and the play is only where the bitch pin is, simply get a tap thats bigger than the hole and thread that sucker, and run a bolt in it. run it in from the top if you can so it doesnt have a chance of turning out and falling out, or use loctite
if your U joint is messed up, you should either do the kakabox fix, or as you said replace it. id recommend the kakafix because most U joints this old ARE worn out.
QUOTE (kjeffery @ Apr 17 2009, 06:17 PM) <{POST_SNAPBACK}>
Yet again Scott, you have all the answers
QUOTE (cbstdscott @ Apr 17 2009, 07:31 PM) <{POST_SNAPBACK}>
No. All the answers are in the Kakabox build thread.
QUOTE (Lymitliss @ May 26 2009, 08:06 PM) <{POST_SNAPBACK}>
Ohh yeah I guess that makes sense. King Kaymo has all the answers 
#5
Posted 15 April 2010 - 08:14 AM
-
- Slowpoke
-
- Group: Members
-
Drives: 1987 CRXSi
I will have to look at the U joint, I know the bitch pin hole is enlarged, the pin is tight, just the sleeve hole is too big, and allows way too much travel at the shifter end. Uh, if I may ask, what is the kakafix? Maybe I missed something...
#6
Posted 15 April 2010 - 09:17 AM
-

- Turd Polisher
-
- Group: 2012 Contributor
- Location:Seattle, WA 98115
-
Drives: from point 'A' to point 'B' daily.
-
Image Gallery
 View Garage
QUOTE (zoomster @ Apr 15 2010, 06:14 AM) <{POST_SNAPBACK}>
I will have to look at the U joint, I know the bitch pin hole is enlarged, the pin is tight, just the sleeve hole is too big, and allows way too much travel at the shifter end. Uh, if I may ask, what is the kakafix? Maybe I missed something...
"kakafix" here: http://www.redpepper...e...st&p=372510
The attachment of the u-joint to the OE shift rod doesn't have to be as complicated as I made it in the above example, that's just what worked for me. This mod takes out 99% of the slop associated w/the stock linkage.
I've used this linkage for over a couple years now on the street and 'banging gears' at the local autocross. It has worked flawlessly.
Personally, I would never use a through bolt/nut at the 'bitch' pin locn. The 'bitch' pin is a rolled spring pin used for it's superior hole filling properties. Keeping the hole common to the rod end and the transaxle shifter shaft 'filled' helps to keeps that joint tight. Unless the bolt you replace the rolled pin with has an interference fit, you won't keep that shifter shaft/shifter rod interface as tight. Sure, it'll work fine if all you want to do is connect the two pieces together, however, along w/the typically worn/sloppy stock shifter rod u-joint, you'll still have a sloppy connection. You're better off sourcing another OE shift rod w/hopefully a less worn end and buying a new 'bitch' pin from the dealer. The pins are still available last time I checked.
I believe I have several 1/3g shift rods in stock...I'll see if any I have have decent 'ends'. However, it might be pricy to ship due to it's 'oversize' nature.
Cheers!

#7
Posted 15 April 2010 - 10:32 AM
-
- Mr.Ididntseeyousittingthereofficer
-
- Group: 2009 Contributing Member
- Location:Hickory, North Carolina
-
Drives: 74'vert Blazer, 84redrexHF (RIP), 87blackrexSI, 91STDhatch(resurrected for beater)(RIP again)
kaka, if you read what i said, i WAS talking about an interference fit. i used a tap to cut threads in both the shift rod end AND the shift bar coming out of the transmission. its way better at keeping things tight than that stupid roll pin.
im sorry but i really dont understand why you think the OE roll pin has a superior "hole filling" quality. you've always been spot on about so many things, but this one i have to call you out LOL. all ive found is that it gets stuck easier, and not in a good way. the shift rod end seems to be made out of a much more pliable metal, causing this hole elongation that puts major slop in the side to side shifter play. obviously the U joint you used is stronger and doesnt wear out like the original shifter, but i still like the idea of threads and a bolt over a stupid roll pin
i hate roll pins if you couldnt tell, i have had trouble with them on other things like the forklift controls on our old CLARK forklift.
what i really dont get is why honda continued to use this on 88-91 cars, when the 84-87 seemed to wear out pretty fast.
oh and i used a shoulder bolt and nut on condor's car (and my own for a while) and it also worked better than the stupid bitch pin. his words were "better than new" and he would know being an original owner. however next time he comes up here i am going to tap the hole and run a bolt in it as well.
QUOTE (kjeffery @ Apr 17 2009, 06:17 PM) <{POST_SNAPBACK}>
Yet again Scott, you have all the answers
QUOTE (cbstdscott @ Apr 17 2009, 07:31 PM) <{POST_SNAPBACK}>
No. All the answers are in the Kakabox build thread.
QUOTE (Lymitliss @ May 26 2009, 08:06 PM) <{POST_SNAPBACK}>
Ohh yeah I guess that makes sense. King Kaymo has all the answers
#8
Posted 15 April 2010 - 01:15 PM
-
- Turd Polisher
-
- Group: 2012 Contributor
- Location:Seattle, WA 98115
-
Drives: from point 'A' to point 'B' daily.
-
Image Gallery
View Garage
QUOTE (kaymo @ Apr 15 2010, 08:32 AM) <{POST_SNAPBACK}>
kaka, if you read what i said, i WAS talking about an interference fit. i used a tap to cut threads in both the shift rod end AND the shift bar coming out of the transmission. its way better at keeping things tight than that stupid roll pin.
I'm sorry but that's not an interference fit. That's a threaded fit...not the same.
An interference fit is where the bolt's shank diameter (non-threaded portion) is typically anywhere from 0 to .005" larger than the hole ID. You get better joint strength, stability, and longevity from this interference, or, hole filling, of the bolt shank. The forced interference imparts compression stresses on the hole and can improve the fatigue life of the hole too. A properly sized roll pin provides better hole filling than a typical non-interference fit through bolt.
I respectfully disagree w/your statement about your method keeping "things tight" vs. a proper fitting roll pin. Sure, things wear and have to be replaced, but that's normal. The factory roll pin should be replaced everytime it is removed to maintain the factory tight fit.
What it sounds like you've got going is a shear joint that is bearing on bolt threads...this is not a 'proper' way to load a joint of this type or to keep it together, keep it tight. In addition, unless you've 'split' the shift rod end (it's essentially a cylinder), you're not getting any 'real' clamp-up onto the trans shaft. The bolt you're using is not acting like a true 'pinch' bolt in this application.
QUOTE (kaymo @ Apr 15 2010, 08:32 AM) <{POST_SNAPBACK}>
im sorry but i really dont understand why you think the OE roll pin has a superior "hole filling" quality. you've always been spot on about so many things, but this one i have to call you out LOL.

It has better hole filling relative to a typically installed non-interference through bolt.
QUOTE (kaymo @ Apr 15 2010, 08:32 AM) <{POST_SNAPBACK}>
...all ive found is that it gets stuck easier, and not in a good way.
Coat the pin w/anti seize prior to instl and it will not.
QUOTE (kaymo @ Apr 15 2010, 08:32 AM) <{POST_SNAPBACK}>
...but i still like the idea of threads and a bolt over a stupid roll pin
Maybe if the bolt shank is an interference fit w/the shaft and rod end hole...but don't put the threads in shear or bearing.
QUOTE (kaymo @ Apr 15 2010, 08:32 AM) <{POST_SNAPBACK}>
...however next time he comes up here i am going to tap the hole and run a bolt in it as well.
Come on! Why so stubborn?

The joint in question was not designed for a through, or 'pinch' bolt. It was designed for an interference fit rolled pin. The 'pin in tube' joint stays 'tight' by the hole filling, interference fit, of the roll pin. Of course, if the male trans input shaft (pin) was an interference fit w/the female (tube) shift rod end, the connection would be even tighter and stay tighter longer. However, that would probably make it near impossible to separate the shift rod from the input shaft while installed on the car!

I suspect most if not all the problems people have w/this pin joint being loose is from the owner or mechanic not replacing the rolled pin w/a new, factory fresh Honda rolled pin whenever it is removed. So, what once used to be an interference fitting roll pin has now become just a shear pin…goodbye tight connection. IIRC, the FSM says to replace the pin after removal. I suggest coating it w/anti-seize for easier removal down the road.
The real culprit to the shifter slop, however, lies in the low quality, stamp-steel, rivet pinned, 'U' joint at the end of the shifter rod. Not using the proper method of connecting the shift rod to the input shaft just adds another potential locn for sloppiness to develop and increase the sloppiness of an already sloppy joint.
Cheers!

#9
Posted 15 April 2010 - 08:14 PM
-
- Mr.Ididntseeyousittingthereofficer
-
- Group: 2009 Contributing Member
- Location:Hickory, North Carolina
-
Drives: 74'vert Blazer, 84redrexHF (RIP), 87blackrexSI, 91STDhatch(resurrected for beater)(RIP again)
yea see thats the thing, the cheap U joint not only wears out, but the hole for the bitch pin. at that point it doesnt matter how new the pin is, its not going to keep things tight.
and yeah the bolt i was running in there was a tad oversize for the hole, so it does make it quite snug in fact removes all play
i know you are TECHNICALLY right about most of these things, but im going by redneck engineering. it seemed like a good at the time, i tried it, and it worked quite well. if i have a problem with it, i'll just redo it a different way, and use YOUR ingenious idea of replacing the u joint with a steering joint
i have a few of the removable u joints from different hondas, but i chopped the u joint off the end of an old honda steering column, and it looks like it will be even easier to adapt on to my shift rod. the part of the steering column seems like it might be just right to fit over the end of the transmission rod, and the other end has a shaft that looks like it will fit nicely in the hollow tube of the original shift rod, once the original u joint is cut off. i plan on drilling some holes in the hollow rod first to weld the shaft to the hollow rod thru the holes. i hope that all made sense.... LOL
im sure you know what im talking about kaka, since im sure you know what the end of the steering column looks like. like me you've touched every part of your car!
QUOTE (kjeffery @ Apr 17 2009, 06:17 PM) <{POST_SNAPBACK}>
Yet again Scott, you have all the answers
QUOTE (cbstdscott @ Apr 17 2009, 07:31 PM) <{POST_SNAPBACK}>
No. All the answers are in the Kakabox build thread.
QUOTE (Lymitliss @ May 26 2009, 08:06 PM) <{POST_SNAPBACK}>
Ohh yeah I guess that makes sense. King Kaymo has all the answers
#10
Posted 16 April 2010 - 01:28 AM
-

- Leadfoot
-
- Group: 2011 Contributing Member
- Location:Edmonton, AB
-
Drives: 2009 AUDI TT 3.2L, Project Teg powered Austin Mini Van
-
Image Gallery
J,
I just re-read your blurb on the U-joint fix. Was there a reason you couldn't use all metric or SAE coupling nuts? Since you used a Honda steering rack u-joint would it not work with a metric fit? Or could you have used a metric unit and just filed the edges minutely or would that be more difficult than using the tap for the stud? I guess I have this aversion to mixing units for some reason. JS
I just re-read your blurb on the U-joint fix. Was there a reason you couldn't use all metric or SAE coupling nuts? Since you used a Honda steering rack u-joint would it not work with a metric fit? Or could you have used a metric unit and just filed the edges minutely or would that be more difficult than using the tap for the stud? I guess I have this aversion to mixing units for some reason. JS
If you want one of these Logos send me a PM
Austin Mini Van with DOHC Honda HP
http://www.angelfire.com/droid/strudel
Honda reliability and power combined with Mini cachet and style.
#11
Posted 16 April 2010 - 01:50 AM
-

- ホンダ、夢の力
-
- Group: 2012 Contributor
- Location:Nashville TN.
-
Drives: -------- 1986' CRX Si (X2) -------- 1993' GMC Sanoma SLE
-
Image Gallery
btw kaka.. on the "kakafix" of the shift linkage you did. How much of the "slop" is actually in the tranny itself? I just installed EA_Hatch's old no reach shifter and when I put the thing in gear there is literally about 4-6 inches of left to right throw left at the top of that tall bad boy. I get under the car and do discover that ALOT of it is coming through the linkage, but what about the tranny itself? (which I know cannot be changed)
Basically, how much "slop" is left in the system you have now?
Basically, how much "slop" is left in the system you have now?

#12
Posted 16 April 2010 - 10:49 AM
-
- Turd Polisher
-
- Group: 2012 Contributor
- Location:Seattle, WA 98115
-
Drives: from point 'A' to point 'B' daily.
-
Image Gallery
View Garage
QUOTE (strudel @ Apr 15 2010, 11:28 PM) <{POST_SNAPBACK}>
J,
I just re-read your blurb on the U-joint fix. Was there a reason you couldn't use all metric or SAE coupling nuts? Since you used a Honda steering rack u-joint would it not work with a metric fit? Or could you have used a metric unit and just filed the edges minutely or would that be more difficult than using the tap for the stud? I guess I have this aversion to mixing units for some reason. JS
I just re-read your blurb on the U-joint fix. Was there a reason you couldn't use all metric or SAE coupling nuts? Since you used a Honda steering rack u-joint would it not work with a metric fit? Or could you have used a metric unit and just filed the edges minutely or would that be more difficult than using the tap for the stud? I guess I have this aversion to mixing units for some reason. JS
Jerry,
Yeah, the way I did the mod w/the coupling nuts and stud may seem somewhat overly complicated. However, I had some logical reasons behind it…
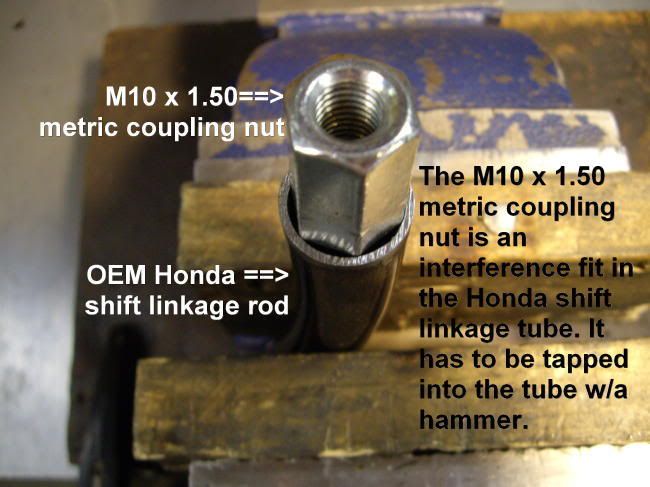
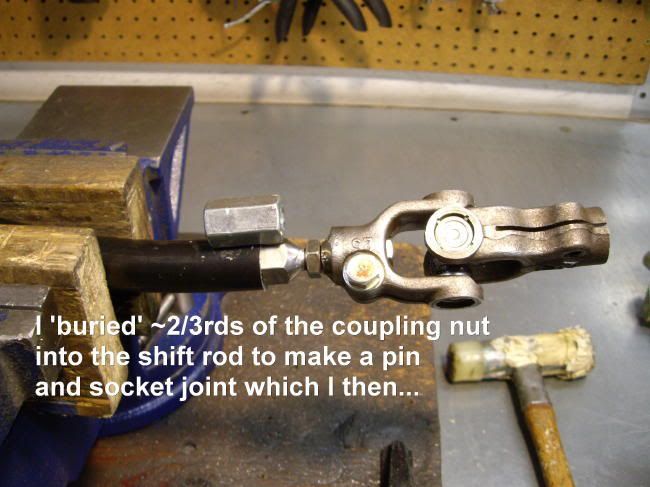
I used a metric coupling nut (M10-1.50) because I had it in house and it was a tight fit into the OE hollow shift rod. It is already threaded, of long length, made of decent material, fits the ID of the tube tightly w/o machining, and costs $0.89…not bad for a welded tube insert! The standard coupling nuts I tried did not fit the tube and I didn't want to do any filing or machining.
The standard 3/8-24 coupling nut also fit the OE steering u-joint perfectly. However, I did have to make a clearance notch for the pinch bolt:

Now, since I ended up welding the 3/8-24 coupling nut to the u-joint, you could argue that you don't to file the clearance notch or use a pinch bolt at all. I did it, as firstgencrx likes to say, for "extra insurance".
So now I have a M10-1.50 insert that fits the shift rod, and a u-joint that has a 3/8-24 welded insert. How to connect the two?
Re-tap the M10 insert to 'hold' and center a 3/8" stud just long enough for me to weld it solid...
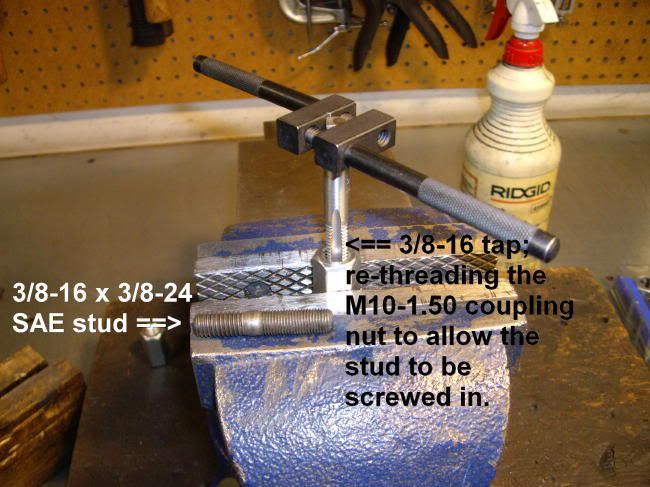
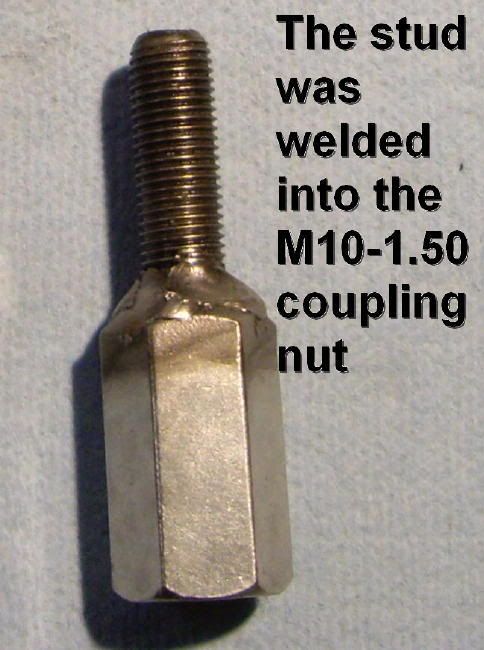
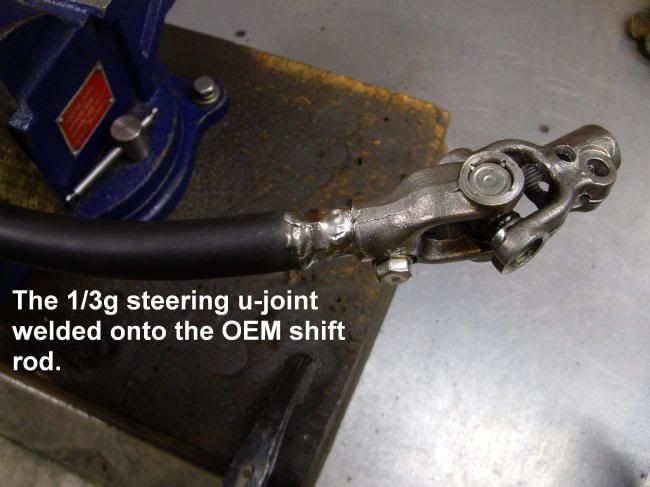
...allowing me to connect the u-joint to the shift rod (which was welded together after this pic was taken):
At this point I've spent <$10 on coupling nuts and a stud and haven't needed to use a lathe and/or mill. Now I had an adjustable length shift rod w/a nice and tight, proper u-joint on the end.
Orginally, my idea was not to weld the stud to the coupling nuts, but, leave the stud free to adjust the position of the shift lever (knob). I mocked it up and found that after a few side-to-side swings of the shift lever, the lock-nut loosened itself and the lever was left free to flop side-to-side. Not good and not worth the risk of it loosening while driving.
In the end, this adjustable feature turned out to be nice in that I was able to position the shift knob to where I liked it, lock the nut, then capture the locn forever by welding everything together.
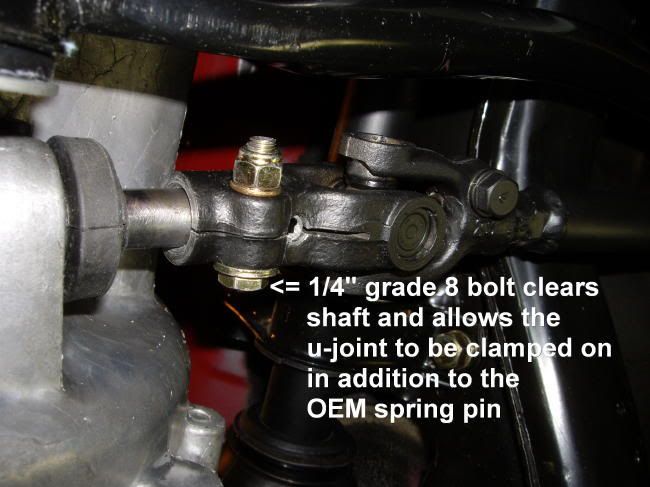
FYI, the OE 1/3g steering u-joint I used does not fit tightly onto the trans input shaft. Since the input shaft is not splined, just using the pinch bolt to tightly clamp it onto the shaft (friction) is risking the possibility of it sliding off some time down the road. To prevent this, I used the pinch bolt AND the OE rolled pin...for 'extra insurance'
I drilled a hole in the u-joint for the rolled pin...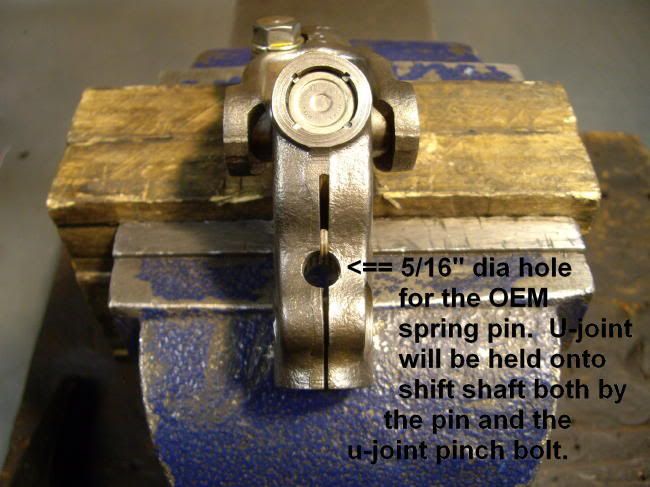

If I were to make another no-slop shift rod today, I would make it the way Kaymo has described above. At the time I made this one, I didn't think to cut off a length of steering shaft and use that shaft portion as my welded insert to the shifter rod. My original design just evolved from what I had in my shop at the time. Since the steering shaft is splined and matched u-joint is designed to lock-on to the shaft w/the pinch bolt, you have shift knob adjustability. This appears to be a far easier way to go and a better design. A couple years ago I planned to make and sell this version under the Kaka No-Slop Shift Rod moniker, but I changed my mind due to...well, firstgencrx can probably fill in the blank!
I would, however, still drill the u-joint for the OE roll pin as I've described above.
QUOTE (Old School REX @ Apr 15 2010, 11:50 PM)
btw kaka.. on the "kakafix" of the shift linkage you did. How much of the "slop" is actually in the tranny itself? I just installed EA_Hatch's old no reach shifter and when I put the thing in gear there is literally about 4-6 inches of left to right throw left at the top of that tall bad boy. I get under the car and do discover that ALOT of it is coming through the linkage, but what about the tranny itself? (which I know cannot be changed)
Basically, how much "slop" is left in the system you have now?
Basically, how much "slop" is left in the system you have now?
Ah yes!
 You hit on the very reason I no longer rock the Kaka No-Reach Short Shifter.
 While the No-Reach shifter works as advertised, conveniently locating the shift knob just to the right of the steering wheel, it's extra long sexy shape also increases the side-to-side distance the knob moves. With the slop taken out of the OE 'u-joint' at the shaft end, what is left is the play inside the transaxle. It's normal and necessary for the transaxle input shaft to have some rotational movement. The No-Reach shift lever amplifies this rotational 'play' by virtue of the increased distance the shift knob is from the shifter pivot ball.
It is for this very reason, I've gone back to the standard length, OE shift lever which I've modified for shorter throws (lower shaft extension). This is the first time I've ever used a standard length shift lever w/the 'No-Slop Shift Rod' and the reduction in slop is much more noticeable. This is the best feeling 1/3g shifter I've ever experienced.
With the short shift lower shaft extension and a counter weight added (one split collar), the shift action is direct and purposeful…it no longer feels like a stick in a bucket of oatmeal!So, there you have it, while the No-Reach shifter maybe more convenient and sexier looking, it will amplify any play the shift linkage, or transaxle input shaft has. BTW, I did mentioned this effect to the buyers of my No-Reach Fat-Sticks.
Cheers!
#13
Posted 16 April 2010 - 12:51 PM
-
- ホンダ、夢の力
-
- Group: 2012 Contributor
- Location:Nashville TN.
-
Drives: -------- 1986' CRX Si (X2) -------- 1993' GMC Sanoma SLE
-
Image Gallery
QUOTE (kakabox @ Apr 16 2010, 10:49 AM) <{POST_SNAPBACK}>
Ah yes! You hit on the very reason I no longer rock the Kaka No-Reach Short Shifter.
While the No-Reach shifter works as advertised, conveniently locating the shift knob just to the right of the steering wheel, it's extra long sexy shape also increases the side-to-side distance the knob moves. With the slop taken out of the OE 'u-joint' at the shaft end, what is left is the play inside the transaxle. It's normal and necessary for the transaxle input shaft to have some rotational movement. The No-Reach shift lever amplifies this rotational 'play' by virtue of the increased distance the shift knob is from the shifter pivot ball.
It is for this very reason, I've gone back to the standard length, OE shift lever which I've modified for shorter throws (lower shaft extension). This is the first time I've ever used a standard length shift lever w/the 'No-Slop Shift Rod' and the reduction in slop is much more noticeable. This is the best feeling 1/3g shifter I've ever experienced. With the short shift lower shaft extension and a counter weight added (one split collar), the shift action is direct and purposeful…it no longer feels like a stick in a bucket of oatmeal!
So, there you have it, while the No-Reach shifter maybe more convenient and sexier looking, it will amplify any play the shift linkage, or transaxle input shaft has. BTW, I did mentioned this effect to the buyers of my No-Reach Fat-Sticks.
Cheers!
You hit on the very reason I no longer rock the Kaka No-Reach Short Shifter. While the No-Reach shifter works as advertised, conveniently locating the shift knob just to the right of the steering wheel, it's extra long sexy shape also increases the side-to-side distance the knob moves. With the slop taken out of the OE 'u-joint' at the shaft end, what is left is the play inside the transaxle. It's normal and necessary for the transaxle input shaft to have some rotational movement. The No-Reach shift lever amplifies this rotational 'play' by virtue of the increased distance the shift knob is from the shifter pivot ball.
It is for this very reason, I've gone back to the standard length, OE shift lever which I've modified for shorter throws (lower shaft extension). This is the first time I've ever used a standard length shift lever w/the 'No-Slop Shift Rod' and the reduction in slop is much more noticeable. This is the best feeling 1/3g shifter I've ever experienced.
With the short shift lower shaft extension and a counter weight added (one split collar), the shift action is direct and purposeful…it no longer feels like a stick in a bucket of oatmeal!So, there you have it, while the No-Reach shifter maybe more convenient and sexier looking, it will amplify any play the shift linkage, or transaxle input shaft has. BTW, I did mentioned this effect to the buyers of my No-Reach Fat-Sticks.
Cheers!
I knew the no reach would cause this "issue" However, I have had problems actually reaching my shifter with harnesses on with my 9ft. long legs and having to sit further away from the dash...
 This was, however, a DC sports shifter which sits lower to the console than the OE shifter. In the future I just may hack open a factory shifter and add length to the bottom with a counter weight.
 BTW!! another thread jack in the direction of kaka! Where did you get that nifty counter weight I've seen in your build thread? I wants one on my no reach!
#14
Posted 16 April 2010 - 01:11 PM
-
- Turd Polisher
-
- Group: 2012 Contributor
- Location:Seattle, WA 98115
-
Drives: from point 'A' to point 'B' daily.
-
Image Gallery
View Garage
QUOTE (Old School REX @ Apr 16 2010, 10:51 AM) <{POST_SNAPBACK}>
...with my 9ft. long legs and having to sit further away from the dash...
BTW!! another thread jack in the direction of kaka! Where did you get that nifty counter weight I've seen in your build thread? I wants one on my no reach!
BTW!! another thread jack in the direction of kaka! Where did you get that nifty counter weight I've seen in your build thread? I wants one on my no reach!
9'...wow, you are a tall one!
The counter weight I use is just a black oxide 3/4" ID 'split collar' from my local, and the most awesome, hardware store: Stoneway Hardware (shameless plug).

You can get them here: http://www.mcmaster....collars/=6orzre ...that's where Stoneway gets them! I use one on my current short shifter as I did not extend the lower lever as far as I had on my previous versions (for reasons of shift effort and exhuast clearance). One collar seems to add enough mass to 'smooth' out the shift effort, although, it's not a huge effect.
#15
Posted 16 April 2010 - 02:11 PM
-
- ホンダ、夢の力
-
- Group: 2012 Contributor
- Location:Nashville TN.
-
Drives: -------- 1986' CRX Si (X2) -------- 1993' GMC Sanoma SLE
-
Image Gallery


Community Forum Software by IP.Board
Licensed to: Red Pepper Racing