Jump to content


The Kakabox Build


  • You cannot reply to this topic
2000 replies to this topic

#1126
kakabox

  • Turd Polisher
  • PipPipPipPipPip
    • Group: 2012 Contributor
    • Location:Seattle, WA 98115
    • Drives: from point 'A' to point 'B' daily.
    • Image Gallery
    Garage View Garage
Thanks everyone!

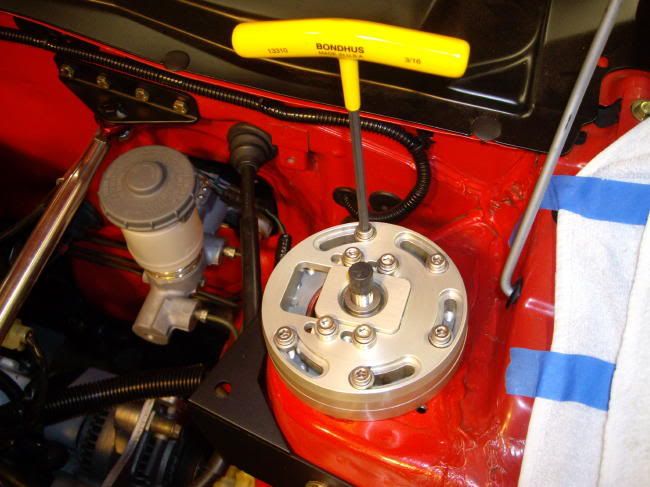
Ok, so I'm kinda old school and even though I totally understand the benefits and advantages of having the shift knob right next to your steering hand (that's why I made it), and I've seen pics of other long neck shifters in race cars...I have to say that when I initially "erected" ( blink.gif ) the Kakashifter in the car I thought it looked kinda goofy. That lasted for 1 minute...now I think it's one sexy beast!

Sitting in the race seat with the harness on, it's amazing how quick and easy it is to snick a shift and get back on the wheel. Of course it feels a little strange not to have to reach down and fwd to grab a gear, but that's just because I've been doing it that way for 30+ years! This is an improvement. I can't wait to actually drive the K'box instead of sitting in the seat shifting gears and making vroom, vroom noises! wink.gif

FYI:
I happened to have in stock two more "split collars" (they're common shaft stops). I added them as additional counter weights over the OEM shift rod counter weight. Their ID is 7/8". So, now the Kakashifter has a total of four split collar counterweights, as seen in this pic:


These additional collars have made the shifting action even smoother and it seems to be slightly quicker going into gear...however, this is just my observation while sitting in the car in the garage rowing the gears. It'll be a couple months before I do a real road test.

Cheers! cool.gif

#1127
Czezcho

  • Turbo d16a1 in progress....
  • PipPip
    • Group: Members
    • Location:Finland
    • Drives: Honda 1g/3g Gti or Si with turbo in progress
    • Image Gallery
    Garage View Garage
QUOTE (kakabox @ Dec 12 2007, 09:30 AM) <{POST_SNAPBACK}>
If by "the 1-1.5" in the rod position" you're talking about the slots in the brackets that allow the pillow blocks to move fore-aft...that's just a feature that allows you to keep the links within 0 - 10 degrees from vertical when the car is static and level. The stabar arms should be level w/the ground and the drop links perpendicular to the arms when the car is level and at rest. This orientation is where the links are the most effective, i.e., most if not all the axle's vertical displacement goes into twisting the torsion bar (stabar).

As the angle of the drop links move more from vertical (think of a vertical line, straight up and down), a fore-aft displacement vector (now think of a right triangle where the fore-aft vector is the sine of the angle from the vertical) is produced that gets larger in magnitude the further the links move from vertical. This, of course, reduces the vertical displacement vector (the cosine of the angle from vertical)...it's this vertical displacement vector that's actually twisting the bar.

So, for large drop link angles (from vertical) for a given axle vertical displacement, you get less vertical displacement of the arms, or less twist of the bar, hence, less resistance torque, or roll stiffness...the stabar is less effective. That's why it's important to start out w/the arms horizontal (|| to the ground) and the drop links perpendicular to the arms...the closer you get to this ideal, the better.

The way stabar roll stiffness vs. moment arm length works is that for a given axle vertical displacement, the longer the moment arms are, the smaller the angle of twist applied to the bar, hence, the smaller the resistance torque (roll stiffness) the bar produces. Shorter moment arms (for the same vertical axle displacement) produce greater angles of twist, hence more resistance torque, or, roll stiffness. We just recognize it as more leverage (longer arm) or less leverage (shorter arm).

For all uniform straight members in pure or unrestrained torsion:

theta = TL / GJ

...or, solving for the resistance torque,

T = (theta)GJ / L

Where:
'theta' is the angle of twist in radians (it's actually the delta angular twist of the left side vs. the right side axle)
'T' is the resistance torque
'L' is the length of the member
'G' is the modulus of rigidity of the material (torsional stiffness), a constant
'J' is the torsional constant and is calculated based on the member's cross section (it's similar to the moment of inertia, 'I', of a beam in bending)


I try to figured this out for a week and i don't get it... How much different the bar is if it solid, not hollow? I want that same kakabox style rear
sway bar, but nobody don't sell here that kind of kit, i e do it yourself-kit. I choice special fabricator, Finnish steel company, who fabricate
me that sway-bar (yes it "spring"-steel of course), but they can do it only solid form, how much stiffer that could be? Any thoughs??

J-P

P.s Incredible job so far... i just can say wow...
J-P


Civic dont't go fast, it's flying low...

#1128
kakabox

  • Turd Polisher
  • PipPipPipPipPip
    • Group: 2012 Contributor
    • Location:Seattle, WA 98115
    • Drives: from point 'A' to point 'B' daily.
    • Image Gallery
    Garage View Garage
QUOTE (Czezcho @ Jan 7 2008, 05:58 AM) <{POST_SNAPBACK}>
How much different the bar is if it solid, not hollow? I want that same kakabox style rear
sway bar, but nobody don't sell here that kind of kit, i e do it yourself-kit. I choice special fabricator, Finnish steel company, who fabricate
me that sway-bar (yes it "spring"-steel of course), but they can do it only solid form, how much stiffer that could be? Any thoughs??

J-P

P.s Incredible job so far... i just can say wow...

Thanks.

Typically, for equivalent torsional stiffness, you have to size larger in diameter using a hollow tube (but depends on the wall thickness) compared to a solid round section...that is assuming the same material and length.

The difference (assuming matl and bar length is the same) is in the torsional constant, 'J'.

The equation for the rate of change of the angle of twist of uniform straight members is:

theta = (T x L) / (G x J)

where: theta = angle of twist in radians
T = torsional moment (or the resistance torque)
L = length of bar
G = modulus of rigidity (a constant, use 11.5 x 10^6 psi for all steel)
J = torsional constant....

...for solid round cross sections: J = (pi x R^4) / 2 ; where: R = bar radius
...for hollow round cross sections: J = 2 x pi x R^3 x t ; where: t = the tube wall thickness and R = the radius of the tube to the midpoint of 't'

The angular deflection, theta, will be less for the stiffer bar or tube, assuming the same torsional moment, 'T', length, 'L', and modulus 'G'.

My calcs show that a hollow tube of 1" x .120" wall x 42.5" theoretically has the same torsional stiffness as a solid .8994" diameter bar of the same length and material. The .8994" diameter is where the 'J' for the solid round section equals the 'J' of the tube.

#1129
Czezcho

  • Turbo d16a1 in progress....
  • PipPip
    • Group: Members
    • Location:Finland
    • Drives: Honda 1g/3g Gti or Si with turbo in progress
    • Image Gallery
    Garage View Garage
Gee, thanks very much. Now even i get the point, now i can calculate the lenght of those sway-bar arms, and get the whole idea much greater...
Now i have to find sway-bar links, and those things what keeps sway-bar in chassic. Thanks for great idea and all those ideas!!
You're the Man!!

J-P
J-P


Civic dont't go fast, it's flying low...

#1130
kakabox

  • Turd Polisher
  • PipPipPipPipPip
    • Group: 2012 Contributor
    • Location:Seattle, WA 98115
    • Drives: from point 'A' to point 'B' daily.
    • Image Gallery
    Garage View Garage
Dampachi's in da House!

Arrived late last week smile.gif


Rear dampers revalved to 9 kg/mm rate...


...still waiting for the 7 kg/mm springs sad.gif

Cheers! cool.gif

#1131
rollz87civic

  • VOOM VOOM NO VTEC!!!!!!!!!
  • PipPipPipPipPip
    • Group: 2014 Contributor
    • Location:SPRINGFELD,OREGON
    • Drives: 1987 civic sedan(sold) 1987 civic DX(sold) 1992 civic SI(sold) 1985 civic wagon 4wd(sold) 1986 civic std DD(Sold)1986 civic dx(sold)
    • Image Gallery
OMG..............I hate you tongue.gif
SACHR member be hate for who you are not loved for who your not.

Posted Image
Member in the Carburetion Nation


RIP GLEN

#1132
zakats

  • 1980's birth control, brought to you by Honda.
  • PipPipPipPipPipPip
    • Group: 2014 Contributor
    • Drives: The work car, way more than I'd care to admit
    Garage View Garage
noice sleep.gif
He who dies with the most toys, wins.

#1133
firstgencrx

  • This thing should fit!
  • PipPipPipPipPip
    • Group: 2013 Contributor
    • Location:opɐɹoloƆ 'suılloƆ ʇɹoℲ
Oh, Shiny Kaka Arms!


biggrin.gif biggrin.gif biggrin.gif biggrin.gif

They ship out tomorrow J.

Take care,

David
Sharing with others what I do for myself!

My H22 CRX Project

Posted Image

#1134
kakabox

  • Turd Polisher
  • PipPipPipPipPip
    • Group: 2012 Contributor
    • Location:Seattle, WA 98115
    • Drives: from point 'A' to point 'B' daily.
    • Image Gallery
    Garage View Garage
QUOTE (firstgencrx @ Jan 20 2008, 06:45 PM) <{POST_SNAPBACK}>
Oh, Shiny Kaka Arms!

Take care,
David

blink.gif DAMN! blink.gif ...that's "noice"! wink.gif

Many thanks David...I look forward to installing those bad boys!

Cheers!

#1135
Doodson

  • DOODSON
  • PipPipPipPipPip
    • Group: Contributing Member
    • Location:Port Coquitlam B.C. Canada
    • Drives: 1985 Racing Civic , 1995 Street Civic CX , 2007 Honda Civic 4dr, 1992 Racing Acura integra
    • Image Gallery
    Garage View Garage
Should have sent you mine aswell

#1136
kakabox

  • Turd Polisher
  • PipPipPipPipPip
    • Group: 2012 Contributor
    • Location:Seattle, WA 98115
    • Drives: from point 'A' to point 'B' daily.
    • Image Gallery
    Garage View Garage
Caster Camber Plate Instl, TEIN Damper Instl and a NEW, Improved Kaka Strut Tower Bracket!

OK, there's a lot to cover...we better get started! wink.gif

I'm installing a set of firstgencrx's Caster/Camber (CC) plates. David's CC plates are a very innovative design and are superbly crafted. Please note that they do eliminate your typical strut tower brace (stb) attachments because most stbraces use the strut top mount bolts to attach to. David's CC plates eliminate that method of stb attachment by using those bolt holes to attach the 'static', bottom plate...they use up all the 'real estate' on top of the strut towers.

So, it was back to the drawing board I went to come up w/a strut tower bracket design that would work. I came away w/a design that works in concert w/David's CC plates. The brace struts still triangulate to the firewall hardpoint I installed when I constructed the first version of the Kakabox triangulated stb.

So, follow along as I pull out all the Kaka ghetto machining and fabrication tricks I know to make the NEW strut brackets!

First, the old Kakabox stb brackets:


On w/the new!


...can't stop now, it's continued...

#1137
kakabox

  • Turd Polisher
  • PipPipPipPipPip
    • Group: 2012 Contributor
    • Location:Seattle, WA 98115
    • Drives: from point 'A' to point 'B' daily.
    • Image Gallery
    Garage View Garage
...continued...


...don't fall asleep yet, it's continued...

#1138
kakabox

  • Turd Polisher
  • PipPipPipPipPip
    • Group: 2012 Contributor
    • Location:Seattle, WA 98115
    • Drives: from point 'A' to point 'B' daily.
    • Image Gallery
    Garage View Garage
...continued...

The brackets are now done.


Here's how they fit on the car...


...hey, stick around, firstgencrx CC plate install up next...

#1139
kakabox

  • Turd Polisher
  • PipPipPipPipPip
    • Group: 2012 Contributor
    • Location:Seattle, WA 98115
    • Drives: from point 'A' to point 'B' daily.
    • Image Gallery
    Garage View Garage
firstgencrx CC Plate Install:

Remove the strut...put a bag over your brake/axle assy (keeps the dirt/grit/etc. off)...and...


Here's how I prepared the TEIN struts for instl:


Here's a tip: I found it easier to install the TEIN strut in the knuckle BEFORE the top CC plate was on. This way I could insert the strut in the knuckle w/o the top of the strut hitting the bottom of the CC top plate.After inserted the strut in the knuckle, I just put the top CC plate over the strut shaft, held it in place w/my hand and installed the five top plate retaining bolts (machine screws actually!). I then made sure I installed the top strut shaft bushing (the shorter of the two provided) onto the shaft end.


...but wait, there's more...

#1140
kakabox

  • Turd Polisher
  • PipPipPipPipPip
    • Group: 2012 Contributor
    • Location:Seattle, WA 98115
    • Drives: from point 'A' to point 'B' daily.
    • Image Gallery
    Garage View Garage
...continued...


Installing the firstgencrx CC plates causes the FI resistor and the engine bay fuse box to be relocated...


WOOOO WHOOO...All done! TEIN front struts installed...firstgencrx CC plates installed...and the NEW triangulated Kakabox stb brackets installed!


All is well; Dampachi is happy!


"...ain't it funky now!"

Cheers! cool.gif