...Firewall Attach Brackets:
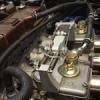
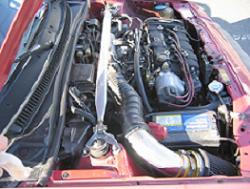
I located a couple of steel angle brackets on the firewall to provide a reaction point for the triangulation of my up coming strut tower brace and for the new engine link.
I chose a couple points on the firewall where the vertical firewall panel is welded to the vertical portion of the wiper trough panel...where it forms a double wall vertical flange. This area also has some local pockets and bends that help to stiffen the location to allow the load to be sheared out to the firewall and wiper trough.
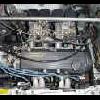
After cutting a couple 5" lengths of 1.25 x 1.25 x 0.125 angle steel and drilling 1/8" pilot holes, I clamped the brackets into position...
...along w/cut down angle backing plates on the other side:
I then "back drilled" through the piloted brackets, the firewall and the backing plates:
I then drilled full size (1/4") and bolted them in place:
The fasteners and bracket shapes are only temporary and are bolted up just for mock up purposes. After the engine and strut tower brace are installed I'll be able to determine the final position of the triangulation braces and engine strut. I'll then remove the brackets, cut to final shape, paint and reinstall.
Cheers!
33
The Kakabox Build
Started by kakabox, Sep 23 2005 04:31 PM
2000 replies to this topic
#631
Posted 27 November 2006 - 01:01 AM
#632
Posted 27 November 2006 - 02:54 AM
You are such a good fab'er I am very impressed with all of your custom made parts. I am glad you found a 3g civic for this project I think its a perfect platlform for your skills. But really really good work.
#633
Posted 27 November 2006 - 08:39 AM
That's what I'm talkin' about!
"If Honda does not race there is no Honda." -Soichiro Honda
#634
Posted 27 November 2006 - 03:09 PM
#635
Posted 28 November 2006 - 01:55 PM
kakabox i just made the engine mount inserts out of POM polyacetaal jerry has some of that stuff wich i send him a couple of monts back.. its a sollid nylon based stuff that resists oil, acid, extreme heat and cold.. and the collor is black.
that way i mounted my engine sollid into the engine bay without needing bracces etc.. maybe an idea for you ??
Greetings Erwin.
that way i mounted my engine sollid into the engine bay without needing bracces etc.. maybe an idea for you ??
Greetings Erwin.
1. EDM 1986 Honda CRX AS - B16A1 engine - OBD1 - Turbo - Stitch welded chassis.
2. EDM 2001 Lexus IS300 3.0 RWD - Daily Drive
#636
Posted 28 November 2006 - 03:32 PM
QUOTE (toxicshit @ Nov 28 2006, 11:55 AM)
kakabox i just made the engine mount inserts out of POM polyacetaal jerry has some of that stuff wich i send him a couple of monts back.. its a sollid nylon based stuff that resists oil, acid, extreme heat and cold.. and the collor is black.
that way i mounted my engine sollid into the engine bay without needing bracces etc.. maybe an idea for you ??
That's neat about the inserts.
Even though the Kakabox is NOT a dd, it's still a street car and will be driven to all track events, plus I still want to drive it occasionally to work, etc., however, I don't want to experience the NVH of solid mounts. My brace is designed to be easily installed once I get to the track and removed before I drive home...locking the engine down for track events, then returning to the NVH of the factory mounts afterwards.
That was the main reason for making it. Otherwise I had planned to fill the lhs engine mount w/castable urethane.
#637
Posted 30 November 2006 - 10:35 AM
QUOTE (kakabox @ Nov 28 2006, 03:32 PM)
That's neat about the inserts.
Even though the Kakabox is NOT a dd, it's still a street car and will be driven to all track events, plus I still want to drive it occasionally to work, etc., however, I don't want to experience the NVH of solid mounts. My brace is designed to be easily installed once I get to the track and removed before I drive home...locking the engine down for track events, then returning to the NVH of the factory mounts afterwards.
That was the main reason for making it. Otherwise I had planned to fill the lhs engine mount w/castable urethane.
My car wont be my DD either, and will be driven to the tracks etc but i chose for the sollid inserts because my mounts came without inserts they are home made.. to mount the Bseries engine into my chassis. and i used to have hockey pucks in the mounts but the ripped etc so now its sollid.
But i understand your idea. just diddnt know that you made them easy removable. thats a nice idea!
Greetings Erwin.
1. EDM 1986 Honda CRX AS - B16A1 engine - OBD1 - Turbo - Stitch welded chassis.
2. EDM 2001 Lexus IS300 3.0 RWD - Daily Drive
#638
Posted 06 December 2006 - 01:02 AM
Door Cards:
I made door cards using an ultra light weight, yet rigid, corrugated plastic panel material called Coroplast:
http://www.coroplast.com/product.htm
I bought a 4' x 8' sheet locally (TAP Plastics) for $25.
First I made a chipboard template of the door panel:
I spaced and marked the fastener locations; the fasteners are not evenly spaced around the entire perimeter due to "pockets" and recesses in the inner door panel. I then drilled holes through the template and inner door for the stainless steel "square" drive mounting screws. I used the 3g's "Oh My God" handles for door pulls; I just drilled mounting holes and bolted them to the door by reaching up under the bottom of the door panel to tighten the nuts.
I transferred the pattern to a 4' x 4' sheet of 1/8" thick black Coroplast and cut the panel out using a razor knife and patience:
I also marked the screw locns on the panel since the template had their holes defined...installing was just a matter mounting the panel on the door, and using a sharp pick, I poked a hole thru the panel at the fastener locn into the pre-drilled hole, then installed a screw...22 screws later, done!
I painted the oem ivory colored 3g grab handle using SEM 39143 Trim Black. I've used this paint before on other cars interior plastic/vinyl pieces and have found it to be extremely durable if the pieces are prepped properly before applying.
Passenger side:
Like them or not, I made the "red dot" window cranks knobs by using red vinyl stucco masking tape I found a HomeDepot:
...cutting and sticking a piece over the old, scratched-up silver knob button...
...and using an Xacto knife in the groove of the knob button, I cut off the excess tape and peeled it away:
...done:
The rear inner quarter panels are up next...I'll use the same technique to make them and post pics when finished!
Cheers,
I made door cards using an ultra light weight, yet rigid, corrugated plastic panel material called Coroplast:
QUOTE
The name Coroplast‘ applies to a wide range of extruded twinwall plastic sheet products produced from a high impact polypropylene copolymer. Coroplast uses a copolymer resin in order to increase impact and low temperature performance. Chemically, the sheet is inert, with a NIL pH factor. At regular temperatures most oils, solvents and water have no effect, allowing it to perform under adverse weather conditions or as a product component exposed to harsh chemicals.
http://www.coroplast.com/product.htm
I bought a 4' x 8' sheet locally (TAP Plastics) for $25.
First I made a chipboard template of the door panel:
I spaced and marked the fastener locations; the fasteners are not evenly spaced around the entire perimeter due to "pockets" and recesses in the inner door panel. I then drilled holes through the template and inner door for the stainless steel "square" drive mounting screws. I used the 3g's "Oh My God" handles for door pulls; I just drilled mounting holes and bolted them to the door by reaching up under the bottom of the door panel to tighten the nuts.
I transferred the pattern to a 4' x 4' sheet of 1/8" thick black Coroplast and cut the panel out using a razor knife and patience:
I also marked the screw locns on the panel since the template had their holes defined...installing was just a matter mounting the panel on the door, and using a sharp pick, I poked a hole thru the panel at the fastener locn into the pre-drilled hole, then installed a screw...22 screws later, done!
I painted the oem ivory colored 3g grab handle using SEM 39143 Trim Black. I've used this paint before on other cars interior plastic/vinyl pieces and have found it to be extremely durable if the pieces are prepped properly before applying.
Passenger side:
Like them or not, I made the "red dot" window cranks knobs by using red vinyl stucco masking tape I found a HomeDepot:
...cutting and sticking a piece over the old, scratched-up silver knob button...
...and using an Xacto knife in the groove of the knob button, I cut off the excess tape and peeled it away:
...done:
The rear inner quarter panels are up next...I'll use the same technique to make them and post pics when finished!
Cheers,
#639
Posted 06 December 2006 - 01:10 AM
#640
Posted 06 December 2006 - 01:17 AM
I've been waiting for an update for over a week. Thank you, now I can finally stop twitching.
How much does each panel weigh?
(someone was going to ask eventually)
How much does each panel weigh?
(someone was going to ask eventually)
#641
Posted 06 December 2006 - 01:21 AM
I hate you because you are so good! Excellent stuff, it looks fantastic.
#642
Posted 06 December 2006 - 07:05 AM
i did the same thing with my doors, only i used Carbon sheet material. came out verry nice.. just like your door panels. they look good kaka
Greetings Erwin.
Greetings Erwin.
1. EDM 1986 Honda CRX AS - B16A1 engine - OBD1 - Turbo - Stitch welded chassis.
2. EDM 2001 Lexus IS300 3.0 RWD - Daily Drive
#643
Posted 06 December 2006 - 11:06 AM
QUOTE (lxndr @ Dec 5 2006, 11:17 PM)
Thanks for the compliments guys!
The door panels are lighter than air, hence, the 22 screws to hold them on!
Seriously, they're too light to register on the official Kakascale:
I estimate that they weigh ~1/2 lb., or 8 oz., apiece...they are light and, FWIW, 100% waterproof! Coroplast is cool stuff and I'll keep it in mind for other applications (one could probably make a decent headliner pretty easily using it). It comes in a variety of colors too. However, I don't believe it is fire proof, so that may be a concern for some applications.
#644
Posted 06 December 2006 - 03:27 PM
I'm still waiting to see what you do for your exhaust system..
Will you build it or have the shop do it?
Time to kick some ricer butt!
#645
Posted 06 December 2006 - 11:37 PM
I've been following this thread from the beginning, and all I have to say is wow. Awesome work man, I'll be referring to this when I do my civic. Keep it up.
It's pretty good for what it is.