 Sign In
 Create Account
any reason you have the sway bar bushing and brackets facing backwards, the pictures i have saved they are pointing up
is that just how it ended up or do you have some math to go along with it
im gona be picking up a 14mm bar in the next few days, i planed on using the 1g legend end links, and reinforcing the stock tow hooks

The Kakabox Build
Started by kakabox, Sep 23 2005 04:31 PM
2000 replies to this topic
#406
 Posted 07 July 2006 - 01:51 AM
-

- Demon Of All Trades
-

- Group: 2013 Contributor
- Location:Oklahoma
-
Drives: 87 Civic Si, 88 Civic DX, 90 CRX DX, 80 Trans Am, 10 Fit Sport
-
Image Gallery
 View Garage
 Back to top
#407
Posted 07 July 2006 - 09:14 AM
-
- Turd Polisher
-
- Group: 2012 Contributor
- Location:Seattle, WA 98115
-
Drives: from point 'A' to point 'B' daily.
-
Image Gallery
View Garage
QUOTE (DEIVIONCRX @ Jul 6 2006, 11:51 PM)
any reason you have the sway bar bushing and brackets facing backwards, the pictures i have saved they are pointing up
is that just how it ended up or do you have some math to go along with it
is that just how it ended up or do you have some math to go along with it
Best fit for my application was to have the brackets on the aft side of the axle tube.
...math?
T = [(theta)(G)(J)] / L
Where: T = the torsional moment (in-lbs.); theta = angular deflection (radians); G = modulus of rigidity for the bar's material (psi); J = polar moment of inertia (in^4); and L = length of twisted bar (in.)
...this 'math' works the same way no matter where on the axle (i.e., 12 o'clock, 6 o'clock, 3 o'clock, 1:30, 4:45...you get the idea) you mount the stabar. In other words: as long as you keep the moment arms the same length and the links perdendicular to the axis of rotation, the torsional reaction load from the bar will be the same irregardless of where on the circumference of the axle tube the bar is mounted.
I could of mounted it on the bottom (6 o'clock) of the axle tube, but I wanted short drop link lengths (stiffeness) and ground clearance. It wouldn't fit on top (12 o'clock) because the brackets would interfere w/the phb brace...
It pretty much comes down to 'packaging' in the end!
Cheers!

#408
Posted 07 July 2006 - 12:02 PM
-

- Leadfoot
-
- Group: 2011 Contributing Member
- Location:Edmonton, AB
-
Drives: 2009 AUDI TT 3.2L, Project Teg powered Austin Mini Van
-
Image Gallery
QUOTE
T = [(theta)(G)(J)]/ L
My formula comparison is M= [B] [B] [B] Only because no normal person in their right mind knows what any of that stuff means or how to actually calculate it.

The only person that might know how to do this is an engineer that works for Boeing but they are really hard to find. Sometimes, if you are lucky, one can be found just off 526 on the north side of Paine Field in the parking lot sitting in a Box! JS
Edited by strudel, 07 July 2006 - 12:03 PM.
If you want one of these Logos send me a PM
Austin Mini Van with DOHC Honda HP
http://www.angelfire.com/droid/strudel
Honda reliability and power combined with Mini cachet and style.
#409
Posted 07 July 2006 - 12:27 PM
-
- Turd Polisher
-
- Group: 2012 Contributor
- Location:Seattle, WA 98115
-
Drives: from point 'A' to point 'B' daily.
-
Image Gallery
View Garage
QUOTE (strudel @ Jul 7 2006, 10:02 AM)
My formula comparison is M= [B] [B] [B] Only because no normal person in their right mind knows what any of that stuff means or how to actually calculate it.
The only person that might know how to do this is an engineer that works for Boeing but they are really hard to find. Sometimes, if you are lucky, one can be found just off 526 on the north side of Paine Field in the parking lot sitting in a Box! JS
The only person that might know how to do this is an engineer that works for Boeing but they are really hard to find. Sometimes, if you are lucky, one can be found just off 526 on the north side of Paine Field in the parking lot sitting in a Box! JS
What can I say, DEIVIONCRX wanted math, I gave him the math...
 I'm sorry if you can't handle the tech!
BTW, I hope to be not just sitting in the 'box, but actually DRIVING those parking lots (Boeing AX club ax course) at a high rate of speed soon!
Cheers!
#410
Posted 07 July 2006 - 12:41 PM
-
- Leadfoot
-
- Group: 2011 Contributing Member
- Location:Edmonton, AB
-
Drives: 2009 AUDI TT 3.2L, Project Teg powered Austin Mini Van
-
Image Gallery
QUOTE
I finally got around to finishing the install of the itr rear stabar...just so you know, I did try to 'chassis' mount the bar w/drop links to the axle, but I just couldn't make it work w/this bar, so: axle mount it is w/all it's evil unsprung wt!
Can you elaborate just a bit on this issue as I think that would be the way to go. What were the pitfalls in your mind or obstructions, I'm guessing. This is still far off for me.
I'm having enough trouble installing my projector beam lights but after much trial and error may have it finally solved. It was kind of trying to use some original parts and then when I was done looking at the complicated contraption the light went on and then I saw the simplified solution. Will be doing up a thread when time permits.
So when will be the first trial in the "Box"? Take lxndr with you and scare the daylights out of him. Let's see, who actually wanted to ride shotgun? JS
If you want one of these Logos send me a PM
Austin Mini Van with DOHC Honda HP
http://www.angelfire.com/droid/strudel
Honda reliability and power combined with Mini cachet and style.
#411
Posted 07 July 2006 - 01:12 PM
-
- Turd Polisher
-
- Group: 2012 Contributor
- Location:Seattle, WA 98115
-
Drives: from point 'A' to point 'B' daily.
-
Image Gallery
View Garage
QUOTE (strudel @ Jul 7 2006, 10:41 AM)
Can you elaborate just a bit on this issue as I think that would be the way to go. What were the pitfalls in your mind or obstructions, I'm guessing. This is still far off for me.
So when will be the first trial in the "Box"? Take lxndr with you and scare the daylights out of him. Let's see, who actually wanted to ride shotgun? JS
So when will be the first trial in the "Box"? Take lxndr with you and scare the daylights out of him. Let's see, who actually wanted to ride shotgun? JS
Yes, a PROPERLY chassis mounted stabar w/drop links attached to the axle would be perferred due to the reduction of unsprung wt (axle no longer carries the stabar) on the axle.
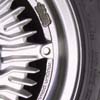
I couldn't make the Integra Type 'R' rear stabar work because the outbd ends of the bar are not colinear left to right side. In other words, I could mount it to the chassis (I had bushing mounts partially fabbed), but, since the center of rotation of the bar in the left bushing isn't in line w/the right, the bar would not rotate freely, just bind.
Here, you can see what I mean...it's the short, straight section that is slightly angled...that's the section I was going to mount to the frame rail...but, it doesn't have the same axis of rotation as the bar's center section:

Thankfully, I sussed that out before I actually completed the chassis mount fab. If that section on the ITR bar was straight (parallel w/the center portion), the axes of rotation would of been colinear and it would work perfectly. FWIW, the drop link attachment to the axle would of ended up at btwn the two shock bracket vertical flanges (on the aft side of axle), a perfect locn for welding on a drop link bracket!
Again, it was just the 'shape' of the ITR rear stabar that was the problem. In the end I went w/the simple soln: axle mount.
But, I'm thinking someday I'll engr a chassis mounted rear stabar using something like this:

http://www.1speedway...ars.htm#stdbars
...a real, racing style, adj stabar...chassis mounted to rear frame rails w/the bar going thru the trunk, ala '65-'89 Porsche 911 FRONT stabar style...

FWIW, I've already take lxndr out in the 'brand X' car and had 'some fun'! The 'box ride is still a ways off however!
Cheers!
Edited by kakabox, 07 July 2006 - 01:18 PM.
#412
Posted 07 July 2006 - 05:31 PM
-
- Speedy
-
- Group: Members
- Location:Victoriaz British Columbia
-
Drives: NZDM? 85' Civic Hatch LX- D16A1,92 Toyota Soarer Big Single and a Bunch of Other Stuff
im wishing i payed more attention to math class, but heres a simple question
are you going with side exit exhuast? the link seems to be smack dab in the way of the axle over portion
are you going with side exit exhuast? the link seems to be smack dab in the way of the axle over portion
#413
Posted 07 July 2006 - 09:59 PM
-
- Turd Polisher
-
- Group: 2012 Contributor
- Location:Seattle, WA 98115
-
Drives: from point 'A' to point 'B' daily.
-
Image Gallery
View Garage
QUOTE (Richard @ Jul 7 2006, 03:31 PM)
are you going with side exit exhuast? the link seems to be smack dab in the way of the axle over portion
Yes.
#414
Posted 12 July 2006 - 01:45 AM
-
- Turd Polisher
-
- Group: 2012 Contributor
- Location:Seattle, WA 98115
-
Drives: from point 'A' to point 'B' daily.
-
Image Gallery
View Garage
Brake Booster Elimination Redux
(Ref. http://www.redpepper...e...&p=269986):
UPDATED: SEE BELOW!
After being pestered by my gear-head buddies as to why I just didn't remove the brake booster body and bolt the mc onto the firewall since I rendered the brake booster ineffective anyway, I decided to actually THINK about it for a minute or two... DOH! Ah, yeah, why not?
Well, some how I got to thinking that I needed to maintain the actuator rod length to properly work the MC and needed the booster shell to maintain that. But all you really needed is a shorter push rod that is still some what adjustable to maintain a little freeplay between the tip and the MC piston...the MC can be bolted directly to the firewall, and in fact, some peeps do just that...
...yeah, ok, so I'm a little slow...
Anyway, I re-read this post: http://www.redpepper...e...st&p=269016
...and decided to copy racers10's idea and cut off the base of the booster and use it as the MC mounting plate. After removing the front cover, booster plate, spring, and MC mounting thru bolts, I was left w/just the booster base:

Cut on the dashed line!

After smoothing all sharp edges and grinding down the thru bolt bosses; this is the 'new' MC mounting plate:

Since I lost the old thru bolts that used to mount the MC to the booster I had to figure a way to fasten the MC to the firewall, or, really, to the pedal cluster. My soln was to tack welded a couple nuts to the pedal cluster where the old thru bolts connected:

...to these I screwed two studs in, to which the MC is fastened, like so:

Since the MC is now closer to the firewall, the brake lines had to be bent slightly toward the fire wall to connect to the MC's new locn. I used a brake line mandrel to carefully add a bit more bend.

The 'new' push rod was easier than I thought it would be; I just cut the booster's old push rod's end off and rounded the tip:

The push rod fits perfectly and adjusts just like before. I can adjust the pedal free play anywhere from 0 to ~0.50":

All in all, it took ~3 hrs to do this mod. The best parts of this mod were: getting my $1 worth of quarters back ...and removing ~3 lbs. of engine bay clutter!

Oh, and btw, eliminating the booster in this fashion allows you to use an Integra MC w/your 'teg 4 whl disc brake swap w/o having to modify a thing...just bolt it up! This may be of some interest to Canadian's looking for an easier to obtain MC for their 'teg brake swap.
UPDATED: Go here for a report on the booster-less 'teg brake swap fix:
http://www.redpepper...e...st&p=342786
Cheers!
(Ref. http://www.redpepper...e...&p=269986):
UPDATED: SEE BELOW!
After being pestered by my gear-head buddies as to why I just didn't remove the brake booster body and bolt the mc onto the firewall since I rendered the brake booster ineffective anyway, I decided to actually THINK about it for a minute or two...
DOH! Ah, yeah, why not? Well, some how I got to thinking that I needed to maintain the actuator rod length to properly work the MC and needed the booster shell to maintain that. But all you really needed is a shorter push rod that is still some what adjustable to maintain a little freeplay between the tip and the MC piston...the MC can be bolted directly to the firewall, and in fact, some peeps do just that...
...yeah, ok, so I'm a little slow...
Anyway, I re-read this post: http://www.redpepper...e...st&p=269016
...and decided to copy racers10's idea and cut off the base of the booster and use it as the MC mounting plate. After removing the front cover, booster plate, spring, and MC mounting thru bolts, I was left w/just the booster base:
Cut on the dashed line!
After smoothing all sharp edges and grinding down the thru bolt bosses; this is the 'new' MC mounting plate:
Since I lost the old thru bolts that used to mount the MC to the booster I had to figure a way to fasten the MC to the firewall, or, really, to the pedal cluster. My soln was to tack welded a couple nuts to the pedal cluster where the old thru bolts connected:
...to these I screwed two studs in, to which the MC is fastened, like so:
Since the MC is now closer to the firewall, the brake lines had to be bent slightly toward the fire wall to connect to the MC's new locn. I used a brake line mandrel to carefully add a bit more bend.
The 'new' push rod was easier than I thought it would be; I just cut the booster's old push rod's end off and rounded the tip:
The push rod fits perfectly and adjusts just like before. I can adjust the pedal free play anywhere from 0 to ~0.50":
All in all, it took ~3 hrs to do this mod. The best parts of this mod were: getting my $1 worth of quarters back
...and removing ~3 lbs. of engine bay clutter! Oh, and btw, eliminating the booster in this fashion allows you to use an Integra MC w/your 'teg 4 whl disc brake swap w/o having to modify a thing...just bolt it up! This may be of some interest to Canadian's looking for an easier to obtain MC for their 'teg brake swap.
UPDATED: Go here for a report on the booster-less 'teg brake swap fix:
http://www.redpepper...e...st&p=342786
Cheers!
- 87CSi likes this
#415
Posted 12 July 2006 - 01:49 AM
-
- corvette contender
-
- Group: Contributing Mod
- Location:Hanover Pennsylvania
-
Drives: your car if i find the keys
-
Image Gallery
most intelligent post i read all day ^^^^ 
When I die, i want to go asleep peaceful.......... not screaming and freaking out like everyone else in the car
"i left the bar a little after you and ended up flipping my car in the arbys drive thru"
IM A LOSER!!! my car pulls harder when spinning than any "highly modified" EW

Team BUrnOUt founding member
"i left the bar a little after you and ended up flipping my car in the arbys drive thru"
QUOTE (cbstdscott @ Dec 10 2008, 03:27 PM) <{POST_SNAPBACK}>
Another loser who can not get traction. I feel sorry for him.
IM A LOSER!!! my car pulls harder when spinning than any "highly modified" EW
Team BUrnOUt founding member
#416
Posted 12 July 2006 - 02:11 AM
-
- All work and no play makes LXNDR a dull boy. All work and no...
-
- Group: Members
- Location:Seattle, WA
-
Drives: like a maniac
-
Image Gallery
QUOTE (kakabox @ Jul 11 2006, 10:45 PM)
After being pestered by my gear-head buddies...
Sorry
#417
Posted 12 July 2006 - 02:14 AM
-

- civics rule
-
- Group: Contributing Member
- Location:chilliwack BC
-
Drives: 01 jimmy4x4, 92 ranger custom longbox 2wd
i might have missed it but what dose removing the booster really do other then look good
this is the best build thread keep up the good work
this is the best build thread keep up the good work
#418
Posted 12 July 2006 - 02:41 AM
-
- Demon Of All Trades
-
- Group: 2013 Contributor
- Location:Oklahoma
-
Drives: 87 Civic Si, 88 Civic DX, 90 CRX DX, 80 Trans Am, 10 Fit Sport
-
Image Gallery
View Garage
it gives you a better feel and control of the braking pressure, with the booster your foot isnt doing the work so you dont get a very good feel of the braking
its more a race car mod IMO, idk if i do it for a street driven car because your brake pedal is gona be quite a bit stiffer(nothing you couldnt get use to im shure) since the booster didnt show up till the early 70's on most cars
its more a race car mod IMO, idk if i do it for a street driven car because your brake pedal is gona be quite a bit stiffer(nothing you couldnt get use to im shure) since the booster didnt show up till the early 70's on most cars

#419
Posted 12 July 2006 - 09:05 AM
-
- Turd Polisher
-
- Group: 2012 Contributor
- Location:Seattle, WA 98115
-
Drives: from point 'A' to point 'B' daily.
-
Image Gallery
View Garage
QUOTE (lxndr @ Jul 12 2006, 12:11 AM)
Sorry
No problem...
You weren't the only one...in all there were four. You were the only rpr member, however. The others are just 'fans' of the KAKAbuild! It was the first thing they asked about after reading the 'NA Booster' post.

I'm glad you guys gave me a dope slap because it resulted in a lighter/cleaner mod. That's part of the beauty of posting your mods. When it's out there for people of varying gearhead backgrounds to see and question, sometimes the mod/design holds merit, sometimes not!
Thanks!
#420
Posted 12 July 2006 - 03:37 PM
-
- Leadfoot
-
- Group: 2011 Contributing Member
- Location:Edmonton, AB
-
Drives: 2009 AUDI TT 3.2L, Project Teg powered Austin Mini Van
-
Image Gallery
Just curious, did you ever look into getting something like this? The Mini boys use them quite often in their conversions. I should have thought about it earlier. JS

If you want one of these Logos send me a PM
Austin Mini Van with DOHC Honda HP
http://www.angelfire.com/droid/strudel
Honda reliability and power combined with Mini cachet and style.


Community Forum Software by IP.Board
Licensed to: Red Pepper Racing